PRIMARY CATEGORY → DESKTOP SETUP
ZSH → Z Shell
This Shell is prefered over bash or fish because of all the handy functionalities and customisation It offers to the users
It implements handy features such as →
Autocompletion ~ Autosuggestions ~ Syntactical Corrections ~ Advanced Globbing
Shared History between different terminals ~ Syntax Highlighting
Main File → ~/.zshrc
Source File → ~/.config/zsh/src/custom.zsh
Theme’s Configuration File (Powerlevel10k) → ~/.p10k.zsh
More info here
Plugins
Most of the above features can be implemented or enhanced through ZSH Plugins that are sourced from the .zshrc configuration file
The .zsh files related to the plugins below are sourced from the
.zshrcconfiguration file
ZSH-autocomplete
It enhances the ZSH’s inherent auto-complete capability

.zsh file is sourced from .zshrc
if [[ -f /usr/share/zsh-autocomplete/zsh-autocomplete.plugin.zsh ]]; then
	source /usr/share/zsh-autocomplete/zsh-autocomplete.plugin.zsh
fi
ZSH-autosuggestions
It suggests commands as the user types based on history and the previous completions

.zsh file is sourced from .zshrc
if [[ -f /usr/share/zsh-autosuggestions/zsh-autosuggestions.zsh ]]; then
  source /usr/share/zsh-autosuggestions/zsh-autosuggestions.zsh
fi
ZSH-syntax-highlighting
It enables highlighting of commands while typing them in an interactive terminal

.zsh file is sourced from .zshrc
if [[ -f /usr/share/zsh-syntax-highlighting/zsh-syntax-highlighting.zsh ]]; then
  source /usr/share/zsh-syntax-highlighting/zsh-syntax-highlighting.zsh
fi
Dracula Theme
There are different themes for this plugin, the one used in this setup enviroment is the Dracula Theme
To use it, just source, in the .zshrc file, the .zsh script resulting from the steps in the link above
if [[ -f /home/al3xbb/.config/zsh/zsh-syntaxhighlighting/themes/dracula.zsh ]] ; then
  source /home/al3xbb/.config/zsh/zsh-syntaxhighlighting/themes/dracula.zsh
fi
IMPORTANT
Note that the
dracula.zshscript should only be sourced if the zsh-syntax-highlighting’s script has been sourced correctly previouslyThe above action is performed in the ZSH Custom Configuration File. It implements something like this →
$ [[ -f /plugin.zsh ]] && . /plugin.zsh && . /theme.zsh # Or source
ZSH-sudo
This plugins automatically places the sudo binary at the beginnng of the line by pressing the Esc key twice

.zsh file is sourced from .zshrc
if [[ -f /usr/share/zsh-sudo/sudo.plugin.zsh ]]; then
  source /usr/share/zsh-sudo/sudo.plugin.zsh
fi
Installation
CAUTION
sudo apt install -y -- zshUser’s Default Shell
To change the users’ default shell to a ZSH one, as Root →
for _user in al3xbb root
do
    usermod --shell "$( command -v zsh )" "$_user"
done
Plugins
Plugins’ Path →
/usr/share/ZSH_PLUGIN_NAME
To install most of the plugins → Autocomplete ~ Autosuggestions ~ Syntax-hightlighting
sudo apt install -y -- zsh-{autocomplete,autosuggestions,syntax-highlighting}INFO
In this Environment Setup, the only ZSH Plugins to be used are ZSH-Syntax-highlighting and ZSH-Sudo
ZSH-Sudo
As Root, Install the ZSH-Sudo Plugin, as follows →
mkdir -p /usr/share/zsh-sudo ; (( $? )) || cd !$wget https://raw.githubusercontent.com/ohmyzsh/ohmyzsh/refs/heads/master/plugins/sudo/sudo.plugin.zshZSH-Syntax-Highlighting
It has been previously installed via apt in the /usr/share/zsh-syntax-highlighting/
As mentioned in the ZSH-Syntax-Highlighting Plugin’s Section, the Theme selected for this plugin is the Dracula Theme
Install the above Syntax Theme as follows →
mkdir -p ~/.config/zsh/zsh-syntaxhighlighting/themes/ ; cd !$git clone https://github.com/dracula/zsh-syntax-highlighting.git draculamv ./dracula/zsh-syntax-highlighting.sh ./dracula.zsh && rm -rf !$CAUTION
Note that the
dracula.zshscript should only be sourced if the zsh-syntax-highlighting’s script has been sourced correctly previouslySee the Dracula theme Section for more information about the Source Code Block
Theme
The ZSH Theme to install → Powerlevel10k
IMPORTANT
Note that the following steps related to the ZSH Theme’s Installation should be applied for both non-privileged and privileged users
Being in this case for Root and al3xbb
Manual installation as follows →
git clone --depth=1 https://github.com/romkatv/powerlevel10k.git ~/powerlevel10kTo source the powerlevel10k script , insert this line at the beginning of the .zshrc file →
source /home/al3xbb/powerlevel10k/powerlevel10k.zsh-themeThen, to start the interactive powerlevel10k’s setup →
Hack Nerd Fonts’s previous installation is required. See here
source ~/.zshrcDo not forget to repeat the above steps for the other users
To set up a more granular configuration, just edit the .p10k.zsh file as follows →
.p10k.zsh - Modified Sections
In that powerlevel10k file, for this Setup Enviroment, as the non-privileged user, add/edit as follows →
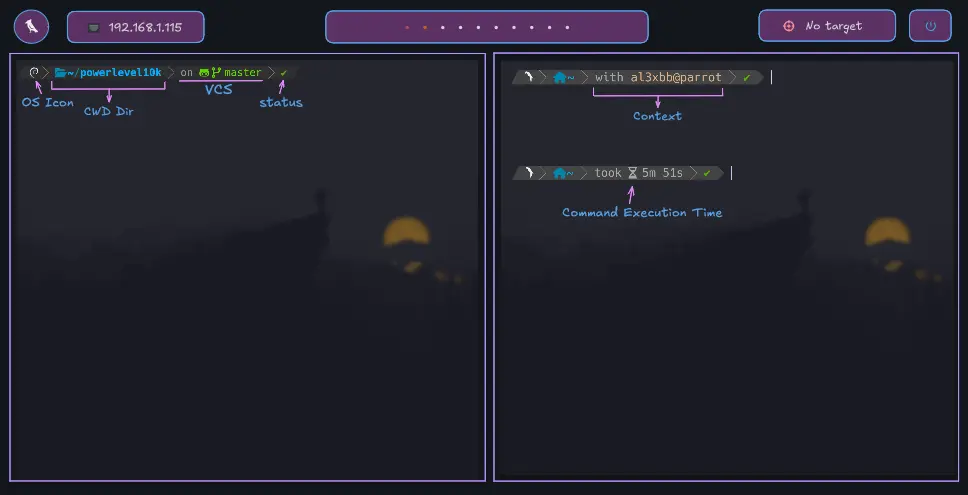
- Left Prompt Elements
typeset -g POWERLEVEL9K_LEFT_PROMPT_ELEMENTS=(
	os_icon
	dir
	vcs
	context
	command_execution_time
	status
)- Righ Prompt Elements → All of them should be commented as in the configuration file
Regarding to the dir segment, the bold font can be disabled as follows →
typeset -g POWERLEVEL9K_DIR_ANCHOR_BOLD=false # Or true to enable itRepeat all the above steps as Root
Only as Root, add/edit as follows to add an icon as a context→
typeset -g POWERLEVEL9K_CONTEXT_ROOT_TEMPLATE='' # Custom Icon
typeset -g POWERLEVEL9K_CONTEXT_PREFIX='' # Empty it.ZSHRC File
Symbolic Link
To avoid having to modify, when a change is made, both the Root and the Non-privileged User’s .zshrc file, simply proceed as follows →
As Root
ln --symbolic --force -- /home/al3xbb/.zshrc ~/.zshrcINFO
Above command just creates a symbolic link as
~/.zshrcwhich points to/home/al3xbb/.zshrcTherefore, any changes made to the .zshrc file apply to both users
ZSH Plugins
As mentioned in the Plugins’ Section, each Plugin’s .zsh script must be sourced from the .zshrc file
In this environment setup, the sourced ones are → zsh-syntax-highlighting ~ zsh-sudo
Check if exist and source them →
- ZSH-Sudo
if [[ -f /usr/share/zsh-sudo/sudo.plugin.zsh ]] ; then
	source /usr/share/zsh-sudo/sudo.plugin.zsh
fi- ZSH-Syntax-Highlighting → 🦇 Dracula Theme 🧛🏻♂️
if [[ -f /usr/share/zsh-syntax-highlighting/zsh-syntax-highlighting.zsh ]]; then
  source /usr/share/zsh-syntax-highlighting/zsh-syntax-highlighting.zsh

  if [[ -f /home/al3xbb/.config/zsh/zsh-syntaxhighlighting/themes/dracula.zsh ]] ; then
    source /home/al3xbb/.config/zsh/zsh-syntaxhighlighting/themes/dracula.zsh
  fi
fi
ZSH Plugin and Plugin’s Theme sourced
Configuration File
ZSH
.zshrc
ZSH Configuration File → .zshrc
src/custom.zsh
ZSH Source File → custom.zsh
Powerlevel10k
.p10k.zsh
Non-Privileged User’s Powerlevel10k Configuration File → .p10k.zsh
Root’s Powerlevel10k Configuration File →.p10k.zsh
Parameters
Z Shell ~ .zshrc
PATH
PATH Enviromental Parameter
export PATH=/opt/kitty/bin:/usr/local/bin:/usr/bin:/bin:/usr/local/games:/usr/games:/usr/sbin:/opt/nvim/nvim-linux64/bin:/home/al3xbb/.fzf/binIn addition to the usual paths such as /usr/bin:/bin:/usr/sbin:/usr/local/bin, others are added →
This allows to use their binaries from any path relatively
Aliases
Various aliases are defined to carry out the following sustitutions →
batcatrather thancat
alias cat='bat' # Standard sustitution
alias catn='bat --style=plain' # Only shows Plain Text (No decorations)
alias catnp='bat --style=plain --paging=never' # Plain Text and No Paginationlsdrather thanls
alias ll='lsd -lh --group-dirs=first'
alias la='lsd -a --group-dirs=first'
alias l='lsd --group-dirs=first'
alias lla='lsd -lha --group-dirs=first'
alias ls='lsd --group-dirs=first'To remove the lsd’s Bold applied to the font and file icons, just declare the LS_COLORS parameter as It appears in the .zshrc configuration file
Command History
Command History File → .zsh_history
HISTFILE=~/.zsh_historyCommand History File’s Size → Number of entries in .zsh_history
SAVEHIST=10000Command History’s Memory entries → Number of entries in the History Memory
HISTSIZE=10000To ignore duplicate entries in the Command History and Synchronise it between the open terminals →
setopt histignorealldups sharehistory # RespectivelyCommand Line Editor
Use the following ZSH Builints to enable the Command Line Editor →
autoload -U edit-command-line # Loads the ZSH Function deferred
zsl -N edit-command-line # Widget Creation from this ZSH Function
binkey '\C-x\C-e' edit-command-line # Widget-Keybind association
The above code ensures that the Command Line Editor can be accessed through C-x C-e as in bash
IMPORTANT
Note that the edit-command-line ZSH Function opens the Command Line Editor with the text editor set as value in the EDITOR parameter
It is necessary to stablish the Text Editor used in the Command Line Editor
This is carried out through the EDITOR parameter
Editor → Neovim
export EDITOR=/opt/nvim/nvim-linux64/bin/nvimThis is extremely useful when e.g. doing
C-x C-eto open the Command Line Editor
Autocompletion System
To enable the ZSH’s Modern Autocompletion System →
autoload -Uz compinit && compinitINFO
The above command deferred loads the ZSH’s compinit function and, if true, calls it
Note that the
-Uoption causes its function reference to not be loaded into the ZSH Hash TableWhile the
-zoption only checks that the function provided as an argument is strictly for ZSH
If the compinit function is loaded and called correctly, then various additional configurations are applied to the ZSH Autocompletion System
These can be found in the .zshrc configuration file
FZF - Fuzzy Finder
This Fuzzy Finder is mainly used to modify the C-r Shell’s shortcut for reverse history search
To load all FZF Functionality and Shortcuts in the ZSH Process Context →
[ -f ~/.fzf.zsh ] && source ~/.fzf.zsh Then, to enable some FZF’s handy features →
export FZF_DEFAULT_OPTS="--height 40% --border --preview 'bat --color=always {} 2> /dev/null'" # File Preview with BATexport FZF_DEFAULT_COMMAND="fd --type f" # FD instead of Find
JAVA Troubleshooting
There are Windows Managers, such as bspwm, that do not perform any Windows Reparenting
Therefore, any Java Application that uses JWT, may experience some integration problems in an environment with these Windows Managers
In order to avoid the previous problems →
export _JAVA_AWT_WM_NONREPARENTING=1The above code simply tells Java to carry out the Windows Reparenting instead of the Windows Manager
IMPORTANT
Note that, in addition to the above measure, another is implemented in the bspwmrc
wmname LG3D &This changes the current Windows Manager’s name, which the System recognises, to LG3D
LG3D is an old Windows Manager, and the Java Applications created with JWT run correctly on it
So changing the Windows Manager’s Name tricks Java into thinking It is running in a supported environment
Custom Functions
All the Custom Functions related to the .zshrc file are sourced from the custom.zsh script
There are several handy functions such as →
- clearScreenAndScrollback → Reference
The remaining functions are related to the Pentesting Index Category

Powerlevel10k ~ .p10k.zsh
This ZSH Theme is extremely customizable
The basic units are the segments, which display specific information from different sources at the user’s prompt
The segments can be located in the left or right side (i.e. the left or right prompt)
In this environment setup, only those on the right are enabled →
OS_ICON
INFO
Note that the below code snippets are related to the .p10.zsh file
It displays the Operative System Icon
To enable it →
typeset -g POWERLEVEL9K_LEFT_PROMPT_ELEMENTS=( os_icon )To modify the displayed icon and its colour →
typeset -g POWERLEVEL9K_OS_ICON_CONTENT_EXPANSION='' # Custom Icon
typeset -g POWERLEVEL9K_OS_ICON_FOREGROUND=255 # Icon's Colour
DIR
It displays the Current Work Directory
To enable it →
typeset -g POWERLEVEL9K_LEFT_PROMPT_ELEMENTS=( dir )
Note how the Current Work Directory changes continously
VCS
If the Current Work Directory is a Github Repository, It displays de Git Status
typeset -g POWERLEVEL9K_LEFT_PROMPT_ELEMENTS=( vcs )
See → “on😺🌿master”
CONTEXT
In this case, if someone is connected to other host remotely, It shows the current user and hostname
typeset -g POWERLEVEL9K_LEFT_PROMPT_ELEMENTS=( context )
See → “with test@parrot”
COMMAND_EXECUTION_TIME
It displays the last command’s time duration, from a sleep command to an SSH Session
typeset -g POWERLEVEL9K_LEFT_PROMPT_ELEMENTS=( command_execution_time )
See → “Took⌛12s”
STATUS
It displays the Exit Code of the last command
typeset -g POWERLEVEL9K_LEFT_PROMPT_ELEMENTS=( status )
See → “❌127/1/INT/TSTP ~ ✅1”